
Many applications have configuration options available where you can pass parameters, transformation files, or configuration files, to the installer in order to set user defaults, configuration, or install license keys. This article will provide instructions on configuring applications or updates using the Patch My PC Publisher using the right click options Modify command line, Add MST transformation file, and Add custom pre/post scripts.
In order to understand how software can be customized via command line, mst file, or configuration file, please refer to the software vendor’s documentation.
Scenarios:
For this guide, we will configure the TeamViewer full client for mass deployment on Windows Devices using the Patch My PC Publishing Tool.
We will cover the following scenarios:
- Scenario 1 – Pass Parameters to the MSI/EXE installer
- Scenario 2 – Add a transformation file
- Scenario 3 – Pass a custom TeamViewer Options File (*.tvopt) to the installer
Note: This KB article applies to the TeamViewer MSI installer.
The TeamViewer MSI installer cannot be downloaded automatically using the Patch My PC Publishing tool, as it is not publicly available for download. You will have to manually download the installer and place it in the local content repository.
Scenario 1: Pass parameters to the TeamViewer installer
1. Right click your TeamViewer app or update from within the Patch My PC Publisher and select the Modify command line option:

2. Add your desired arguments here.
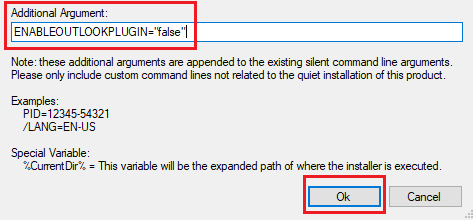
If you are unsure what parameters to enter here, please refer to TeamViewer’s documentation (or the software vendor’s documentation if you’re following along and not working with TeamViewer).
Note: Any arguments you add here will be appended to the default arguments we apply. You can see what arguments we apply by default by right clicking on a product and choosing Show package info: title, command-line, download URL, etc.
3. Synchronize the Patch My PC Publisher
- For Intune Apps/Updates, please delete the package in Intune before syncing
- For everything else, syncing the Publisher alone is sufficient
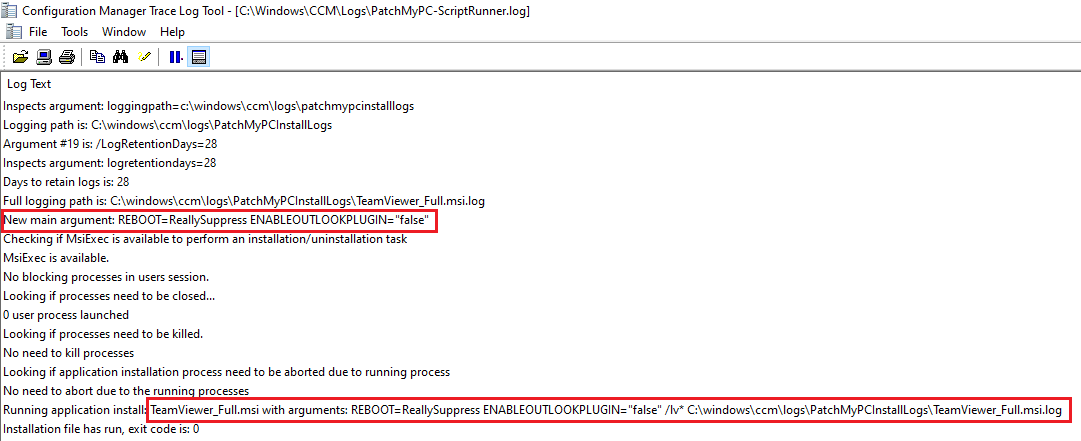
4. Once the deployment is received on an endpoint, you will see the below log lines in PatchMyPC-ScriptRunner.log.
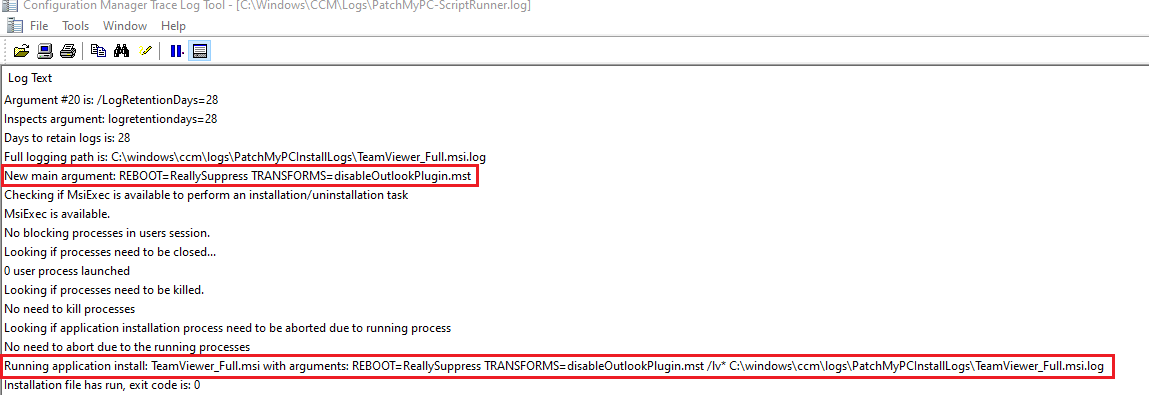
Scenario 2: Add a transformation file
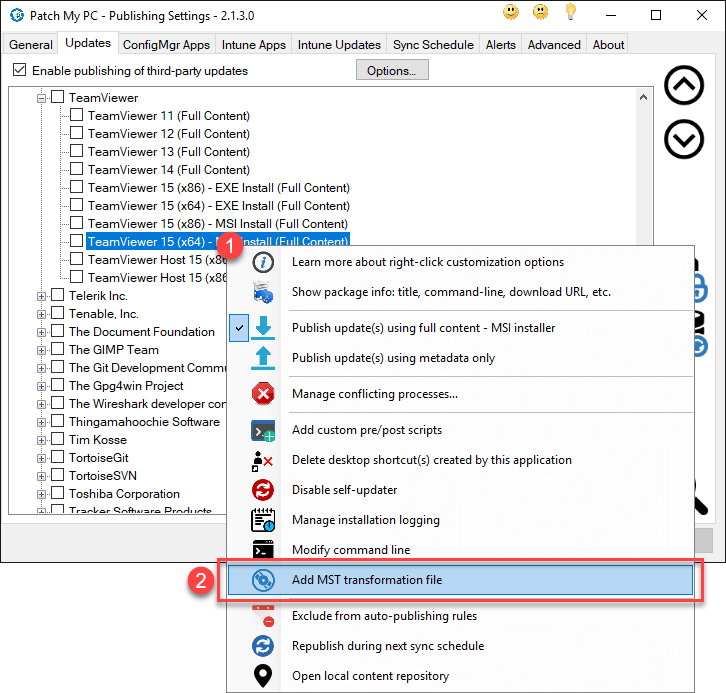
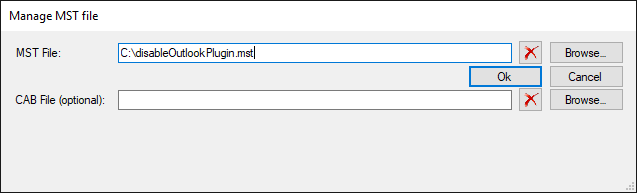
1. Right click your TeamViewer app or update from within the Patch My PC Publisher and select the Add MST transformation file option.
2. Synchronize the Patch My PC Publisher
- For ConfigMgr/WSUS software updates, you must republish the update.
- For ConfigMgr Apps, syncing the Publisher alone is sufficient.
- For Intune Apps/Updates, please delete the package in Intune before syncing.
3. Once the deployment is received on an endpoint, you will see the below log lines in PatchMyPC-ScriptRunner.log and content in ccmcache / IMECache / SoftwareDistribution.

Scenario 3: Pass a custom TeamViewer Options File (*.tvopt) to the installer
For this scenario, we will need to use a combination of the Modify command line option (see Scenario 1), and the Add custom pre/post scripts option to include the options file within the package.
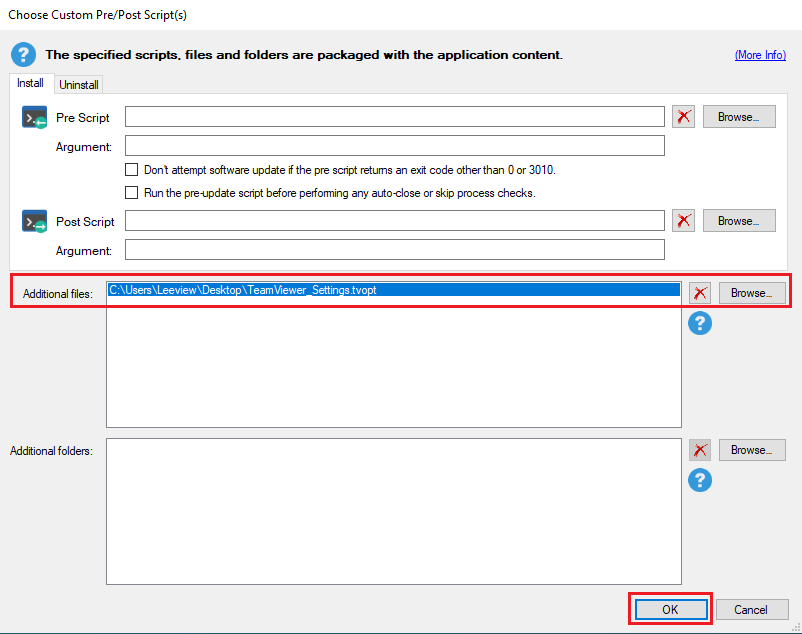
1. Firstly, let’s select the TeamViewer options file, and add it. Right-click the desired TeamViewer version, and select the Add custom pre/post scripts option.

2. In the Additional Files section, browse and select your file, then confirm with OK. You don’t need to add anything else here.
3. Now follow the steps from Scenario 1 to add the custom parameter for specifying TeamViewer Options files. Here we will make use of the %CurrentDir% special variable within the Patch My PC Publisher in order to provide a valid path to the .tvopt file during installation.

4. Synchronize the Patch My PC Publisher
- For ConfigMgr/WSUS software updates, you must republish the update.
- For ConfigMgr Apps, syncing the Publisher alone is sufficient
- For Intune Apps/Updates, please delete the package in Intune before syncing
5. Once the deployment is received on an endpoint, you will see the below log lines in PatchMyPC-ScriptRunner.log and content in ccmcache / IMECache / SoftwareDistribution.

