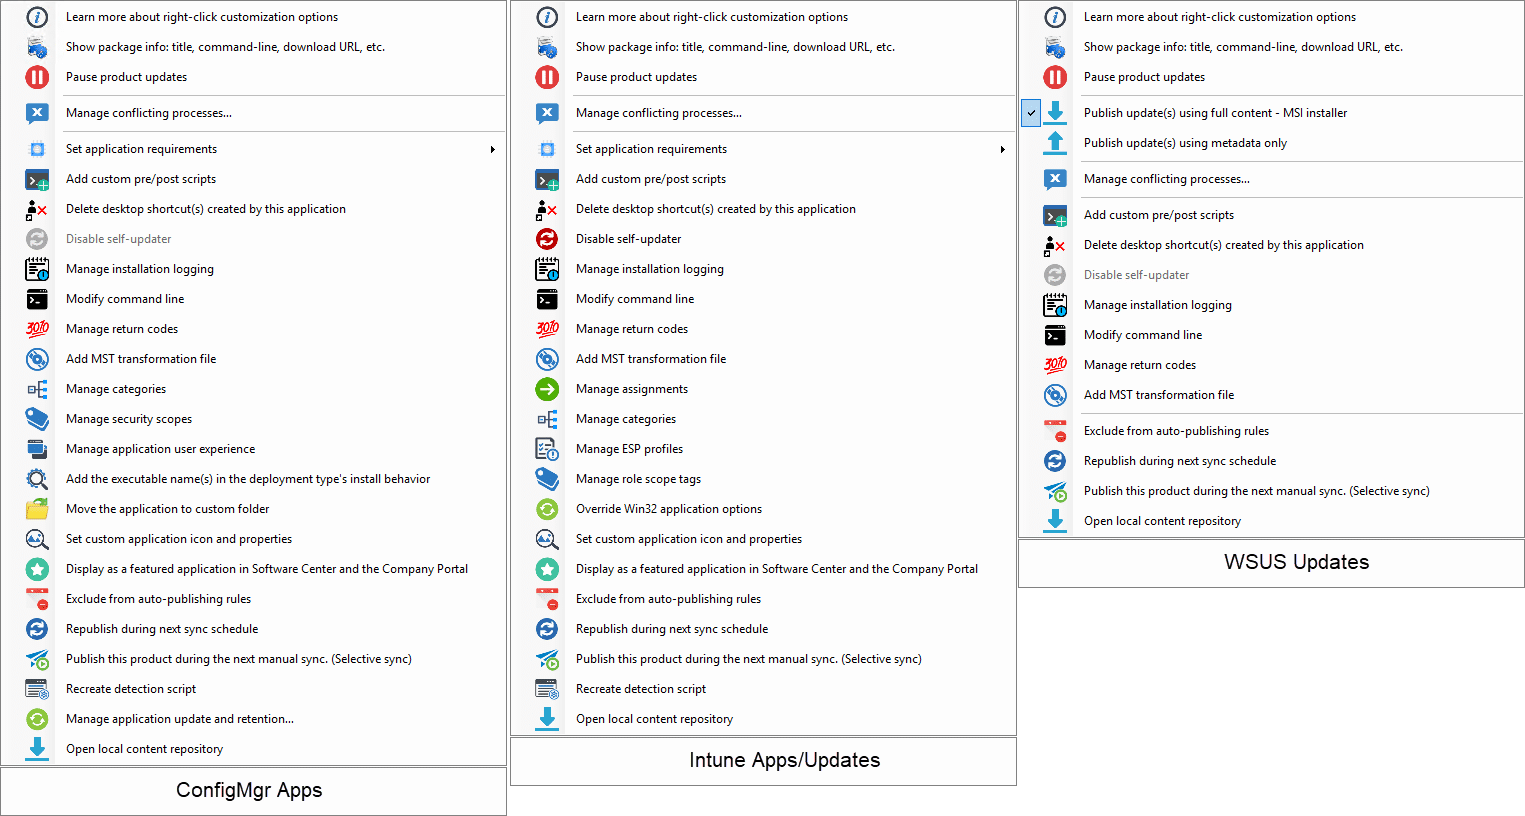
HomeKnowledge BaseRight Click Options Available For Updates and ApplicationsRight Click Options Available For Update…
Right Click Options Available For Updates and Applications
Right-Click Options Available for Updates and Applications
Ben Whitmore
Posted:
Updated:
Table of Contents
You can tailor third-party application, updates and deployments using the right-click options available in Patch My PC Publisher. These actions allow you to configure scripts, command-line options, transforms, installation behavior, and many more settings to match your environment’s needs.
This article explains each right-click customization option and how it can be applied at the All Products, Vendor, or Product level across the different platform specific tabs in Publisher. These options were developed based on customer feedback and are designed to help you refine how updates and applications install across your devices.
Any customizations you configure are automatically carried forward to future update or application versions that Patch My PC publishes, ensuring consistent behavior without requiring repeated manual configuration.
Watch the Live Webinar Playback on Right-Click Options with Q&ACopy Link
You can review our webinar about all the available right-click options for customizing applications in the video below.
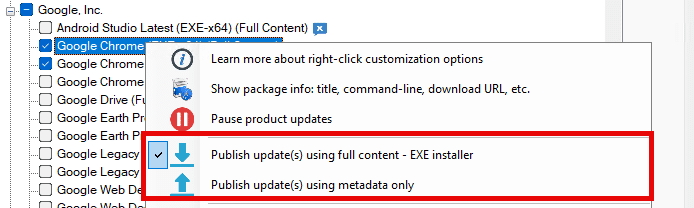
Publishing with Full-content or Metadata OnlyCopy Link
The right-click options for full content and metadata only can be used to configure how you want software updates to be published to WSUS.
Full Content Publishes both the metadata and the actual update binaries to WSUS. This is required if you want ConfigMgr/WSUS to download, distribute, and deploy the update to devices.
Metadata only Publishes only the update metadata to WSUS without the installer binaries. Devices can scan against the metadata, so you will still see compliance information in ConfigMgr, but WSUS will not have the content needed to deploy the update. Metadata only mode is useful for customers who want to assess the impact and requirements of updates across their environment before making them deployable.
Note: If you select the metdata only option, and later decide the binaries for that update should be published, you can change that specific update to Full Content. On the next sync, Patch My PC will download the binaries and publish the update with full content automatically.
Available at level: All Products, Vendor, Product
Available on tab: Updates
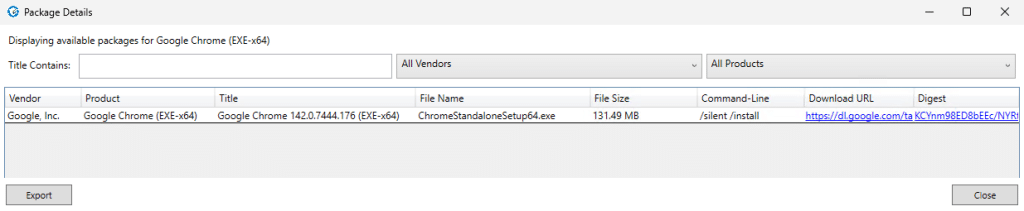
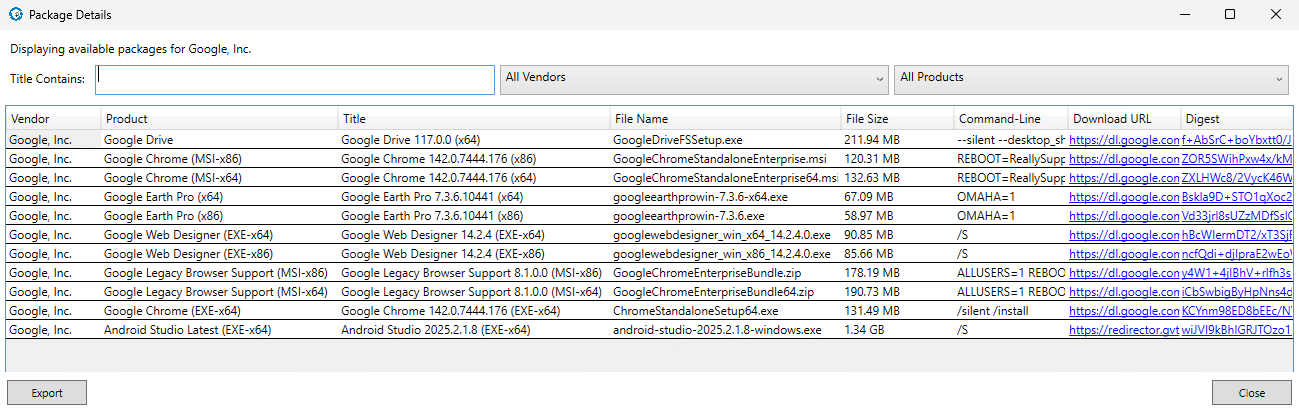
Show Package InfoCopy Link
This option will show update information for the currently synchronized catalog. When used for the first time during a session, the window may take a moment to open because the Publisher needs to parse the catalog before displaying the package details.
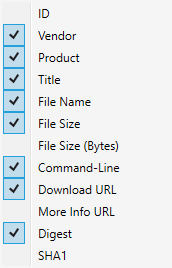
Columns can be added or removed by right clicking the column headers.
You can also use this option at the All Products or Vendor level to display multiple matching products in a single view.
The Export button saves the current Package Details view as a comma-separated (.csv) file.
Available at level: All Products, Vendor, Product
Available on tab: Updates, ConfigMgr Apps, Intune Apps, Intune Updates
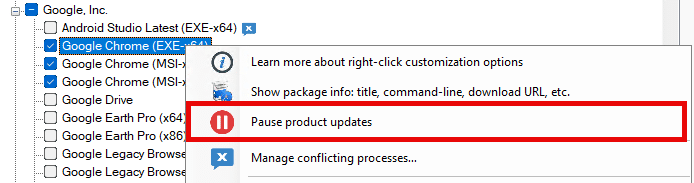
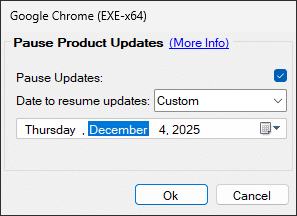
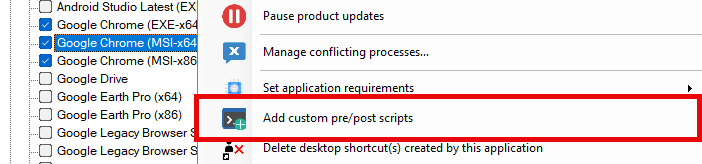
Pause Product UpdatesCopy Link
This option allows you to temporarily stop publishing an application or update, for a specific product, until a date you choose.
In the example below, Google Chrome (EXE-x64) is paused until 4th December 2025. Any new version released before that date will be skipped during Publisher syncs. Once the pause period ends, the Publisher will resume publishing the next new version that becomes available. If no new version has been released by the time the pause expires, and the current version is already published, no action is taken.
Note: If a product is paused, and there is a new version available, you will be notified via the configured Alerts that the product is paused.
You can only pause a product for up to 6 months. If your long term goal is to stop publishing newer versions of a product, you should unselect the product rather than using the pause option. The pause option is designed for short, temporary freeze windows such as year end change control periods where you want to prevent updates from being published for a limited time.
Available at level: Product
Available on tab: Updates, ConfigMgr Apps, Intune Apps, Intune Updates
Limited to SKU: Enterprise Plus, Enterprise Premium, MSP, MSP+
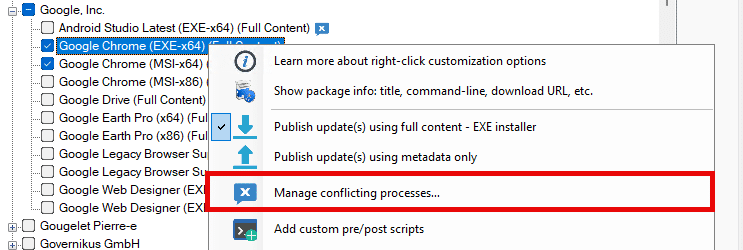
Manage Conflicting ProcessesCopy Link
When updating third-party applications, there may be cases where you need to close an application that is currently open by an end-user.
Available at level: All Custom Products, All Products, Vendor, Product
Available on tab: Updates, ConfigMgr Apps, Intune Apps, Intune Updates
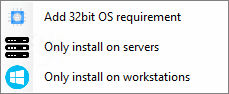
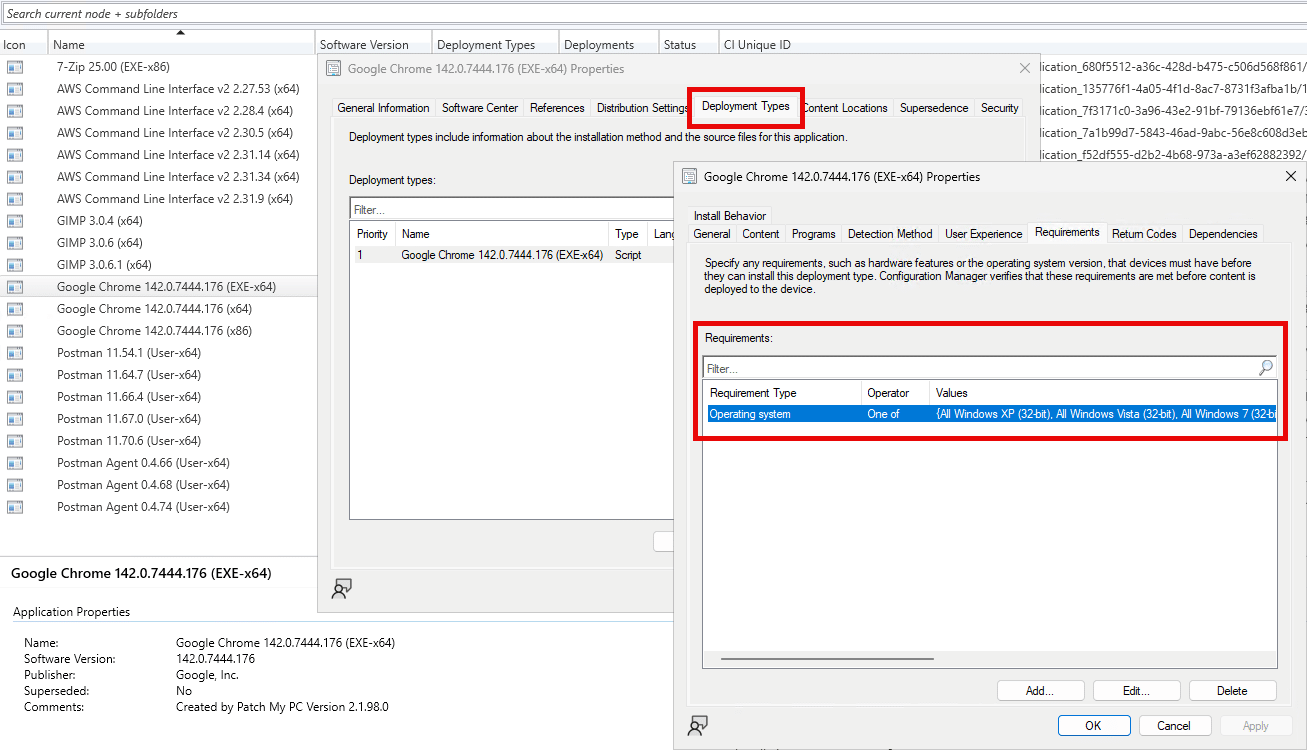
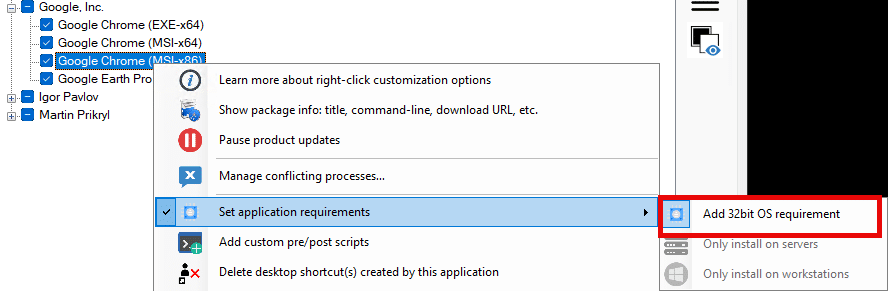
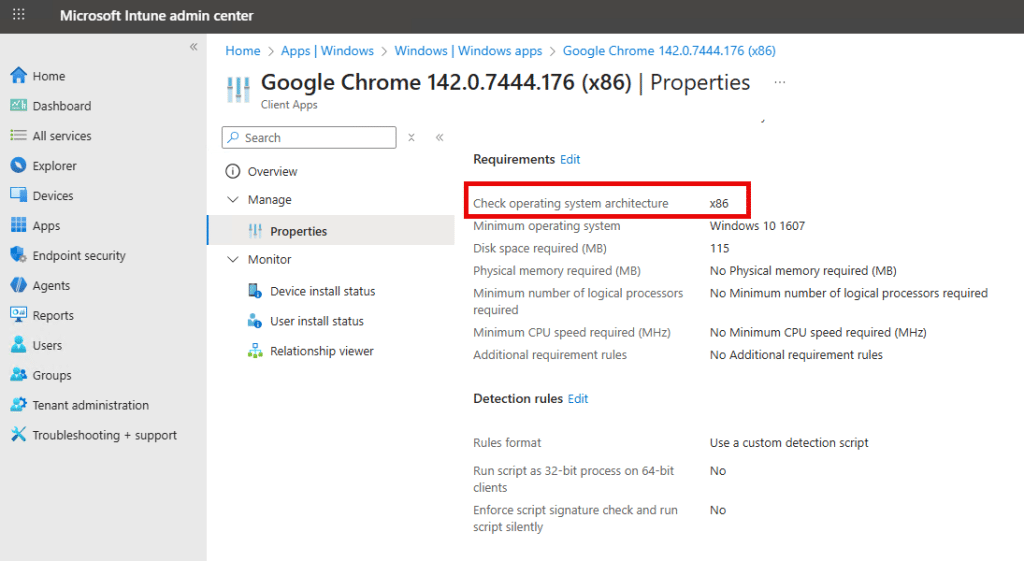
Set Application RequirementsCopy Link
This option allows you to control which devices are allowed to install an application created by the Publisher.
When this setting is enabled, the Publisher adds an operating system requirement on the application’s deployment type in ConfigMgr or the application’s requirement rules in Intune. Only devices that meet the selected requirement will be considered eligible for installation when the application is deployed.
For ConfigMgr applications, you can configure the application so it only installs on workstations, only installs on servers or only installs on 32 bit operating systems.
The ConfigMgr application requirement selected will determine the OS requirement rules configured on the deployment type when the application is created.
For Intune applications, you can configure the application so it only installs on 32 bit operating systems.
Available at level: Product
Available on tab: ConfigMgr Apps, Intune Apps
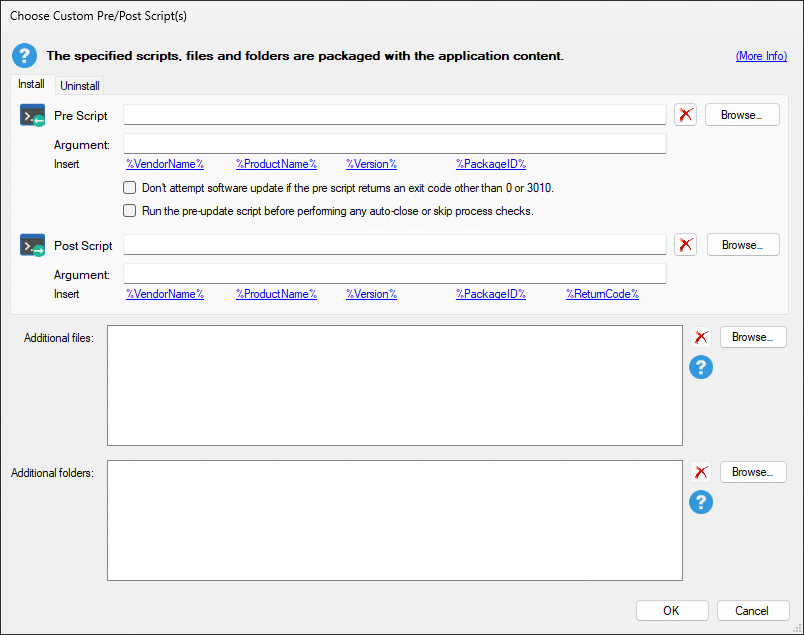
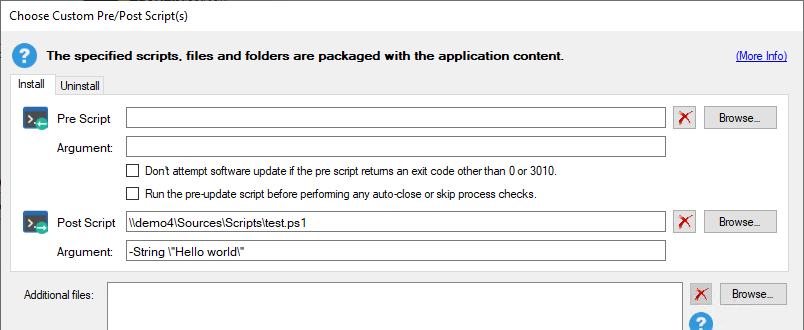
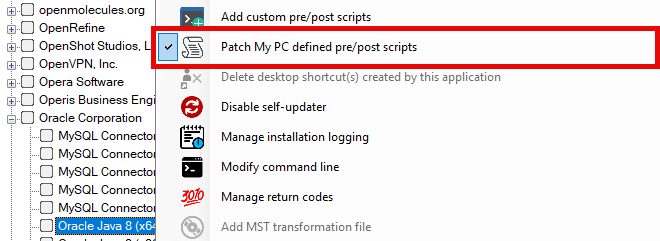
Add Custom Pre/Post ScriptsCopy Link
This option allows you to run your own scripts before or after an installation or an uninstallation.
You can browse to any script file and attach it as a pre install script, post install script, pre uninstall script or post uninstall script. Each script supports an optional argument field, and you can also include any additional files or folders the script needs. These additional files and folders are added to the package and subsequently present in the installation source directory when the application or update is downloaded by a client device.
Two checkboxes control how the scripts behave.
Don’t attempt software update if the pre script returns an exit code other than 0 or 3010 The first checkbox prevents the software update from running if the pre script returns an exit code other than 0 or 3010. When this happens, PatchMyPCScriptRunner.exe (ScriptRunner), which manages the installation process, stops and returns a specific exit code to the calling client such as the ConfigMgr client, the Windows Update Agent or the Intune Management Extension.
There are two exit codes you may see when a pre script does not run successfully.
Exit code 32768 is returned when a Patch My PC recommended pre install script fails. These scripts are provided by Patch My PC for certain products that, for example, cannot remove older versions on their own, such as Oracle Java. If the recommended script cannot run or does not exit cleanly, ScriptRunner stops the installation immediately and returns 32768. This behaviour is always enforced for recommended scripts.
Exit code 32767 is returned when a custom pre script, supplied by the customer, fails and the checkbox to stop the installation when the script exits with anything other than 0 or 3010 is selected. If that option is not selected, ScriptRunner continues even if the customer script returns a non zero exit code.
Run the pre update script before performing any auto-close or skip process checks The second checkbox runs the pre install/update script before any auto close or skip process checks that may have been configured using the Manage Conflicting Processes option. If you are using the Manage Conflicting Processes option. and this box is enabled, the pre script runs before the process check.
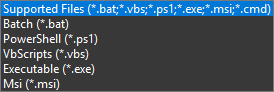
Support Pre/Post Script Formats The file types supported for custom scripts are .bat, .ps1, .vbs, .exe, .msi
ArgumentsCopy Link
To include quotes in the arguments field for your custom pre/post scripts, wrap them in double quotes escaped with a backslash. For example -String \"Hellow World\"
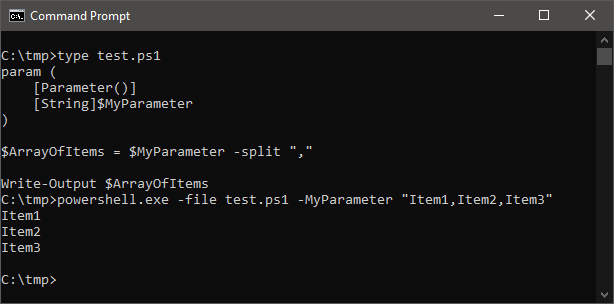
PowerShell Arrays When you use a PowerShell script as a pre or post script and you need to pass an argument that represents an array, you cannot use traditional PowerShell array syntax in the Argument field. This is because powershell.exe is launched from cmd.exe. A command such as -MyParameter "Item1","Item2","Item3" will not be parsed as a PowerShell array. Instead, cmd.exe treats the second item as a separate command or parameter and the array is not passed as intended.
To work around this, pass the items as a single string that uses a delimiter, then split that string inside your PowerShell script. For example, use -MyParameter "Item1,Item2,Item3"
Script Context Pre and post scripts run in the same context as the installation. If the installation starts in the SYSTEM context, the scripts run in the SYSTEM context. If the installation is user based, the scripts run in the USER context.
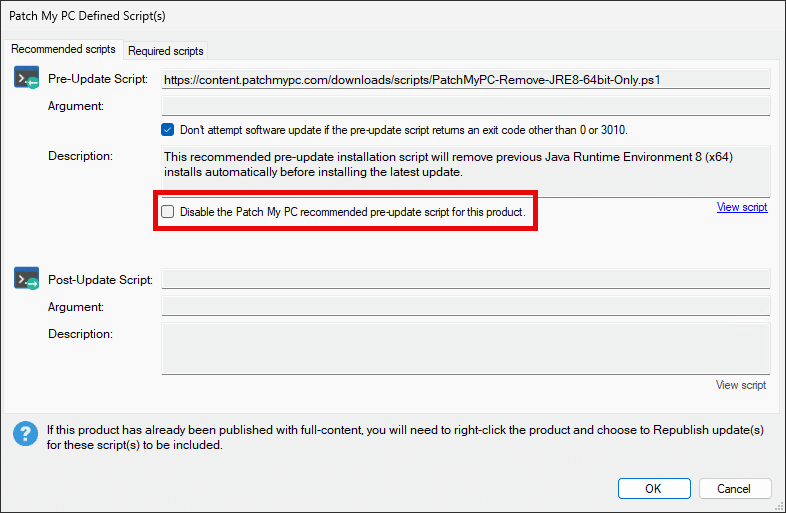
Patch My PC Defined Pre/Post ScriptsCopy Link
These scripts are provided by Patch My PC for certain products that, for example, cannot remove older versions on their own, such as Oracle Java.
Patch My PC can bundle either a recommended script or a required script with an application or update. Required scripts cannot be modified or disabled. Recommended scripts can be disabled if you prefer not to use them.
Advanced Configurations and Examples See the following KB articles as examples on how to leverage scripts or additional files:
Available on tab: Updates, ConfigMgr Apps, Intune Apps, Intune Updates
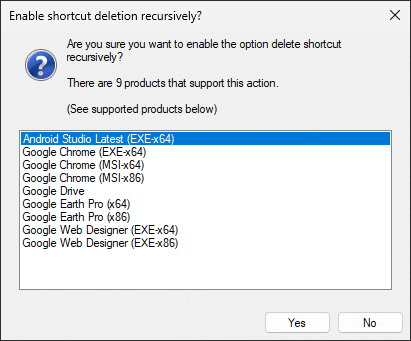
Delete Desktop Shortcuts(s)Copy Link
This option delete desktop shortcuts(s) created by this application will automatically delete any public desktop shortcut(s) created by a product’s installer.
Selecting this option at the All Products or Vendor level will display a confirmation window that lists all products which support the setting and prompts whether you want to enable it, recursively, for all of them.
Available at level: All Products, Vendor, Product
Available on tab: Updates, ConfigMgr Apps, Intune Apps, Intune Updates
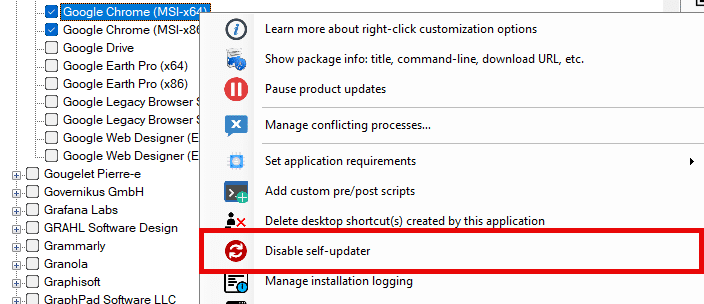
Disable Self-UpdaterCopy Link
This option disables the product’s built-in auto update feature.
When you enable this option, Patch My PC applies the required configuration to turn off self updating, for example by setting a registry value or modifying a scheduled task.
Important: Turning off the Disable self updater setting in the Publisher does not remove or undo the configuration if it was previously applied on devices. Patch My PC does not revert these values because we cannot reliably determine whether they were originally applied by us or by a customer controlled policy or script. As a result, the change only affects new installations, and any device that already received the configuration will keep the setting that is already in place.
If you want to re enable a product’s auto update feature on existing devices, you can do so by applying your own script or policy to reverse the configuration.
Available at level: All Products, Vendor, Product
Available on tab: Updates, ConfigMgr Apps, Intune Apps, Intune Updates
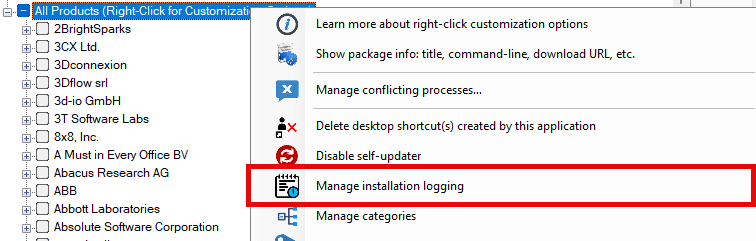
Manage Installation LoggingCopy Link
This option enables additional logging during the installation of an application or update on the client device.
When it is enabled, a Patch My PC installation log and/or the vendor’s installation log for that product are saved during installation of an application or update. This can be helpful when troubleshooting installation issues.
Note: Not all vendors produce installation logs or support redirected logging. If a product does not generate a log file, or the installer does not honour logging parameters, no log will be captured even when this option is enabled.
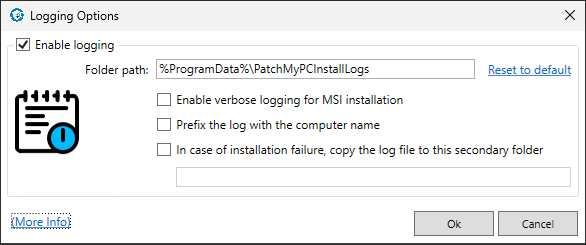
The manage installation logging window provides several options.
Folder Path The folder path specifies where the client-side log(s) will be saved.
Enable verbose logging for MSI installation This option increases the amount of detail written by MSI based installers that support verbose mode.
Prefix the log with the computer name This option adds the device name at the beginning of the log file to make identifying logs for a specific device easier after you collect them for troubleshooting.
In case of installation failure, copy the log file to this secondary folder This option creates a second copy of the installation log when the application or update fails to install. The log is written to the path you specify in this field. The device must be able to reach this location at the time the installation occurs and must have permission to write to it. If the path points to an SMB share, the installation context must have write access to that share.
The default log location depends on the product installation scenario.
Available at level: All Custom Products, All Products, Vendor, Product
Available on tab: Updates, ConfigMgr Apps, Intune Apps, Intune Updates
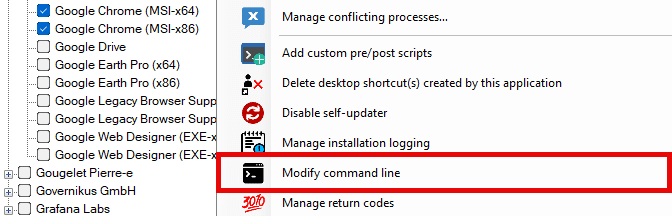
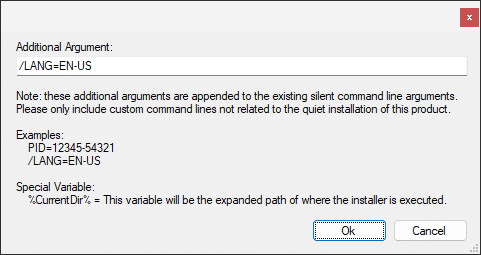
Modify Command LineCopy Link
This option allows you to provide extra arguments that will be appended to the existing silent installation command line for the product.
When enabled, a field will appear to insert additional arguments that will be appended to the existing silent command-line arguments for the product’s installation.
This field does not show the command line that Patch My PC already uses for the installation. To view the existing command line, use the Show Package Info right click option. This makes it easier to understand how your additional arguments will interact with the defaults.
Changing a Patch My PC ParameterCopy Link
When Patch My PC includes a parameter and you provide a parameter with the same name, the value you supply is added later in the command line and therefore takes precedence during installation. This allows you to override a Patch My PC parameter by specifying a different value.
For example, if Patch My PC includes AllUsers=1 in the default command line and you add AllUsers=2 through the modify command line field, the installer will use AllUsers=2.
If you need to completely remove a Patch My PC parameter and there is no vendor-supported opposing parameter that cancels it out, we recommend creating a Custom Application instead.
Note: Although this setting can be used to apply a transform file by using TRANSFORMS=xxx.mst and adding the MST as an extra file through the Add Pre or Post Script option, we recommend using the dedicated Add MST Transform File right click option instead. The transform option handles MST files correctly and is much simpler than bundling and referencing the transform manually through pre and post script actions.
Available at level: Product
Available on tab: Updates, ConfigMgr Apps, Intune Apps, Intune Updates
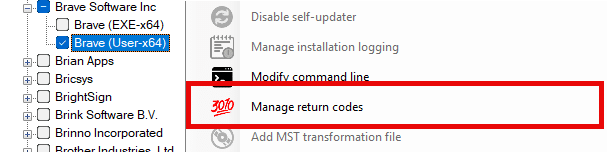
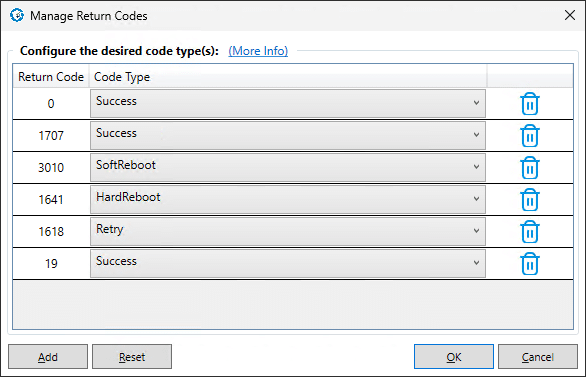
Manage Return CodesCopy Link
This option allows the management of the return codes associated with a product.
For example, a hard reboot or soft reboot can be suppressed by mapping the return codes to 0 for success.
Return code
Code type
Meaning
0
Success
Installation completed successfully
1707
Success
Installer reported “already installed” or “no action required”
3010
SoftReboot
Installation succeeded but a reboot is recommended
1641
HardReboot
Installation succeeded and triggered an immediate reboot
1618
Retry
Another installation is in progress, try again later
The example below shows a custom return code mapping for Brave Browser. This product always exits with return code 19 when the installation succeeds. Because 19 is not considered a success code by default, it has been mapped to Success so that the installation is correctly reported as successful.
Available at level: Product
Available on tab: Updates, ConfigMgr Apps, Intune Apps, Intune Updates
Note: The management platform can also influence how devices respond to return codes, especially in relation to restart behaviour. Review the relevant documentation for Intune, ConfigMgr or WSUS to ensure return codes and restart actions behave as expected in your environment.
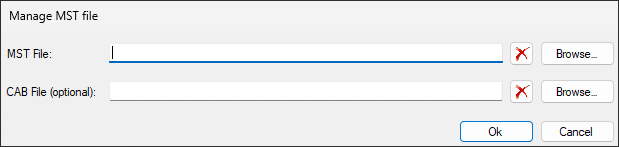
Add MST Transformation FileCopy Link
For products that use an MSI based-installer, you can apply a Transform file.
A transform can modify data stored in the installer database and is commonly used to customise behaviour, set properties, or adjust installation settings. This capability also applies to products that use an MSP based installer because MSP files are patch packages built on top of an MSI database. In both cases, the transform is applied during installation in the same way.
Within the MST file dialog, select the MST file and, if required, a supporting CAB file. The transform and associated CAB file are added into the update or application when it is published. For ConfigMgr applications, Intune applications and updates the files are placed in the application’s content directory. For WSUS/ConfigMgr updates, the MST and CAB files are included within the update’s CAB package. These selections persist across future updates, so the transform continues to be applied when new versions are published.
Important: Some vendors require a new version of the MST file whenever a new version of the application or installer is released. In these cases, an MST created for an earlier version may not work with a later installer. This is important because the MST selected for the product in Patch My PC Publisher is automatically carried forward and applied to newer versions when they are published.
Patch My PC cannot detect when a vendor requires a version-specific MST or when an existing transform is no longer compatible. Customers should review their vendor’s guidance and confirm whether new versions of the application require new MST files.
If the vendor follows this pattern, additional testing may be needed. You may choose to use a longer testing period for deployments that rely on MST files so that any issues caused by an outdated transform can be identified before wider rollout. This may require balancing compliance timelines against the risk of an MST not applying correctly.
Available at level: Product (only for MSI and MSP installers)
Available on tab: Updates, ConfigMgr Apps, Intune Apps, Intune Updates
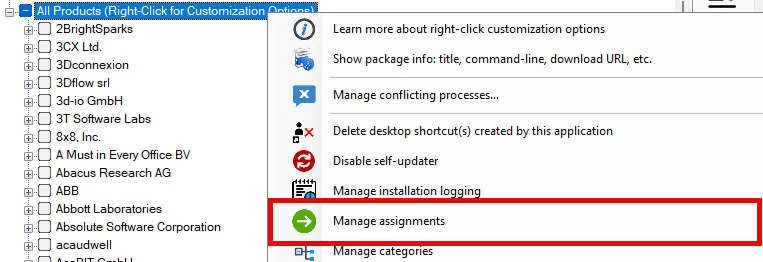
Manage AssignmentsCopy Link
This option allows you to manage the Intune assignments you want Patch My PC to create for your Intune applications and updates.
When selected, a window opens where you can add assignments, remove assignments, and choose whether to override manual assignment changes made directly in Intune.
Add Assignment When you choose Add assignment, a window appears showing the Entra ID groups in your tenant. You can filter the list to find the desired group and select one or more groups to target.
Once an assignment is created, the values in the columns (Name, Mode, Notification, DO Priority, Availability, Deadline, or Restart grace period) can be clicked to open the Assignment editor and configure additional details.
Remove Assignment Selecting Remove assignment will remove the selected assignment from the list. You can multi-select assignments to remove several at once. The removal is applied during the next Publisher synchronization. This action removes the assignment configuration from the Patch My PC Publisher but does not delete the corresponding group in Intune.
Note: Within the Manage Assignments window, the Publisher will not delete assignments directly from Intune. When you remove an assignment here, it is removed from the Publisher’s configuration and will not be recreated for future app or update versions. However, the assignment already present in Intune is not deleted automatically. Depending on your Intune application creation options, assignments may still be copied forward from previous application versions unless removed manually in Intune. See Intune application creation options for more information.
Override manual assignment changes made in Intune during the synchronization of the Publisher
When this checkbox is checked for a product the Publisher will enforce the intent (required, available, uninstall), mode, notification, and restart grace period configuration for the assignments.
Additionally, if this checkbox is selected and an assignment’s intent or mode is changed in Intune, the Publisher will delete and recreate that assignment during the next sync. Because it is created as a new assignment, the availability and deadline timers are reset and will use the values you have configured.
If this checkbox is checked and the notification or restart grace period configuration is changed in the Publisher the settings will be applied during the next sync.
Note: Changes made in the Manage Assignments right-click option are not immediate. They are applied during the Publisher synchronization.
Assignment OptionsCopy Link
Important: Any changes made to assignment options here will be applied to the Intune application or update during the next Publisher synchronization.
ModeCopy Link
Mode determines whether a group is included or excluded for the assignment. When a group is set to Include, Intune applies the assignment to the users or devices in that group. When set to Exclude, Intune specifically excludes that group even if it is part of a larger included group. Exclusions take precedence over inclusions, which allows you to refine targeting for pilot, test, or exception scenarios.
Mode cannot be changed for the built-in All Users and All Devices groups.
NotificationCopy Link
Notification determines whether the device shows toast notifications when the Intune Management Extension installs or uninstalls the application or update. These notifications inform the user that an app is being installed, updated, or requires a restart.
Show all to display all installation and restart messages.
Show restarts to display only messages related to required reboots.
Hide all to suppress all toast notifications. Intune delivers these notifications through the Windows notification system, and the exact behavior may vary depending on whether the installation runs in the user or system context.
DO PriorityCopy Link
Delivery Optimization (DO) priority controls how quickly the content for an application is downloaded once the Intune Management Extension evaluates the policy. Foreground prioritises the download and processes the content immediately, while Background allows Windows to download the content with normal priority and defer based on network conditions and activity.
For most Intune Updates, Background is an appropriate choice because the installation is typically not time-critical. When deploying Patch My PC applications during Autopilot, it is recommended to set DO to Foreground. This ensures faster content download and helps prevent delays to a user’s onboarding experience.
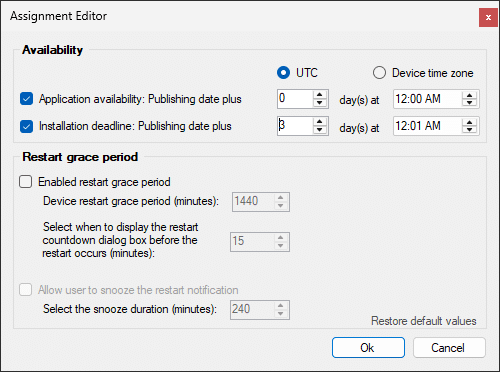
AvailabilityCopy Link
The Availability setting determines the earliest time a Win32 app becomes available to a device. When the availability time is reached, the Intune Management Extension evaluates the assignment, runs detection, and begins downloading the content if the app is required or if the user installs it from the Company Portal.
ASAP is the default setting and makes the app available as soon as policy is received.
Important: Intune currently has a known bug affecting Win32 app deployments when multiple required assignments exist for the same app and the device belongs to more than one of the targeted groups. If one assignment uses ASAP, and another assignment uses a future availability time, and the app includes a requirement rule (all Patch My PC Intune Updates do), the Intune Management Extension may ignore the ASAP assignment. Instead of installing immediately, the client waits until the future availability time before processing the app.
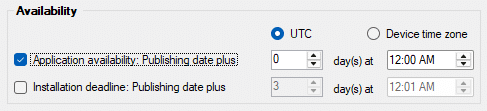
Setting a custom availability of “Publishing date plus 0 days” is an effective workaround, because it sets the availability in the past (the time the Win32 app is published) and avoids the ASAP assignment bug.
A deadline defines the latest point at which a required Win32 app must be installed on the device. Deadlines can only be configured for Patch My PC Apps and Updates that use the Required intent. Intune does not allow deadlines on Available assignments.
A valid availability time must also be set. A value of 0 days means the app becomes available immediately (ASAP). Once the device reaches the deadline, the Intune Management Extension will enforce installation regardless of user activity, as long as the app’s detection rules and requirements are met.
In the example below, the app will be immediately available and the deadline will be reached in 3 days time (from the time the Win32 app was published).
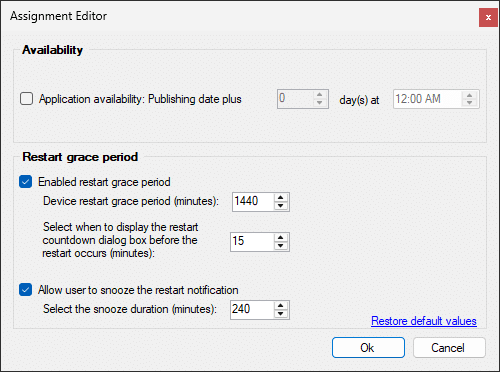
Restart Grace PeriodCopy Link
The Device restart grace period (in minutes) setting controls how long a device can delay a required reboot after the Win32 app is installed. By default, Intune sets this value to 24 hours (1440 minutes). During this period, the user is allowed to continue working before the reboot becomes mandatory.
When a grace period is enabled, the Intune Management Extension displays toast notifications informing the user that a restart is required. You can also configure when to display the restart countdown dialog box, which determines how long before the enforced reboot the countdown UI appears. The default is 15 minutes before the deadline, giving the user a final opportunity to save work.
The restart grace period only applies when the Win32 app installation itself triggers a reboot requirement. If the installer does not return a reboot-required exit code, Intune will not enforce a restart, even if the setting is enabled. This means that the grace period ensures predictable reboot enforcement only when the installer indicates that a reboot is necessary, and the Intune Management Extension will follow that signal. We have more information on the nuances of the restart grace period in our blog Intune Restart Grace Period Simplified – Patch My PC
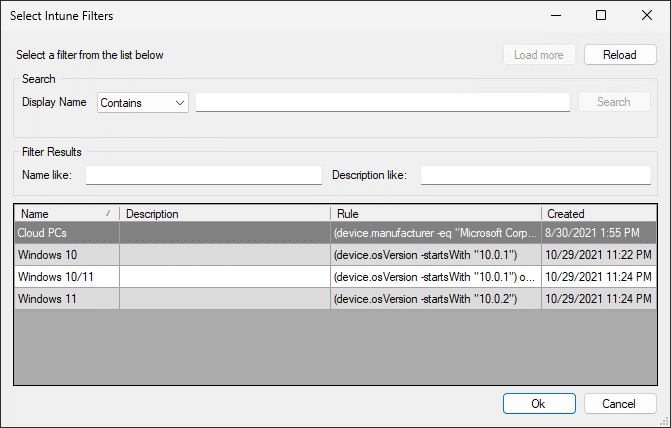
Filter Mode and Filter NameCopy Link
This feature requires leverages Intune filters and allow you to refine which devices or users receive an app assignment based on granular device attributes such as OS version, device model, enrollment type, or join type. This enables precise targeting scenarios, such as deploying an app only to corporate devices, excluding virtual machines, or targeting specific operating system builds.
Filter Mode Determines how the selected filter should apply to the assignment.
None No filter is applied.
Include The assignment applies only to devices that match the filter rules.
Exclude The assignment applies to all targeted devices except those that match the filter rules.
Filter Name Clicking the Filter Name field opens a window listing all Intune device filters in your tenant. You can search and select the filter you want to apply. Only one filter can be applied to an assignment at a time.
Note: To assign and manage filters you will need to ensure your Entra ID application registration has the DeviceManagementConfiguration.Read.All application scoped API permission granted.
Available at level: All Custom Products, All Products, Vendor, Product
Available on tab: Intune Apps, Intune Updates
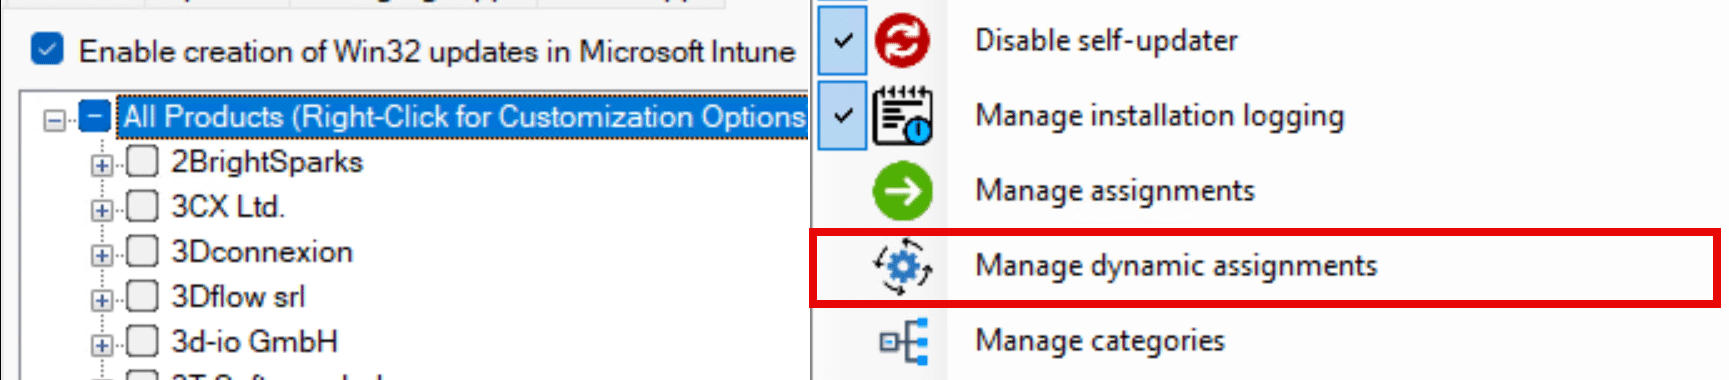
Manage Dynamic AssignmentsCopy Link
This option allows you to automatically create Intune assignments for newly published updates based on predefined search criteria. Instead of assigning every update to the same groups, Dynamic Assignments evaluates each update during a sync and applies assignments only when the update meets your configured rules.
Dynamic Assignments function similarly to Automatic Deployment Rules (ADRs) in ConfigMgr, but for Intune updates. Patch My PC Publisher evaluates each new Intune Update against your chosen criteria, such as whether the update contains a CVE, its severity, keywords in the title, or its update classification. If the update meets the criteria, Publisher automatically assigns it to the Entra ID groups you specify.
We provide a separate knowledge base article for this setting because it includes additional configuration steps and examples that are easier to explain in a dedicated guide. Read more at Manage Dynamic Assignments
Note: Intune only allows a single assignment per app per group. If the same group is targeted by both a static assignment, through the Manage Assignments right-click option, and a dynamic assignment, the dynamic assignment will take precedence
Available at level: All Custom Products, All Products
Available on tab: Intune Updates
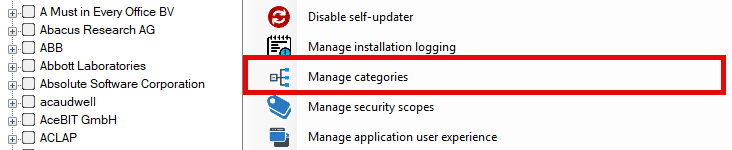
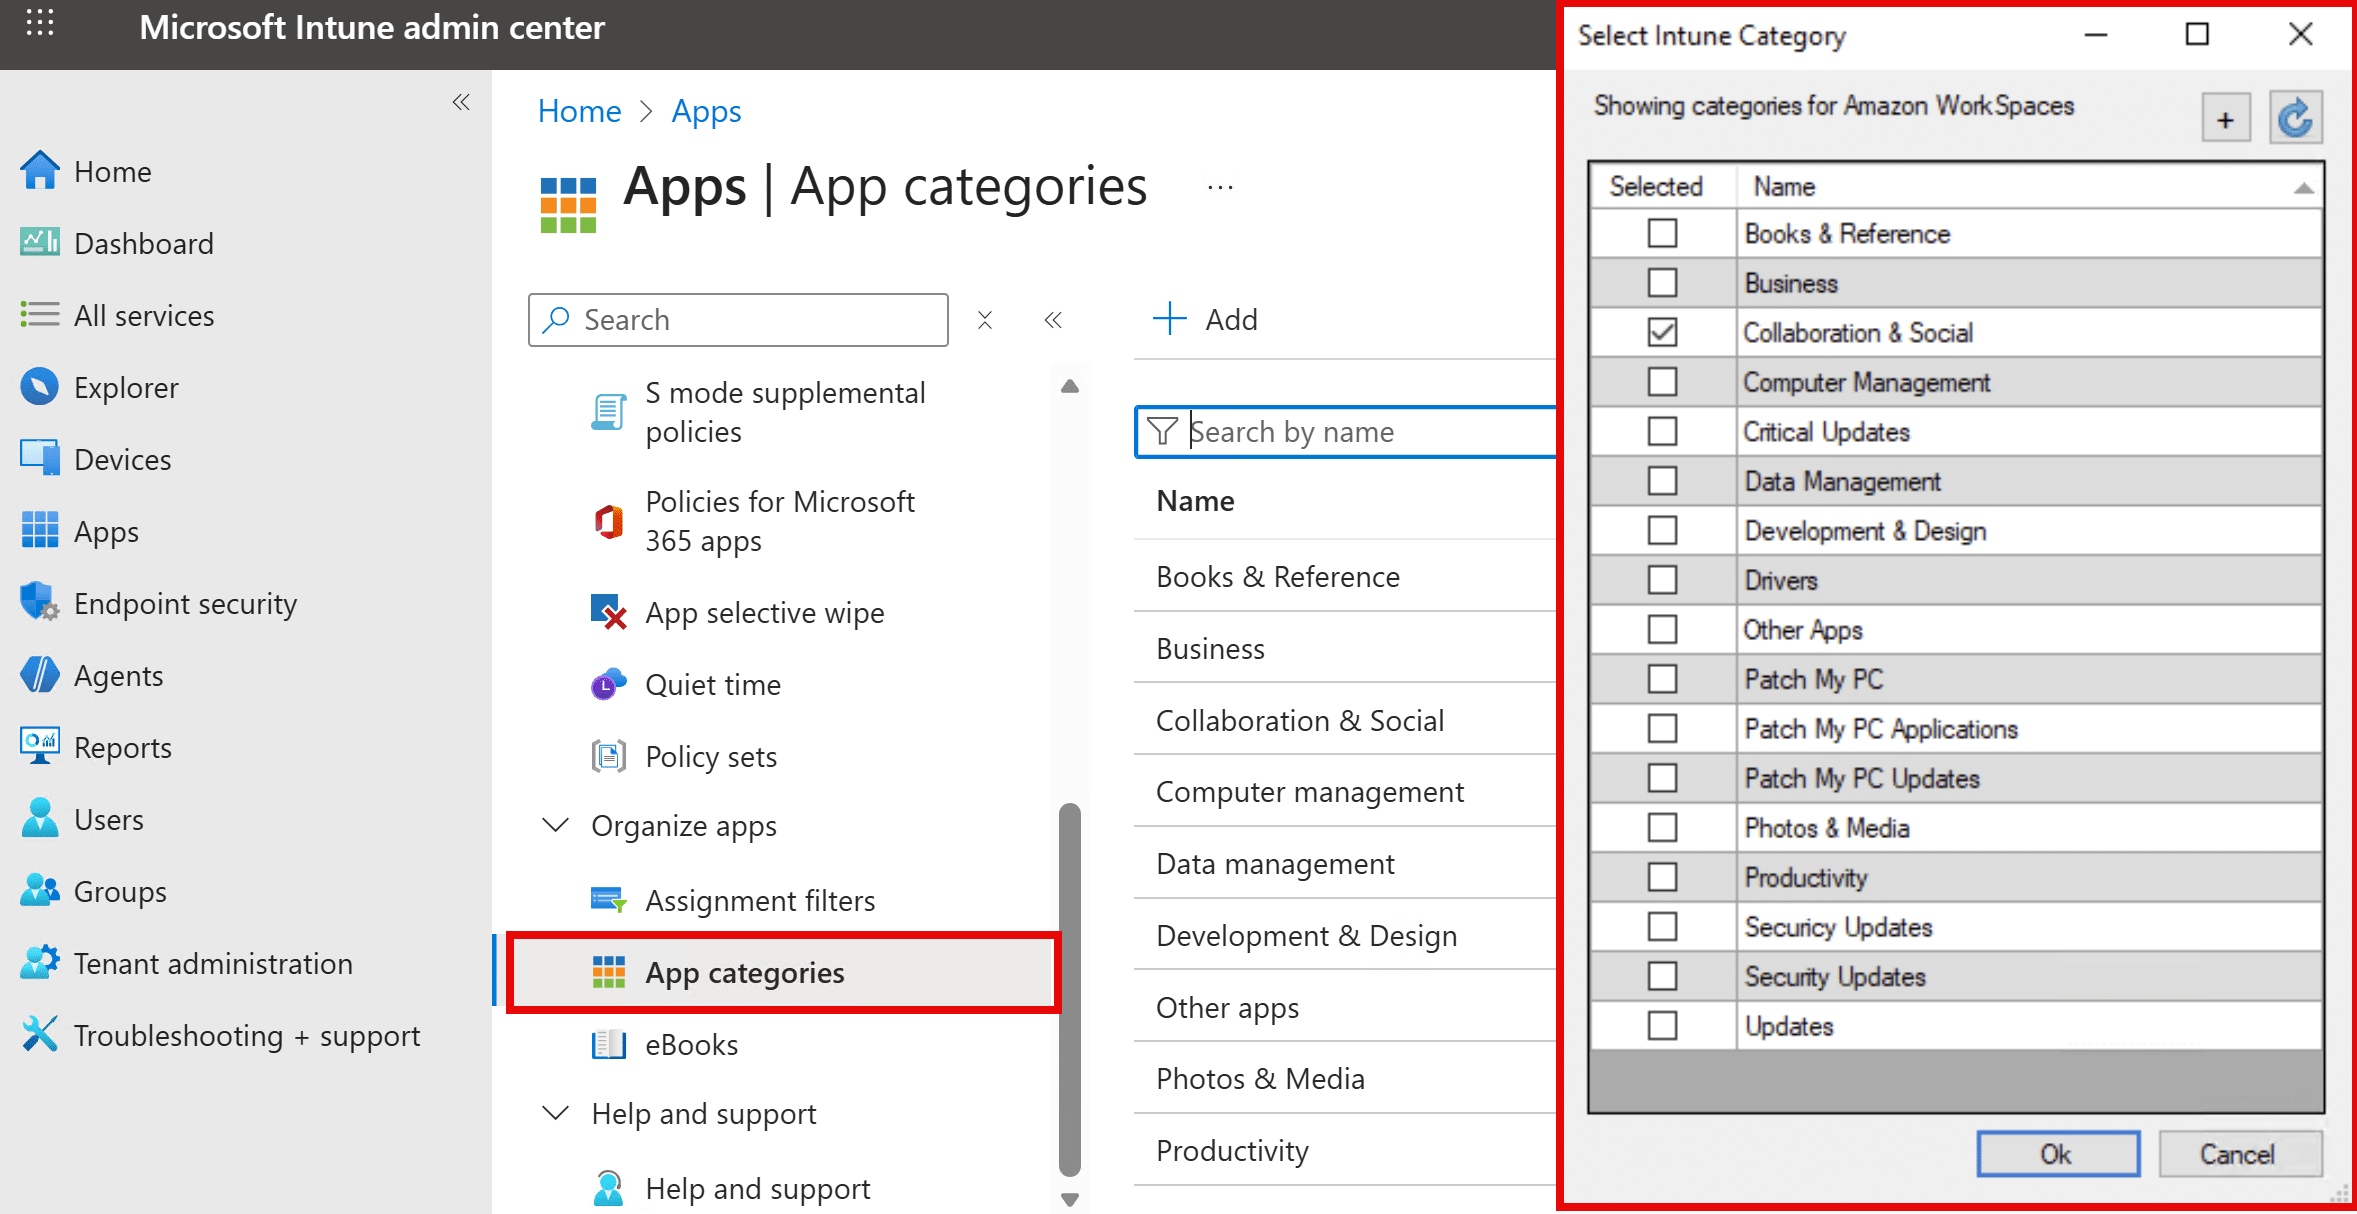
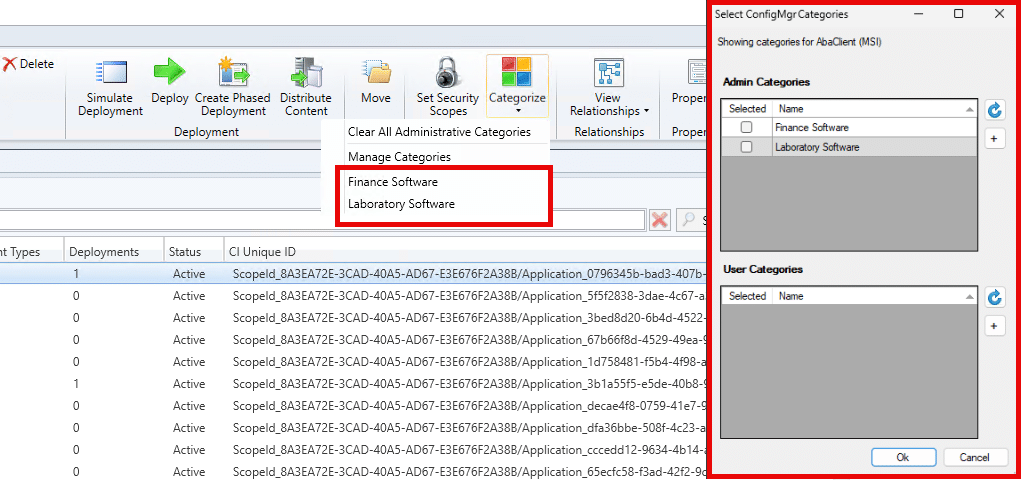
Manage CategoriesCopy Link
This option allows you to set the categories that will be assigned to applications and updates. Categories allow you to organise applications into meaningful groups such as Browsers, Departments, or Development Tools. Assigning categories helps administrators keep large app libraries manageable and improves the user experience when browsing for softwarein the ConfigMgr Software Center or Intune Company Portal.
The categories displayed will include existing categories in the respetive platform. You can create new categories in those platforms by using the + button.
Intune categories
ConfigMgr Categories
Note: Categories will be added to existing applications and updates during the next publisher sync, but they will not be removed for existing applications and updates. Whenever a new application or update is created the Publisher will ensure the currently specified categories are in place.
Available at level: All Custom Products, All Products, Vendor, Product
Available on tab: ConfigMgr Apps, Intune Apps, Intune Updates
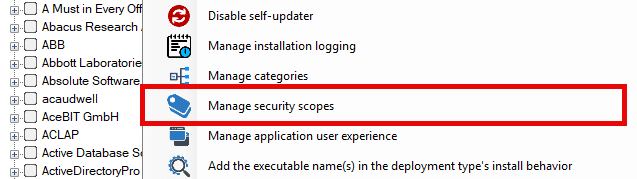
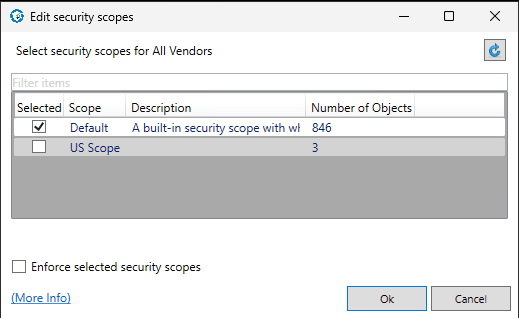
Manage Security ScopesCopy Link
This option allows you to specify which Security Scopes should be applied to applications created in ConfigMgr. During each sync, the Publisher will apply the selected scopes applications created by the Publisher.
The list of available scopes is pulled directly from your ConfigMgr environment. You can refresh the list using the button in the top right corner. The columns can be customised by right-clicking the header, and you can filter the list using the Filter items field.
Optionally, you can also choose to enforce the selected scopes. When this option is enabled, the Publisher ensures that only the scopes you have selected remain on the application. If additional scopes are added outside the Publisher, such as through the ConfigMgr console, the Publisher will remove those extra scopes during the next sync.
Note: Using security scopes requires additional ConfigMgr permissions, specifically Application > Set Security Scope and Security Scopes > Read.
Available at level: All Custom Products, All Products, Vendor, Product
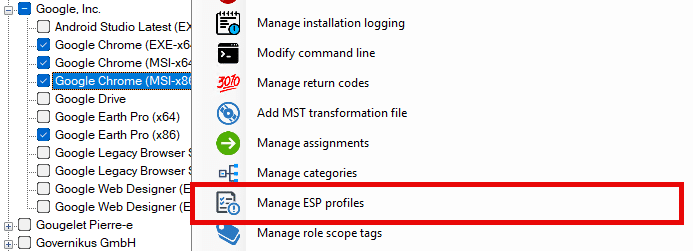
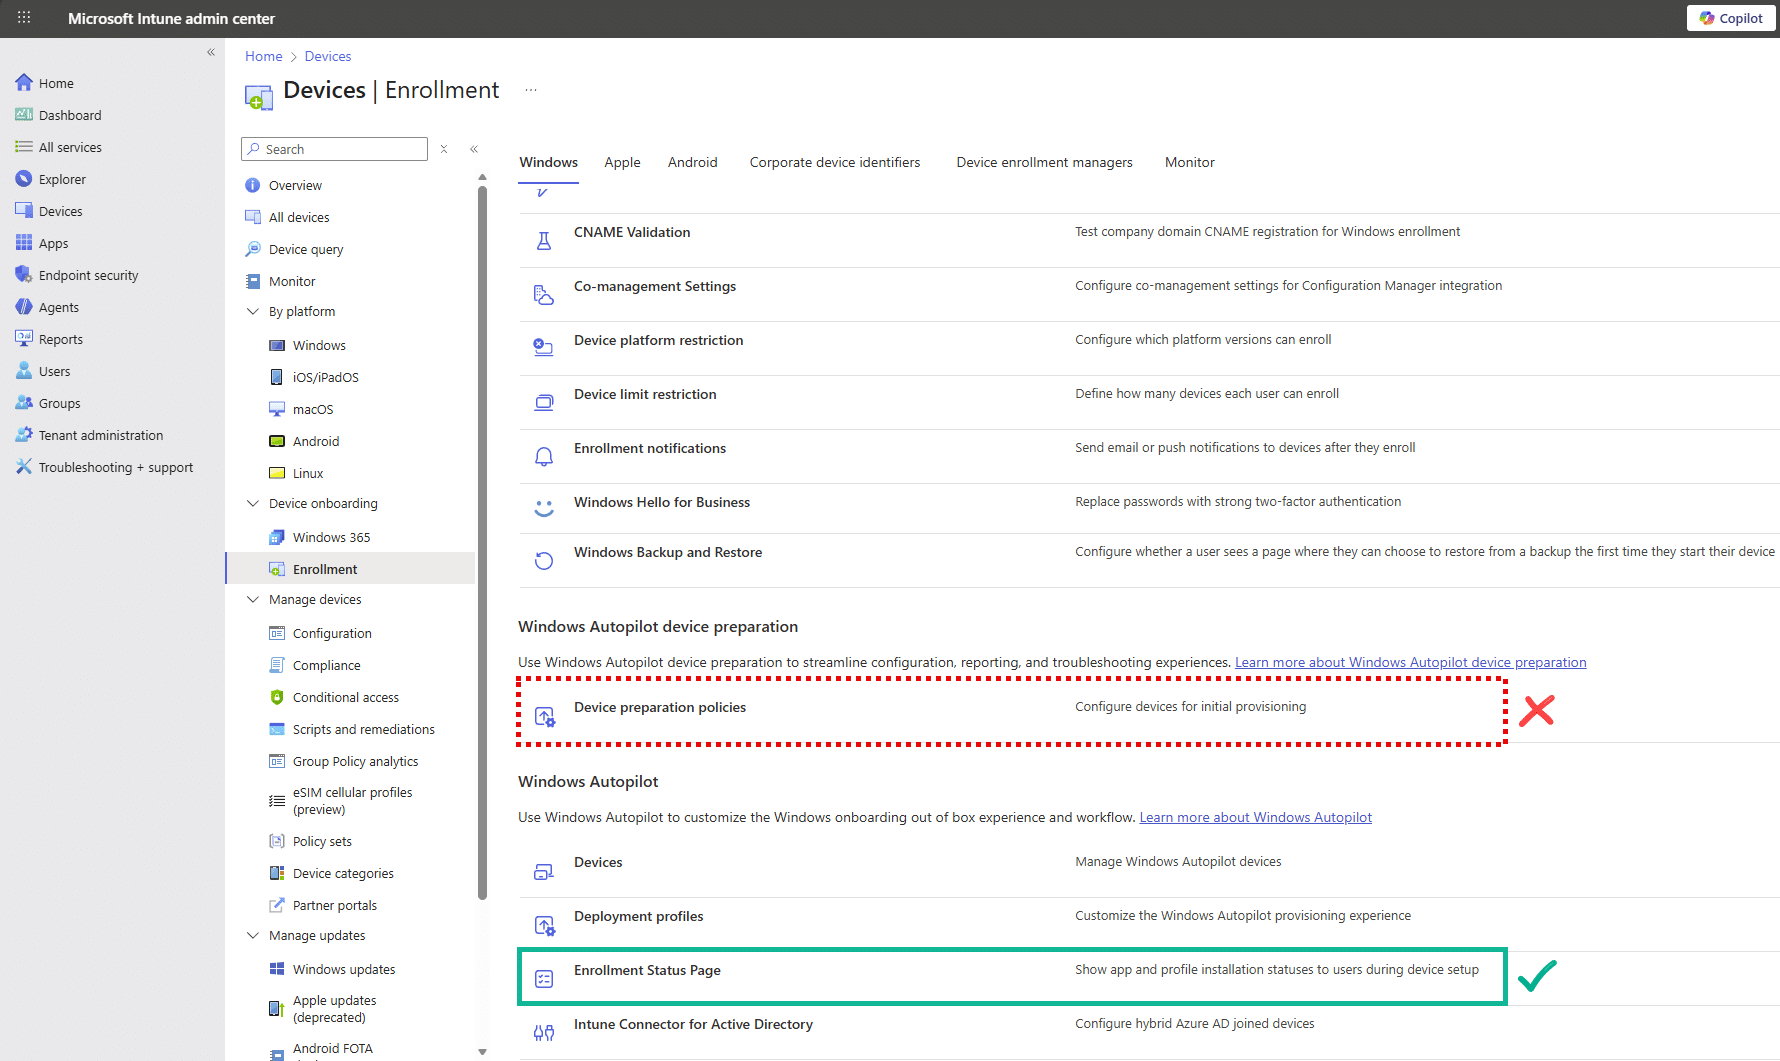
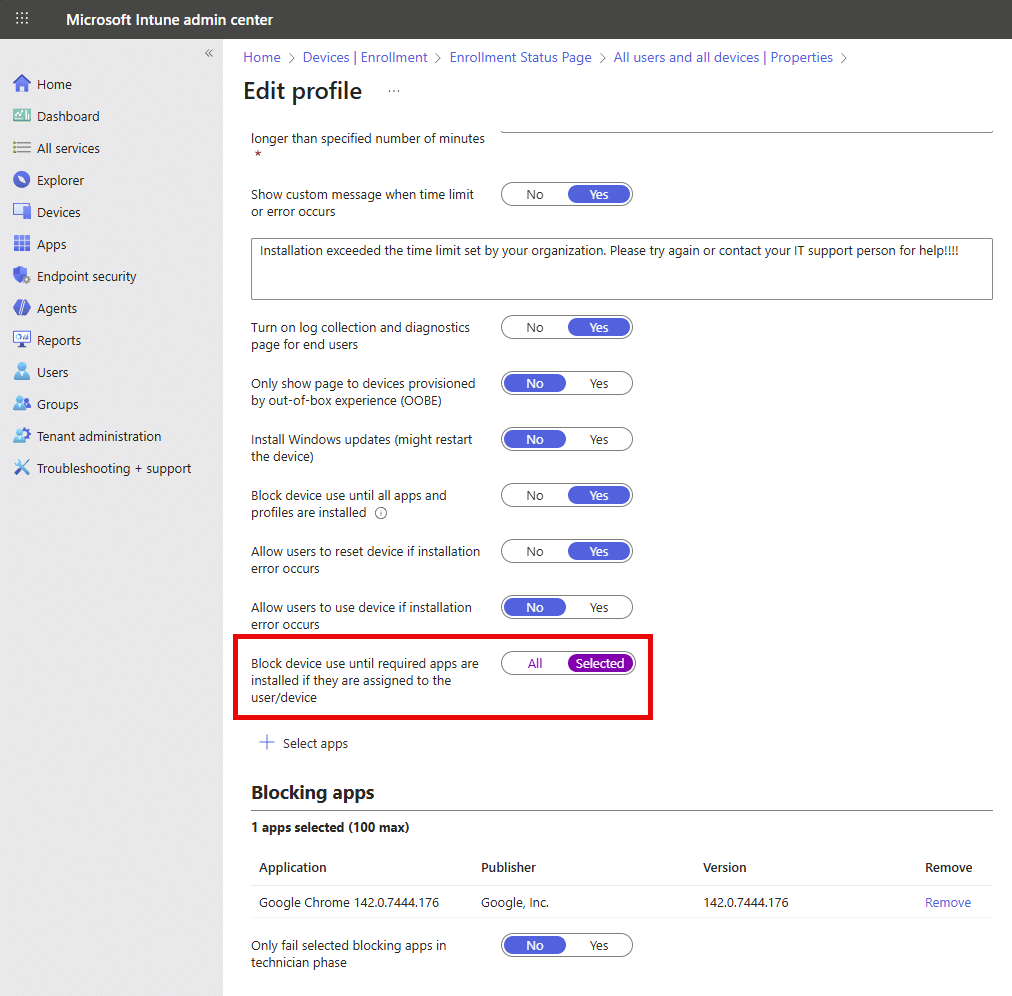
Note: Only classic ESP profiles are supported. This feature does not apply to the newer Autopilot device preperation policies found in the Windows Autopilot configuration experience.
The available ESP profiles are retrieved from your Intune tenant. To appear in the list, an ESP profile must have Show app and profile configuration progress set to Yes.
Products selected will added to the ESP profile as a Blocking app when the Intune application is published.
When a new version of an application is published, the Publisher will remove the previous Patch My PC created version from the selected ESP profiles and add the newly published version in its place. This ensures that Autopilot devices always reference the most recent version of the application during enrollment.
Important: Adding an app to an ESP profile does not cause it to install during Autopilot by itself. The application must also have an active, required, Intune assignment targeting the device or user. The ESP profile only controls whether the app is tracked during Autopilot, assignments determine whether it is actually installed.
Available at level: All Custom Products, All Products, Vendor, Product
Available on tab: Intune Apps
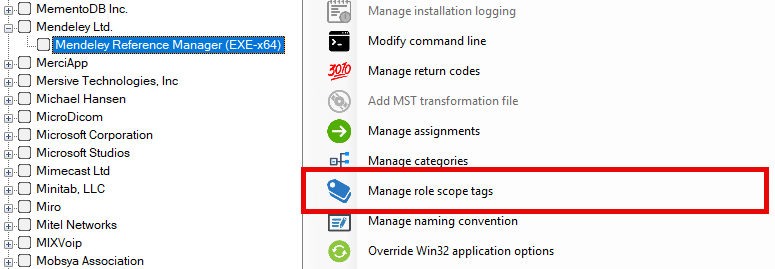
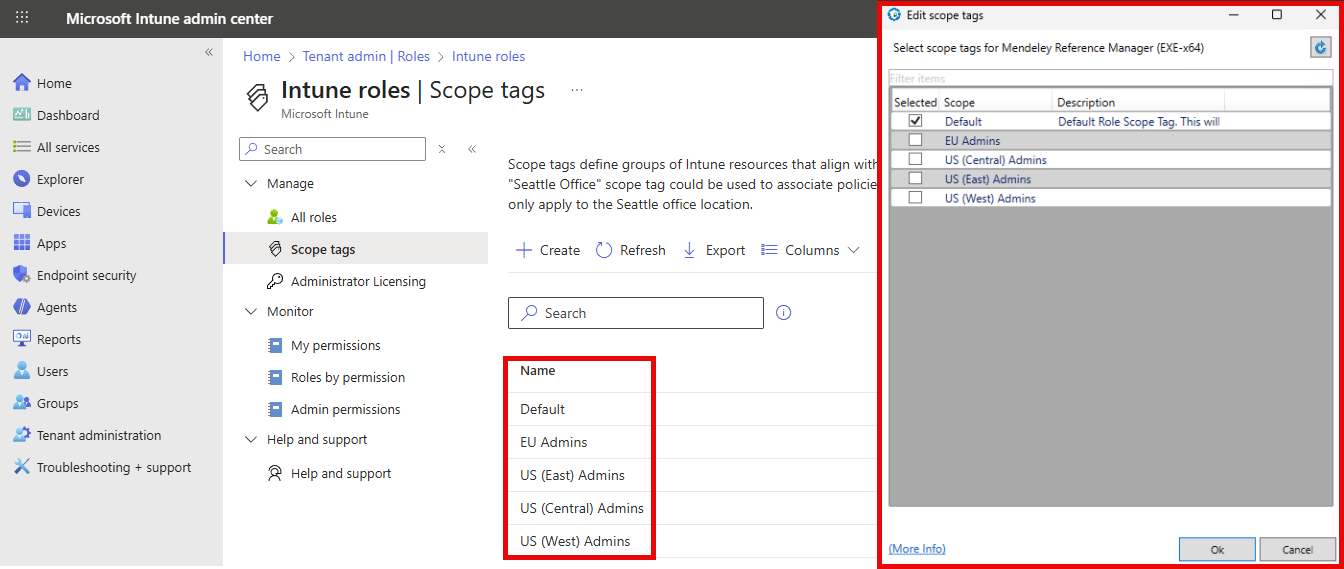
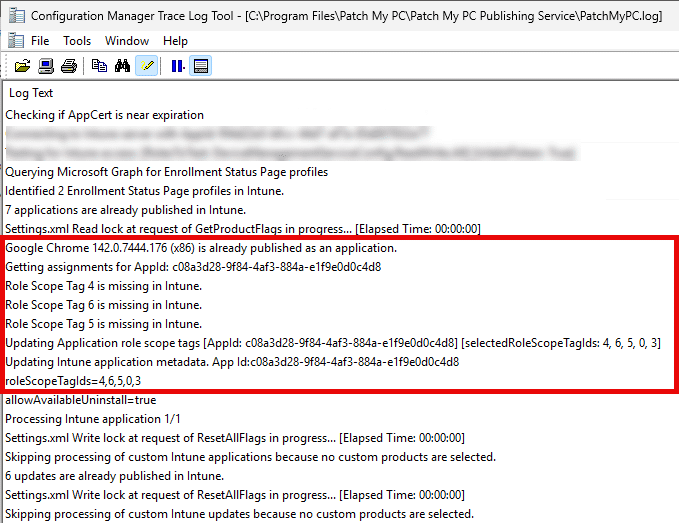
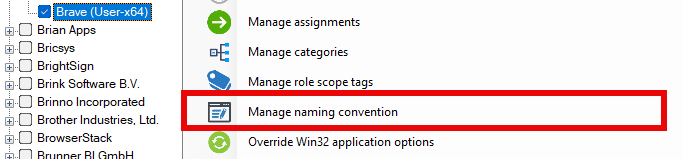
Manage Role Scope TagsCopy Link
This option allows you to manage the role scope tags that a Patch My PC created Win32 application will be associated with in Intune. Scope tags are an Intune RBAC mechanism used to limit which admins can view or modify specific resources. Assigning scope tags ensures that only administrators with matching roles and permissions can see or manage the applications created by the Publisher.
The available scope tags are pulled directly from your Intune tenant. You can select one or more tags to apply. Any Win32 application created by the Publisher will receive the scope tags selected for that application.
When a sync occurs, if the application being processed was previously created by the Publisher, it compares the scope tags defined in the Publisher settings with the tags already assigned to the Win32 application in Intune. Any scope tags selected in the Publisher that are missing on the Intune app are added during the sync. The Publisher does not remove scope tags that already exist in Intune but are not defined in the Publisher settings.
Note: This feature requires the DeviceManagementRBAC.Read.All API permissions set on the Entra ID Application Registration leveraged by the Publisher.
Available at level: All Custom Products, All Products, Vendor, Product
Available on tab: Intune Apps, Intune Updates
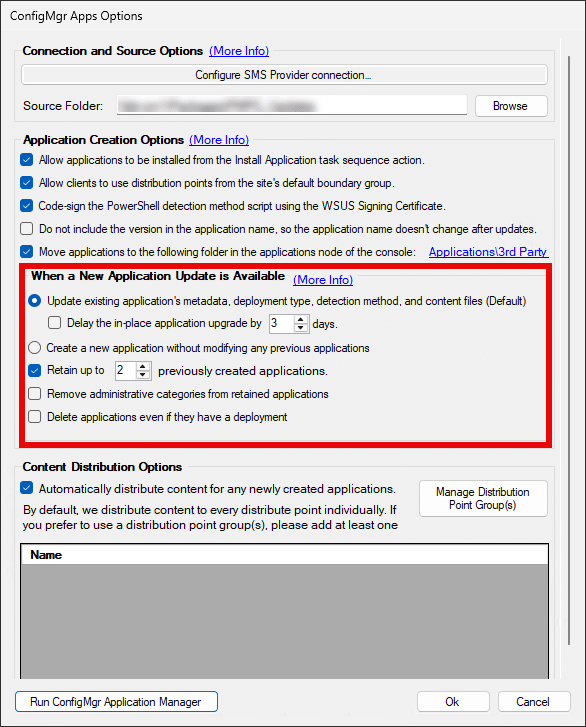
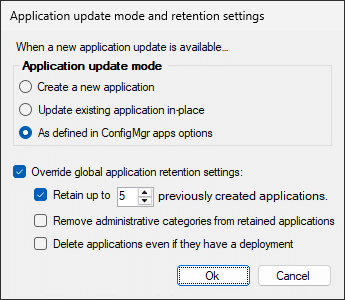
Manage Application Updates and RetentionCopy Link
This option allows you to override the global ConfigMgr application configuration for a specific vendor or product.
Global behaviour is defined in the ConfigMgr Apps tab through the Options button, where you configure how newly released application updates should be processed and their lifecycle managed.
However, you may want certain applications to behave differently. This option lets you customise these behaviours at the vendor or product level without changing your global defaults.
Overrides are especially useful for applications that update frequently, such as Google Chrome, Microsoft Edge, or Mozilla Firefox. These products can introduce issues that may not be noticed immediately, and with a common global retention setting of 2 previous versions, you could lose the version you want to roll back to before the problem is discovered. By configuring a product-level override, you can retain more versions of that specific app, such as keeping 5 versions of Chrome instead of a global default of 2. This gives test groups more time to validate updates, provides a safer rollback path for apps that update frequently.
There may also be situations where, instead of updating the existing application in-place, you prefer to create a brand-new application each time a new version is released. This can be helpful when supporting long-running deployments, task sequences, or collections that reference a specific application version. If the Publisher were to update the application in-place, those deployments could be disrupted or behave unpredictably. By overriding the global behaviour and choosing to create a new application for that product, each version remains intact, allowing ongoing deployments to continue unaffected while still enabling you to publish newer versions.
Available at level: Vendor, Product
Available on tab: ConfigMgr Apps
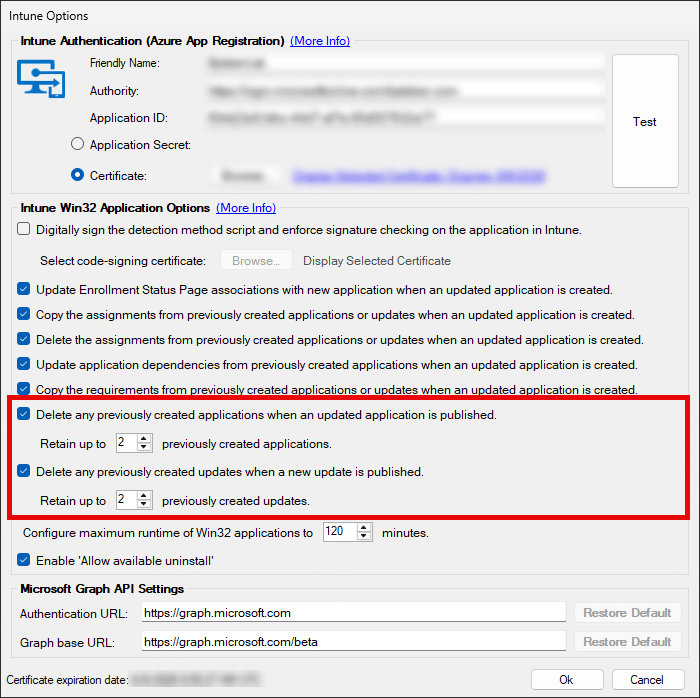
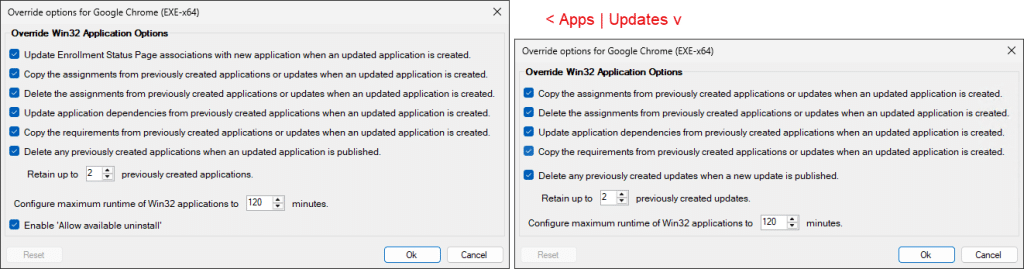
Override Win32 Application OptionsCopy Link
This option allows you to override the global Win32 application options configuration for a specific vendor or product.
Global settings, configured in Intune Options, define how all Win32 applications and updates behave. For example, how many previous versions to retain, whether to copy assignments forward, and whether old versions should be deleted automatically.
However, you may want different behaviour for certain apps, especially those that update frequently or where rollback capability is more important. The Override Win32 Application Options setting lets you customise these behaviours at a more granular level without changing your global defaults.
The override capabilities differ slightly between Intune Apps and Intune Updates.
Option
Applies To
Copy the assignments from previously created applications or updates
Apps and Updates
Delete the assignments from previously created applications or updates
Apps and Updates
Update application dependencies
Apps and Updates
Copy the requirements from previously created applications or updates
Apps and Updates
Configure maximum runtime of Win32 applications
Apps and Updates
Enable “Allow available uninstall”
Intune Apps only
Update Enrollment Status Page associations
Intune Apps only
Delete any previously created applications when an updated application is published
Intune Apps only
Retain up to X previously created applications
Intune Apps only
Delete any previously created updates when a new update is published
Intune Updates only
Retain up to X previously created updates
Intune Updates only
Overrides are especially useful for applications that update frequently, such as Google Chrome, Microsoft Edge, or Mozilla Firefox. These products can introduce issues that may not be noticed immediately, and with a common global retention setting of 2 previous versions, you could lose the version you want to roll back to before the problem is discovered. By configuring a product-level override, you can retain more versions of that specific app, such as keeping 5 versions of Chrome instead of a global default of 2. This gives test groups more time to validate updates, provides a safer rollback path for apps that update frequently.
Available at level: Vendor, Product
Available on tab: Intune Apps, Intune Updates
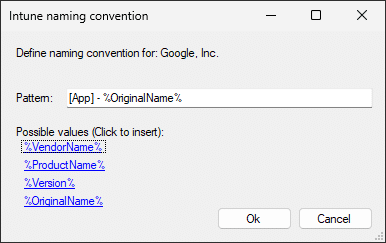
Manage Naming ConventionCopy Link
This option allows you to set a custom naming convention for the Win32 applications and updates that are created by the Publisher.
The variable %OriginalName% is the default name that Patch My PC uses. It can be inserted as a variable if you want to build on the default name. If the pattern is empty, the default name is also used.
Here is an example for Google Chrome and how those variables would map.
Variable
Value Produced
%OriginalName%
Google Chrome 142.0.7444.176 (x64)
%VendorName%
Google, Inc.
%ProductName%
Google Chrome (x64)
%Version%
142.0.7444.176
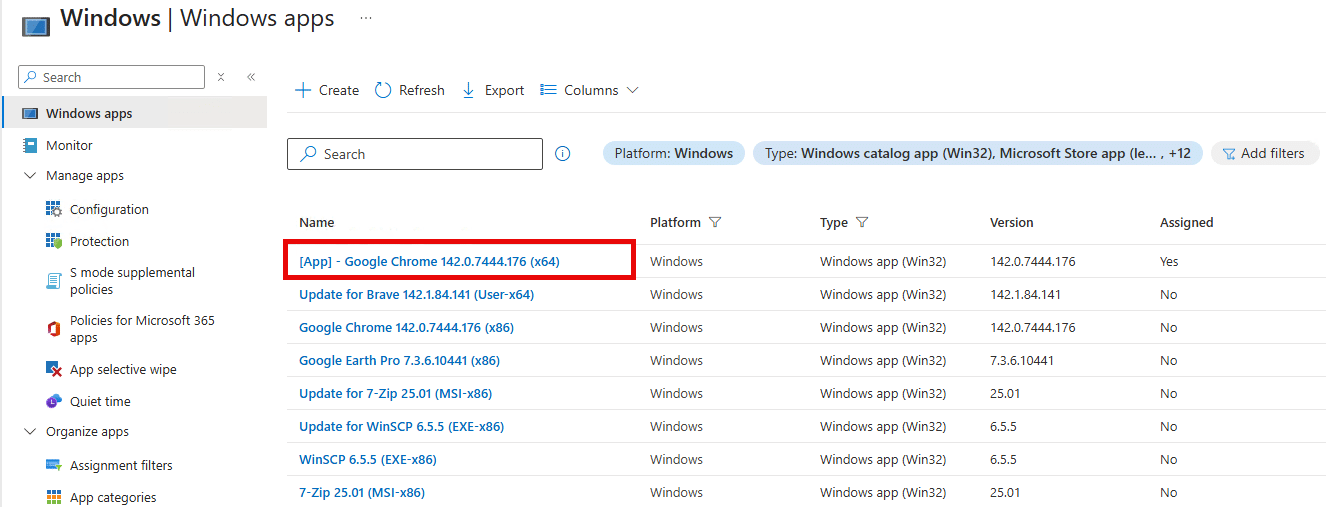
You can click the links of the variable names to insert them into your naming convention. The resulting applications can be seen in Intune with the naming standard set. In the example below, we prefixed [App] - to the original Patch My PC application name for Google Chrome.
* For Intune Apps, at the product level, you will be able to manage naming convention using the Set custom application icon and properties right-click option. If you set the naming convention at the All Products or Vendor level on the Intune Apps tab, the Set custom application icon and properties right-click option inherits the configuration for the naming convention.
Available at level: All Custom Products, All Products, Vendor, Product
Available on tab: Intune Apps, Intune Updates
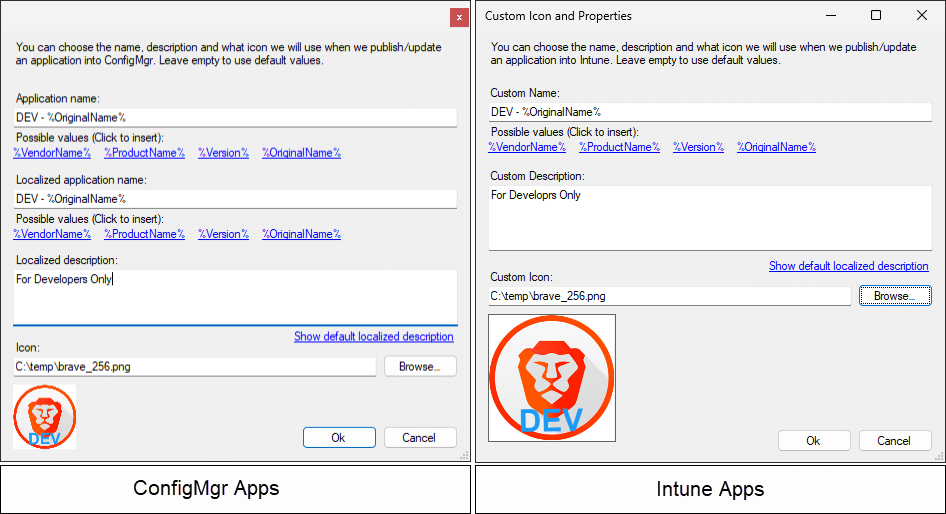
Set Custom Application Icon and PropertiesCopy Link
This option allows you to override the default application name, description, and icon for an application.
You can specify a custom application name, localized name (ConfigMgr only), localized description, and optionally provide a custom icon. The Publisher applies your custom properties during the initial creation of the application and whenever that application is updated.
This option may be helpful if you need the application name and other settings to be static for certain task sequence installation scenarios.
Available at level: Product
Available on tab: ConfigMgr Apps, Intune Apps
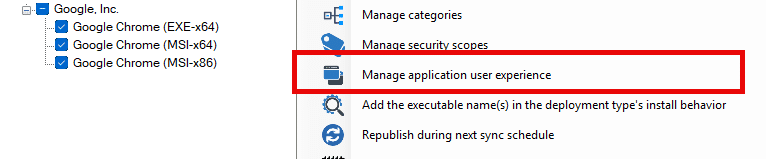
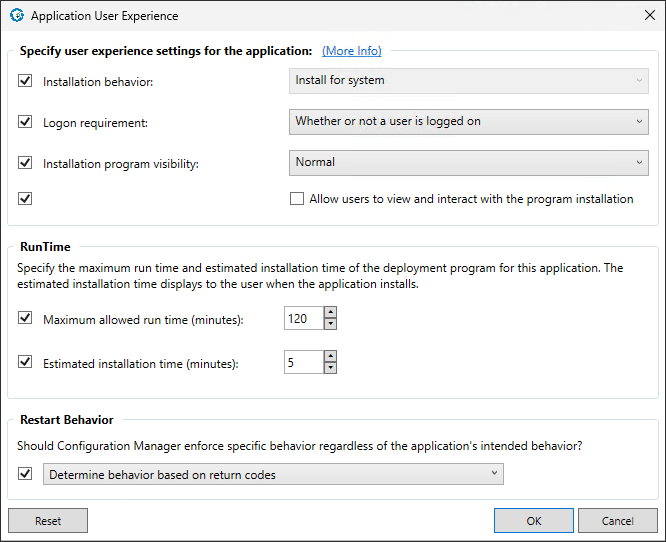
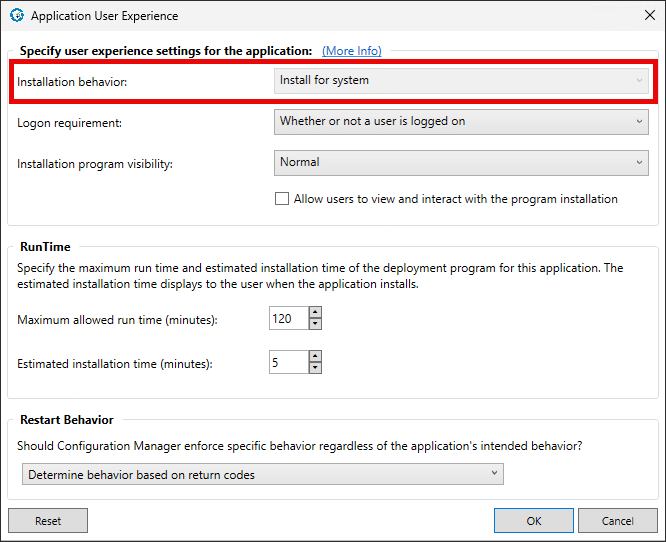
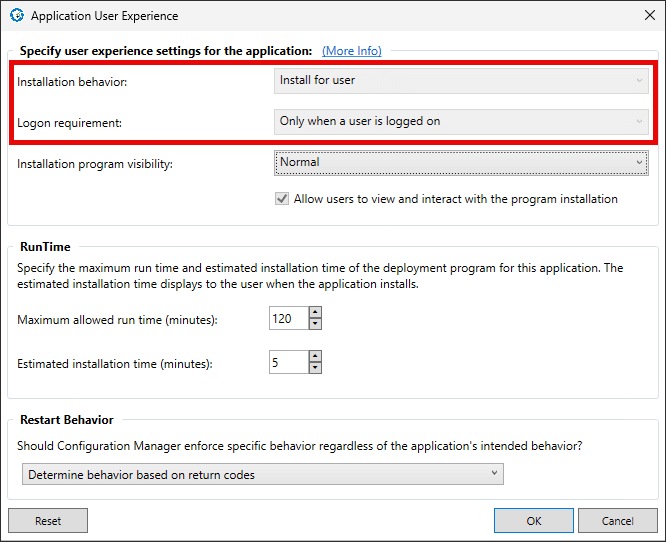
Manage Application User ExperienceCopy Link
This option lets you customise the user experience settings that Patch My PC applies to the ConfigMgr application’s deployment type for the application.
If you configure this option at the Vendor level or at the All Products level, you can also choose which specific user experience settings should be inherited by the products underneath. This allows you to apply consistent defaults across multiple apps while still overriding individual settings when required.
If an application only supports system-wide installation, the Installation behavior option will be greyed out. The UI prevents you from choosing user-based installation behaviour when it is not supported by the application.
For applications in the catalog that are user-based (identified by User in the product name), the installation behavior and logon requirement are fixed. These apps must install in the user context and only when a user is logged on, and therefore these two settings are preconfigured, cannot be changed, and do not inherit any values set at the Vendor or All Products level.
The Reset button resets all options to Patch My PC recommended defaults.
Available at level: All Custom Products, All Products, Vendor, Product
Available on tab: ConfigMgr Apps
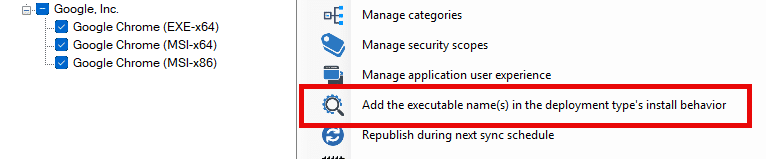
Add the Executable Name(s) in the Deployment Type’s Install BehaviorCopy Link
Important: We strongly recommend using the Manage Conflicting Processes right-click option to notify users about running applications. This option provides greater configuration flexibility and control, allowing you to deliver a smoother and more predictable user experience during application installations and updates.
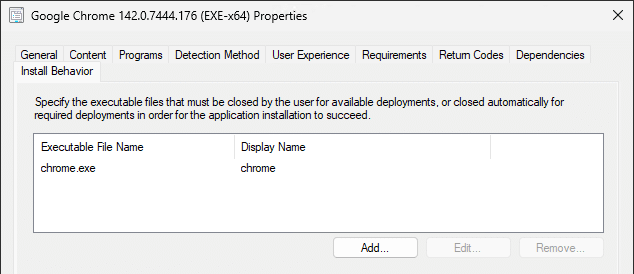
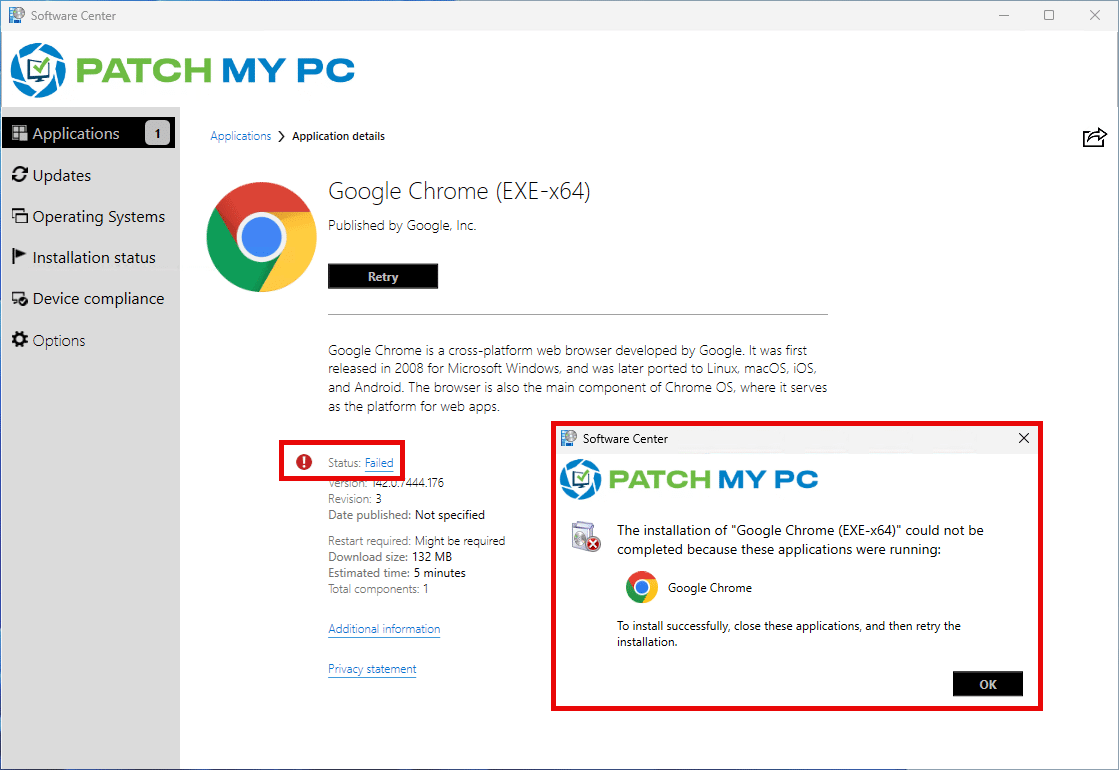
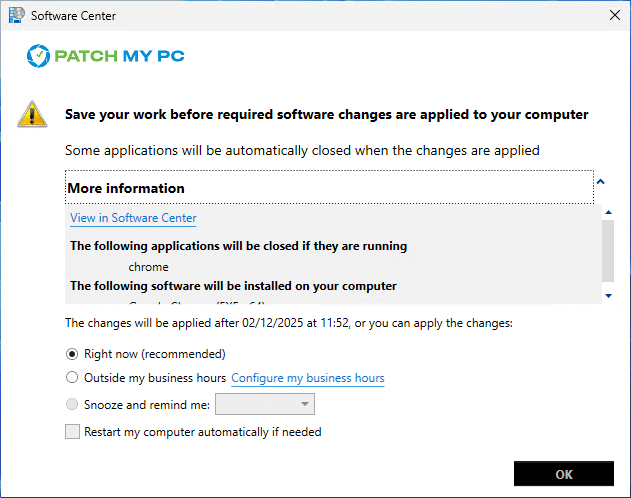
This option allows the publishing service to define the executable files in the install behavior tab that must be closed by the user for available deployments, or close automatically for required deployments for the application installation to succeed.
These file names will be set on the application published to ConfigMgr under the Install Behavior tab in the application’s deployment type properties.
If the executable is running when the deployment is initiated from the Software Center, the installation will fail and the user will be notified to close the application and retry.
A required deployment may notify the user which apps to close too.
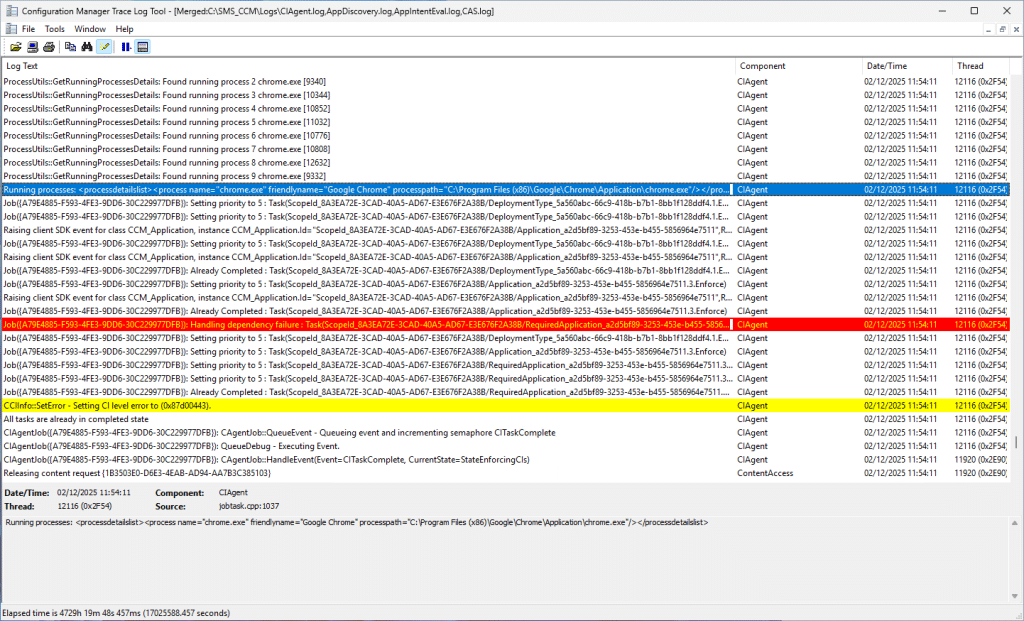
If the process is open, a required installation will fail. You can observe the reson for the failure in CIAgent.log on the client.
Available at level: All Custom Products, All Products, Vendor, Product
Available on tab: ConfigMgr Apps
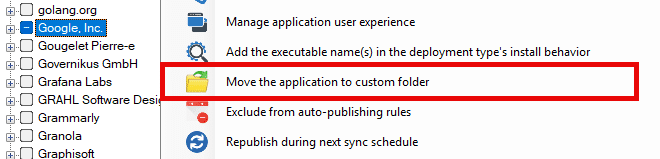
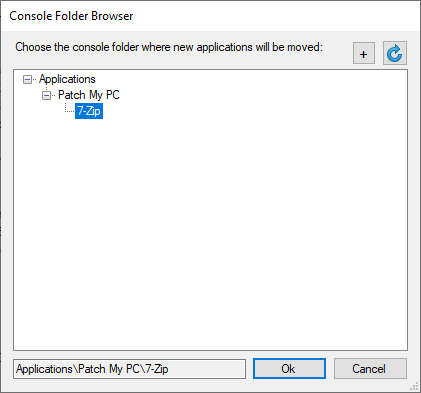
Move the Application to a Custom FolderCopy Link
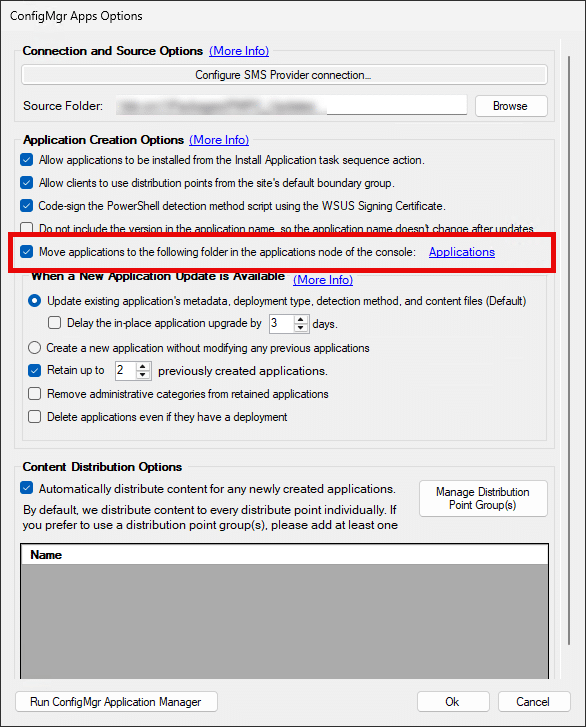
This option allows you to specify a custom folder where the Publisher will automatically move the application after it’s created.
Note: By default, newly created applications are placed in the root Applications node in ConfigMgr.
When enabled, the Publisher will move the application to the specific folder you choose after it is created. This option will override the global ConfigMgr setting. This lets you group apps in a way that makes sense for your environment, for example, placing all Adobe products in an “Adobe” folder, or isolating test applications in a separate folder structure.
You can also create new folders using the + button, or refresh the folder list using the refresh icon.
Available at level: Vendor, Product
Available on tab: ConfigMgr Apps
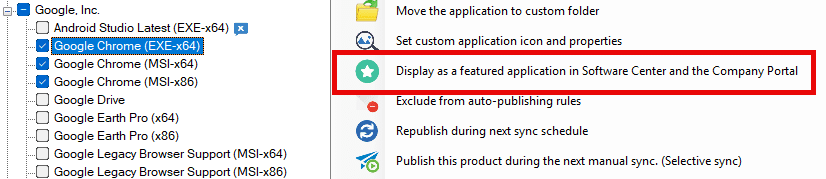
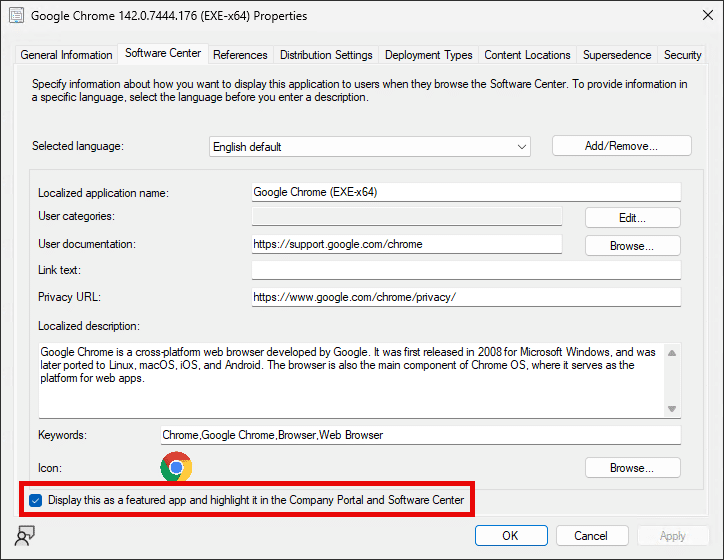
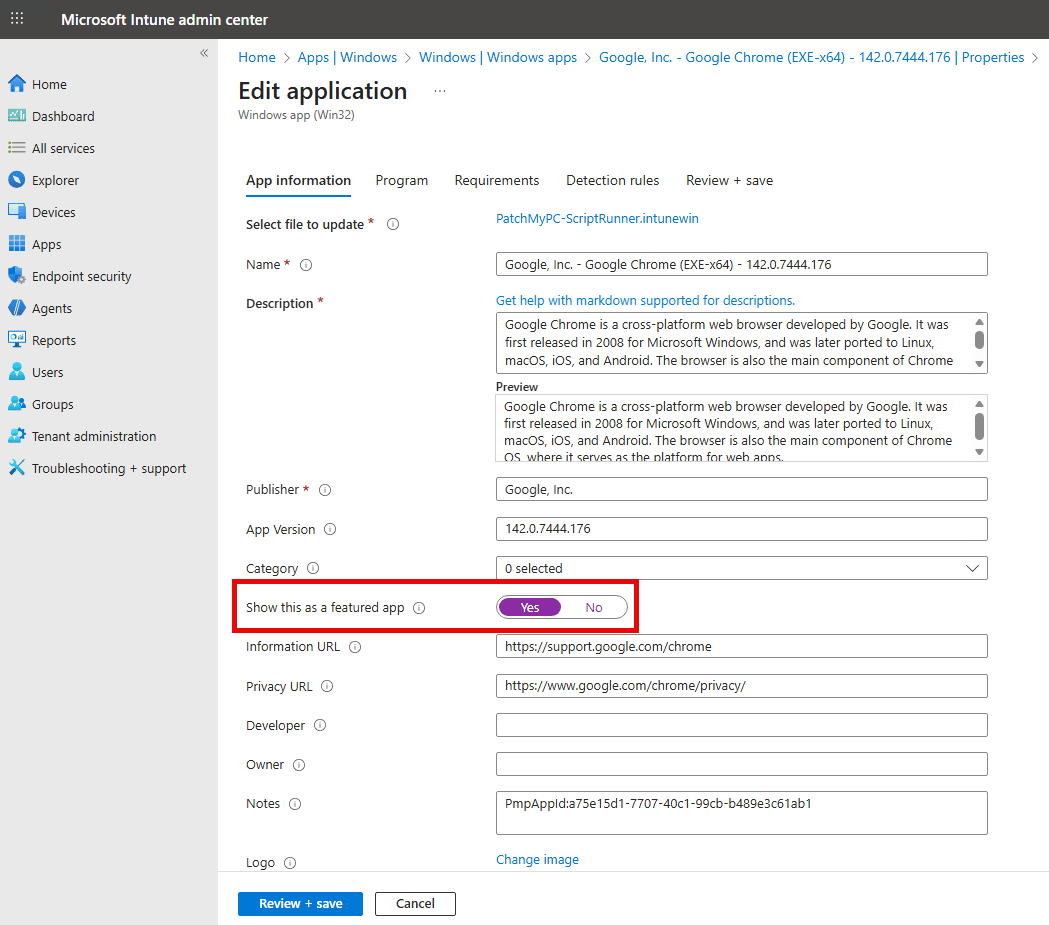
Display as a featured application in Software Center and the Company PortalCopy Link
This option allows you to set an application as featured for the company portal or software center.
The following checkbox in the Software Center tab of an application will be automatically enabled.
And for Intune, it will set Show this as a featured app to Yes.
Available at level: Product
Available on tab: ConfigMgr Apps, Intune Apps
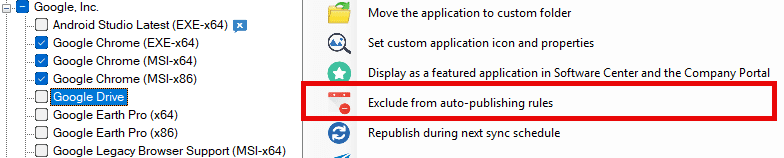
Exclude from Auto-Publishing RulesCopy Link
This option allows you to prevent specific products from being automatically enabled by the auto-publishing logic in Patch My PC.
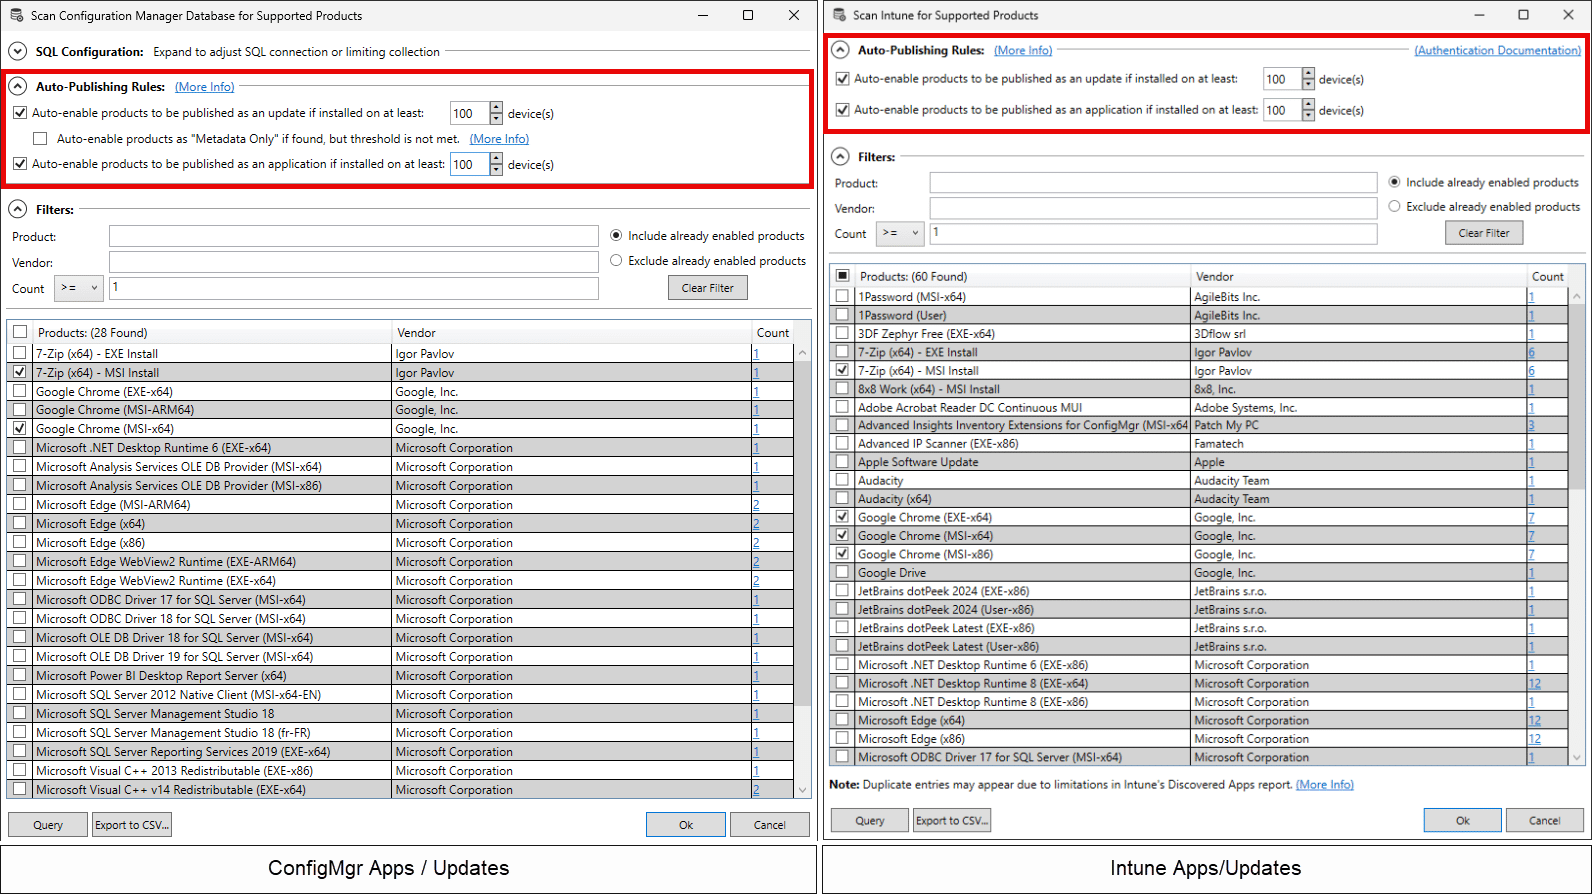
The Publisher includes a feature that can automatically enable applications or updates when they are detected on a certain number of devices. This feature is available for Updates, ConfigMgr Apps, Intune Apps, and Intune Updates. In any of these tabs, you can select the database icon to open the inventory scan tool. This tool allows you to run a one-time scan of your environment or configure automated scans during scheduled synchronizations. When enabled, these scans can automatically turn on products for publishing once they meet the device count threshold.
Selecting the Exclude from auto-publishing rules option will block the product from being enabled for publishing, even if you are leveraging this option.
The auto-publishing exclusion option can be applied to either a vendor or an individual product.
Note: Excluding a vendor is a point-in-time action. If new products are added to the Patch My PC catalog for that vendor in the future, they will not be excluded automatically and must be excluded manually, if required.
Available at level: Vendor, Product
Available on tab: Updates, ConfigMgr Apps, Intune Apps, Intune Updates
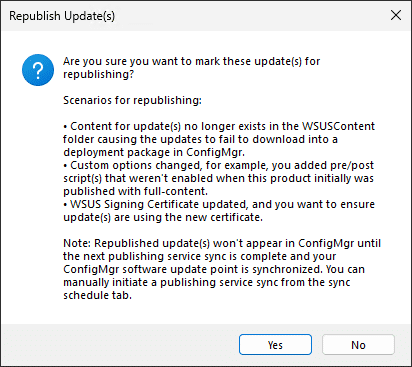
Republish During Next Sync ScheduleCopy Link
This option will enable the product to be republished during the next publishing service sync.
The republishing option can be leveraged to recreate an update or application, that has already been published, when its content or metadata needs to be rebuilt.
Republishing a WSUS update or ConfigMgr application does not create a revision. Instead, republished WSUS updates receive a new update ID, while ConfigMgr applications receive a new content version. Republishing Intune Apps and Intune Updates replaces the existing Win32 app content and meta-data but the Win32 application id remains unchanged.
Note: In many cases, it’s faster to delete an existing Win32 app in Intune and run a Publisher sync, for it to then be created again as a new Win32 app, rather than using the Republish option. When the app is recreated, it receives a new application ID, and the Intune Management Extension (IME) on the client device will evaluate it almost immediately on the next policy sync.
In contrast, applications or updates that have already been processed by the client are subject to the IME’s GRS (Global Re-evaluation Schedule), which only rechecks previously-evaluated apps roughly every 24 hours. As a result, republished apps may take significantly longer for clients to detect a change compared to a newly created Win32 app.
Republishing is only needed when something in the app or update’s content must change, which cannot be handled by a simple metadata revision. The most common scenarios include:
The WSUS content files were removed If the content for a previously published update is missing from WSUS content, ConfigMgr cannot download it and will return a 404 error. Republishing restores the content.
Patch My PC ScriptRunner.exe binaries need to be added The first time you enable a feature, for an already published application or update, that depends on PatchMyPC-ScriptRunner.exe (e.g., Manage Confliting Processes, Manage Logging), the application or update must be republished so our ScriptRunner binaries can be included in the content.
You applied a right-click option that changes the content Options such as adding pre/post scripts, attaching an MST, or enabling Manage Conflicting Processes require the Publisher to include additional files in the application or update. Because these changes modify the actual content, the update must be republished so the WSUS update CAB can be rebuilt or, in the case of ConfigMgr applications, so a new content version can be created to reflect the updated content
Your WSUS code-signing certificate changed Updates must be republished to be re-signed using the new certificate.
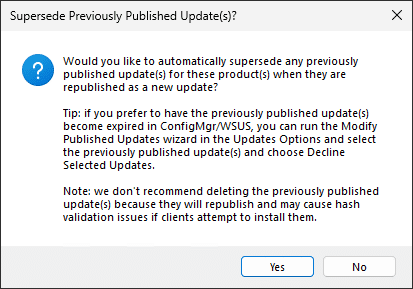
Republish a WSUS Update When you mark a WSUS update for republishing, you will be prompted to confirm the action. The confirmation dialog also reminds you that a Software Update Point (SUP) sync is required before the republished update becomes available in ConfigMgr.
If you click Yes you will be further prompted if you want the republished update to supercede the existing update in WSUS. Choosing Yes means the older versions will be marked as superseded once the new republished update is created.
The dialog also explains that if you prefer those older updates to be expired instead of just superseded, you can use the Modify Published Updates wizard in the Publisher to decline them manually.
Note: Avoid deleting previously published updates directly from WSUS or ConfigMgr. Doing so can cause republished updates to reappear unexpectedly and may lead to hash validation errors if clients attempt to download an update whose content is no longer available.
We provide a separate knowledge base article for this setting because it includes additional configuration steps and examples that are easier to explain in a dedicated guide. Read more at When & How to Republish Patch My PC Updates – Patch My PC
Available at level: All Custom Products, All Products, Vendor, Product
Available on tab: Updates, ConfigMgr Apps, Intune Apps, Intune Updates
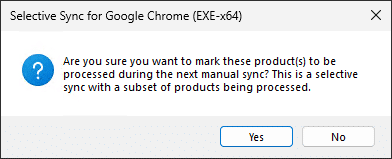
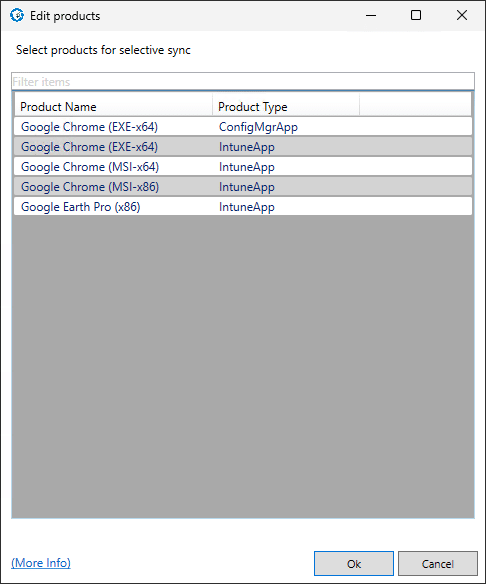
Publish this Product During the Next Manual Sync (Selective Sync)Copy Link
This option allows you to specify an individual, or list of products, to Publish during the next manual sync instead of all products during the next scheduled sync.
Normally, when you run a manual sync, the Publisher evaluates every selected product, which can take time, especially if you have a large number of products enabled across the different paltform tabs. Selective Sync is useful in scenarios where you only want to process a specific app or a few apps, such as when testing a new configuration, validating a change, or troubleshooting an issue, without running a full sync cycle.
When selecting the above right-click context menu option, you will be prompted to confirm your choice.
When clicking Run Publishing Service Sync from the Sync Schedule tab, you will be shown all products with selective sync enabled.
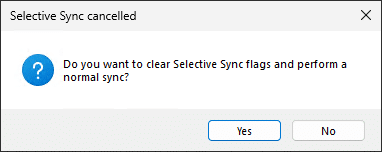
Clicking OK will run a manual sync and process the products marked for selective sync. If you choose to Cancel instead of running the selective sync, you will be prompted to decide on how to proceed. You can either clear all selective sync flags and run a normal full sync, or keep your existing selective sync selections and return to edit them before performing the selective sync again.
Note: If a manual sync has not been run before the next scheduled sync, all selective sync flags will be cleared, and a normal full sync will be run.
Available at level: All Custom Products, All Products, Vendor, Product
Available on tab: Updates, ConfigMgr Apps, Intune Apps, Intune Updates
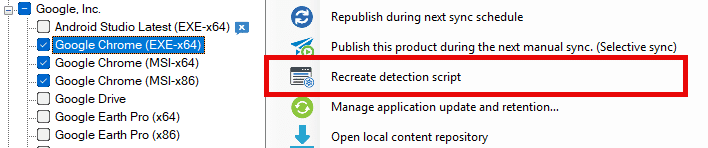
Recreate Detection ScriptCopy Link
This option forces the Publisher to regenerate the PowerShell detection script for the selected application(s).
Recreating the detection script is useful if your code-signing certificate has changed, any existing detection scripts will still be signed with the old certificate, which can lead to validation issues. Regenerating the script ensures all affected applications receive a newly created and correctly signed detection file. Furthermore, Patch My PC periodically improves the detection method script to enhance reliability, logging, and compatibility. Recreating the script allows your applications to pick up the latest version of the detection method, even if the vendor has not released a new update.
Note: Using this option for products on the Intune Apps and Intune Updates tab will also result in the requirement script for those Win32 application being updated too.
Available at level: All Custom Products, All Products, Vendor, Product
Available on tab: ConfigMgr Apps, Intune Apps, Intune Updates