
The Cisco AnyConnect Secure Mobility Client module needs to be updated first on an endpoint before you can update any of the other modules.
If you try and update any of the modules, before first updating the Secure Client, you will get an error similar to the below:

This article will demonstrate how you can control the order of install for the Cisco AnyConnect modules, and also bundle in the preferences.xml and configuration.xml.
It is not necessary to follow this process in order to patch the AnyConnect modules. However, it will optimise the order of operations during the patching flow by ensuring all the modules are installed within one patch, and in the correct order.
We will leverage the custom right click action Add custom pre/post scripts on the Cisco AnyConnect Secure Mobility Client product to install the other modules as part of a post install script, i.e. to install the other modules after the Secure Mobility Client has installed.
The steps covered in this article can be used in all tabs in Publisher: Updates, ConfigMgr Apps, Intune Apps and Intune Updates.
Note:The Cisco AnyConnect modules are part of our catalogue using the local content repository.
Note: Make sure you select the product you want to bundle within the Patch My PC Publisher.
- If you want to deploy version 4.x – select the Cisco Anyconnect products
- If you want to deploy version 5.x – select the Cisco Secure Client products.
Step 1: Download modules
Download all the latest Cisco AnyConnect modules and store only the Secure Mobility Client installer in your local content repository:

Step 2: Enable the product and configure post script
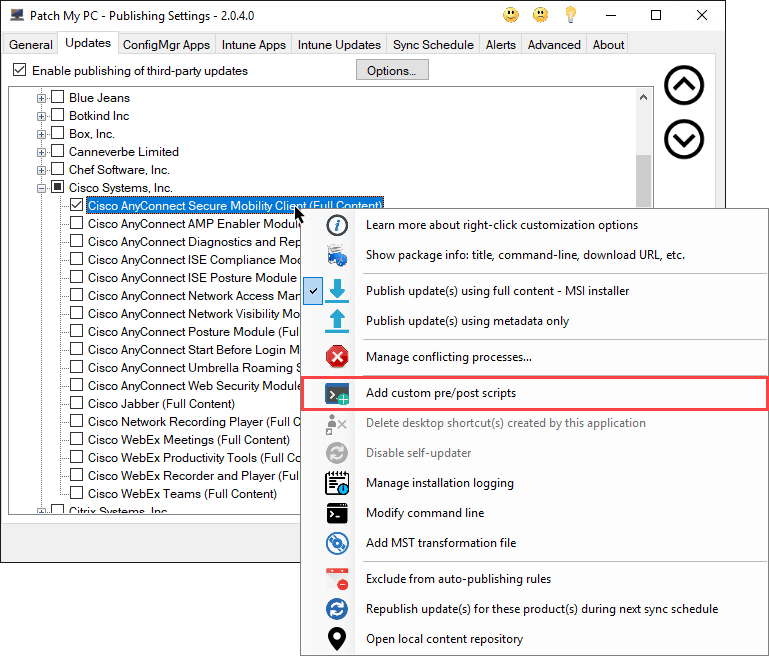
Within the Patch My PC Publisher, ensure you only have the Cisco AnyConnect Secure Mobility Client enabled. Right click on the product and choose Add custom pre/post scripts.
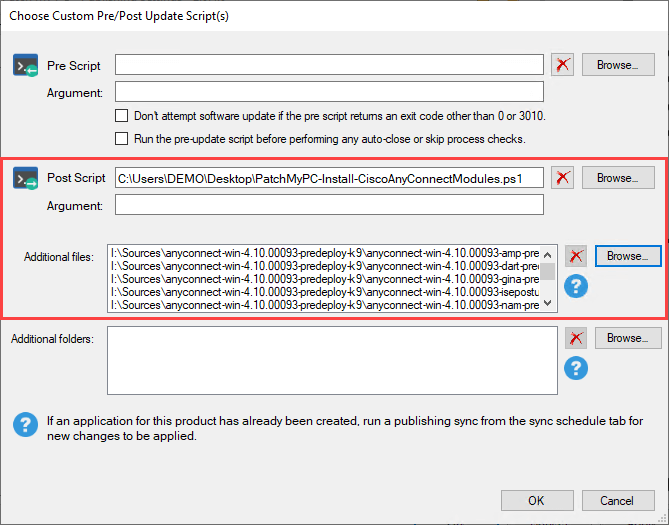
Download and save PatchMyPC-Install-CiscoAnyConnectModules.ps1. This is the post-script which will call the other module installers.
At the subsequent dialogue, click Browse beside Post Script and choose the PatchMyPC-Install-CiscoAnyConnectModules.ps1 script file. This script will install all of the other module installer files after the Secure Mobility Client has installed.
Click Browse beside Additonal Files and choose all of the other Cisco AnyConnect Modules you need, excluding the Secure Mobility Client (typically named anyconnect-win-x.x.x-core-vpn-predeploy-k9.msi). Doing this will include the other module installers within the same the content payload as the Secure Mobility Client package.
Also include the configuration.xml or preferences.xml as Additional Files if you would like them automatically copied to the newConfigFiles folder for the Network Access Manager module after installation.
Click OK.
Step 3: Synchronize to publish
Now the product is configured you are ready to publish. Navigate to the Sync Schedule tab and click Run Publishing Service Sync.
Once publishing is complete, you will see only one update or application for the Cisco AnyConnect Security Mobility Client. This will include all installers for the other modules, which will be installed on the device after the Security Mobility Client has been installed.
Moving forward and dealing with new updates
When a new version of the modules has been released by Cisco, the process is:
- Repeat Step 1 of downloading all of the needed modules from Cisco’s website and storing the Secure Mobility Client installer in your local content repository.
- Right click on the Cisco AnyConnect Secure Mobility Client product in the Publisher, choose Manage custom pre/post scripts and remove all of the existing additional files, and replace them with the newly downloaded module installers.
It is not necessary to redownload the PatchMyPC-Install-CiscoAnyConnectModules.ps1 script and re-add that back in to the Publisher.