
The Patch My PC Publisher has the ability to manage third party patching for multiple Intune tenants. This is commonly referred to as ‘multitenancy‘. This article will document all the features specific to a multi-tenant feature-enabled Patch My PC Publisher.
By and large, the core functionality of the Publisher is the same as detailed in all other documentation. However this article will document exceptions to that rule by highlighting areas that differ in the user interface, or functionality of the Publisher when it is enabled for multitenancy.
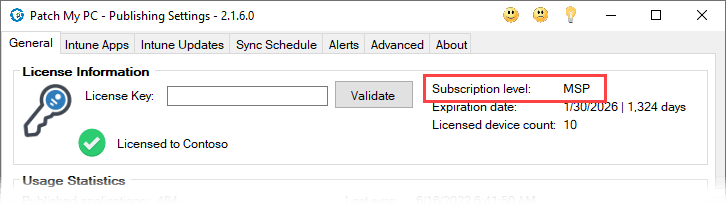
Multi-tenant management features of the Publisher are available for Managed Services Providers using the MSP subscription. To find out more information about this subscription, please see Information for Managed Service Providers.
Installation
Mutli-tenant management features of the Publisher are available in the same installer of the Publisher for all customers. Therefore the installation instructions are the same as currently documented: Intune – Getting Started (patchmypc.com).
A minor exception to the installation process is the Azure App registration. Instead of creating just on Azure App registration in one Azure Active Directory tenant, it is required to create an Azure App registration in each AAD tenant you intend to manage. In other words, if you want to manage 10 customers each with their own AAD tenant, in each tenant create an app registration and enter those in the Publisher as detailed below.
Adding the First Tenant
After installing the Patch My PC Publisher you can start adding more tenants in either of the Intune Apps or Intune Updates tabs.
To configure the first tenant, either click Options… or the + icon, and it will produce the typical Intune Options window.

Enter your the tenant’s Azure App registration details including a friendly name to identify the tenant, e.g. customer or tenant domain name.

For more information on how to create the Azure App registrations, see our documentation: Azure App Registration – Getting Started (patchmypc.com).
After entering the Azure App registration details for your first tenant, click OK.

This tenant will be currently in-focus for both the Intune Apps and Intune Updates tabs.
Enable the checkbox for Enable creation of Win32 applications/updates in Microsoft Intune in both tabs. Products you select in Intune Apps or Intune Updates will configured for this tenant.
Click on Options… to change the Intune Options for the currently selected tenant.
Adding and Removing Additional Tenants
To add an additional tenant, click on the + at the top right in either of the Intune Apps or Intune Updates tab. It will produce the typical Intune Options windows where you can configure another tenant for publishing.

To remove a tenant, change the currently selected tenant to the one you want to remove from the dropdown. Click on the red cross at the top right in either of the Intune Apps or Intune Updates tab. You will be prompted to confirm you want to delete the tenant.

Importing Tenants
If you currently manage multiple instances of the Patch My PC Publisher for Intune publishing and you wish to leverage the new multi-tenant functionality, you can import your settings from the other instances into your new multi-tenant installation of the Publisher!
Gather the latest Settings.xml from the install directory for each install of the Publisher you support today, and copy them to the host running the multi-tenant featured-enabled Publisher.
In either of the Intune Apps or Intune Updates tabs, click the import button and select each (or all) Settings.xml files you want to import. After selecting the Setting.xml file(s) and importing, you will receive a dialogue confirming the successful import.
These are the supported configurations carried over when you import settings from another instance of the Publisher:
- Product selections and their right click options in the Intune Apps and Intune Updates tabs
- Tenant information (friendly name, authority and AAD application ID)
- Intune Win32 Application Options


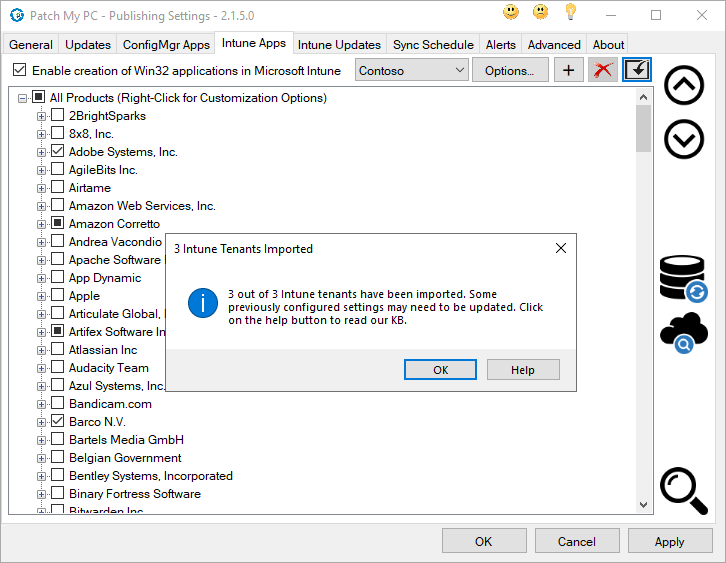
As noted in the confirmation dialogue, some previously configured settings may need to be updated.
For each tenant you will need to re-configure the following:
- AAD application secret
- (If configured) Ensure the code signing certificate is still available for the Intune Option Digitally sign the detection method script and enforce signature checking on the application in Intune.
- (If configured) Restore content used for pre or post, installation or uninstallion scripts, and additional files or folders. If you import a tenant that uses these and the content is no longer available in the same path, this will be logged in PatchMyPC.log. It is recommended you either restore the content using the same same path, or restore the content and update the right click option to use a new path.
After importing other tenant settings from Settings.xml file(s), all the Publisher settings (inc all tenants) are stored in the single Settings.xml in the install directory of the Publisher.
Backup and Restore Publisher Settings
The process of backing up the Publisher, and restoring it, is still the same process for multi-tenant feature-enabled Publishers.
You can more about that process here: Backup and Restore Publisher Settings – Patch My PC
Manage Conflicting Processes
The feature for Manage conflicting processes is still availalbe for multi-tenant feature-enabled Publishers, however its UI and configuration options change. This is to allow you set tenant specific settings, such as:
- Set a unique company logo per tenant
- Configure the ‘Organization Name’ per tenant
- Configure different localization text per tenant
You can still configure global settings via the Manage default settings, however this enables you to configure the above settings differently per tenant.


Alerts
At this time, webhook or mail notification settings configured in the Alerts tab is ‘system-wide’. In other words, the Alerts notifications are used for all tenants.
The email notfication will provide a breakdown of publishing results on a per-tenant basis with a unique table for each tenant configured in the Patch My PC Publisher.
Notes
- Intune Application Manager Utility connects to the currently selected tenant.
- Scan Intune for Supported Products tool connects to the currently selected tenant.