Using DNS aliases with WSUS and third-party patching
In this KB we will discuss another scenario which can cause the error “CreateDirectory failed” seen in PatchMyPC.log and SoftwareDistribution.log when trying to publish new third-party software updates into WSUS and/or Configuration Manager.
While there are a few other solutions to this problem, as detailed in the CreateDirectory failed Error when Publishing Third-Party Updates article, this is an alternative solution proposed to address the error.
However, your applicability for the solutions proposed in this article depends on whether your WSUS service is configured to use HTTPS and if you are using a DNS alias for your WSUS server address.
It may be desirable for organisations to use a DNS alias for WSUS, especially if WSUS is exposed across the Internet; it can simplify certificate requirements and help obfuscate internal hostnames.
It is strongly advised to first read the Determine if you are affected section below to determine if either of the proposed solutions are applicable to you.
Topics covered in this article:
Determine if You are Affected
Before you execute either solution proposed in this article, it is recommended you understand if you are affected and meet the criteria.
You can do this by verifying the three conditions below:
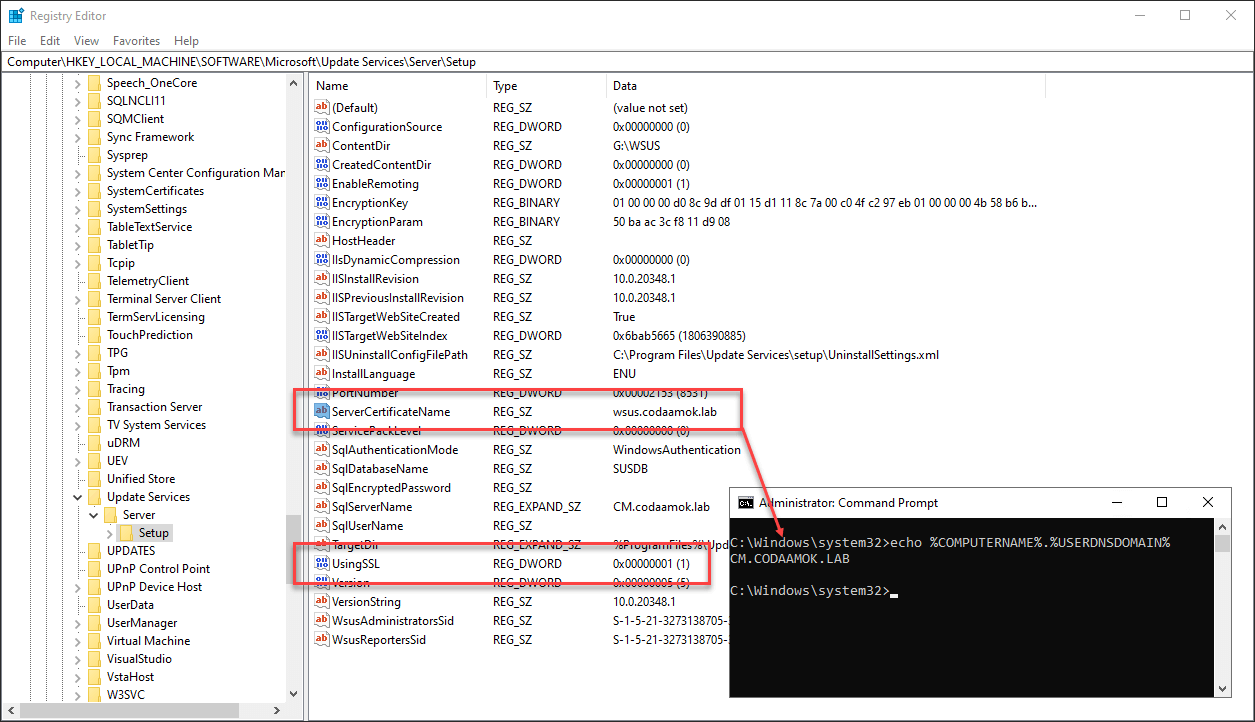
- Firstly, to be affected by this issue, in the below registry key, the value UsingSSL will equal to 1 but ServerCertificateName will be a different address compared to the server’s Active Directory (AD) FQDN address (that’s assuming the WSUS server is domain-joined, otherwise it would be different to the server’s hostname.)
HKEY_LOCAL_MACHINE\SOFTWARE\Microsoft\Update Services\Server\Setup
If the above is true for you, this means you likely have a DNS record configured, on a DNS server you manage, likely of type CNAME (although this can be an A record if WSUS is Internet-accessible and using a public DNS), pointing to your WSUS server’s IP address.
- Secondly, you will also see the below errors in PatchMyPC.log and SoftwareDistribution.log while attempting to publish new third-party software updates:
PatchMyPC.log:
The publishing failed with error: CreateDirectory failed (timestamping was enabled). We will attempt to publish the update again with timestamping disabled.
CreateDirectory failed. ErrorCode:-2147467259 NativeErrorCode:1326 HResult:-2147467259 MethodName:CreateDirectory. This error appears to be a known error. Please see our KB article https://patchmypc.com/an-error-occurred-while-publishing-an-update-to-wsus-createdirectory-failed for the resolution.
SoftwareDistribution.log:
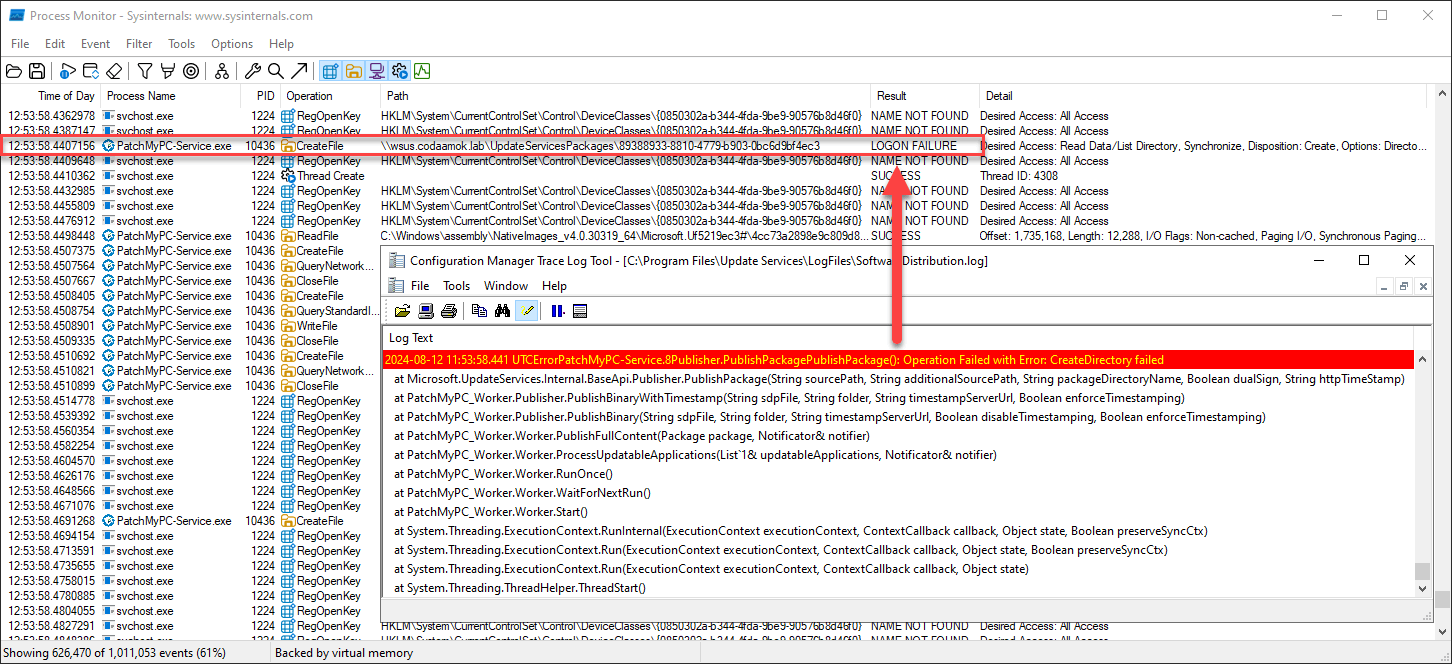
ErrorPatchMyPC-Service.8Publisher.PublishPackagePublishPackage(): Operation Failed with Error: CreateDirectory failed
- Lastly, if you perform a Process Monitor capture while the Patch My PC Publisher is synchronising and produces the error, you will see a LOGON FAILURE when PatchMyPC-Service.exe tries to CreateFile in the UpdateServicesPackages shared folder.
You will also notice the path includes the DNS alias hostname, and not the server’s Active Directory domain name. This is what causes the Kerberos logon failure; there is a bug in the WSUS SDK where the HostHeader registry value is ignored (if configured) and WSUS tries to reach out to the UpdateServicesPackages shared folder using the host’s alias in the path (via the ServerCertificateName registry value).
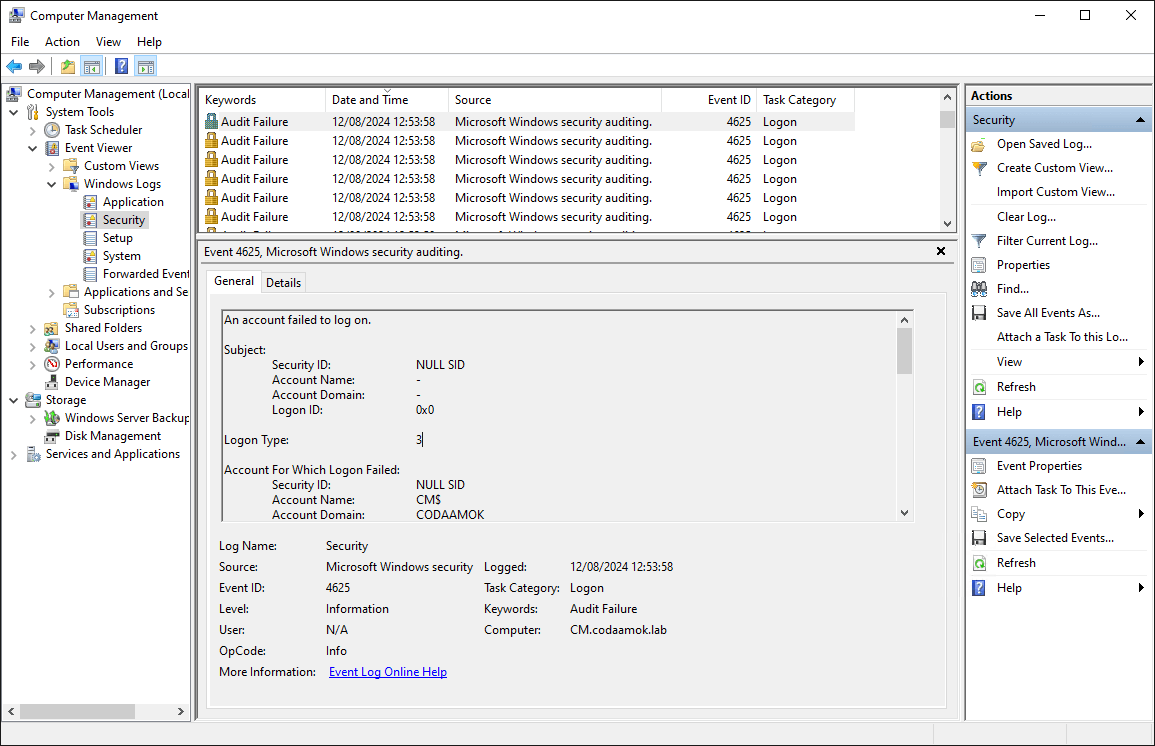
At the same time as the above, you will also see the event ID 4625 on the WSUS server’s security event log also for logon failures.
If all the conditions above are the same for you, it’s highly likely this article can help you and either of the proposed solutions below will fix the issue.
Solution 1: Reconfigure your WSUS HTTPS config to match the AD FQDN address
This solution is choice one of two; and focuses on reconfiguring your WSUS server to use a HTTPS configuration and certificate with a domain matching its AD domain name (or its own hostname, if it’s not domain joined.)
Some customers like to implement a DNS alias for their WSUS server because it might be Internet accessible and prefer to keep the URL simple and not expose the server’s internal hostname. If this is your scenario and your WSUS server is domain joined, you may prefer Solution 2 below by configuring a Service Principal.
To reconfigure WSUS to use the correct hostname and certificate, first, you will need to re-issue your server authentication certificate from your trusted Certificate Authority (CA) containing the WSUS server’s FQDN in the Subject Alternative Name (SAN) attribute.
Once you have the .pfx file for your new certificate (containing the private key), transfer it to the WSUS server and install it in the server’s Local Computer Personal store:
- Right-click on the start menu and choose Run…
- Type certlm.msc and press enter
- Expand Personal, right-click on Certificates, and choose All Tasks > Import…
- Browse out and choose your newly issued certificate .pfx file, and enter the password for the .pfx file (this would have been set at the time of creating the .pfx file.)
Thereafter, configure Internet Information Services (IIS) to use this newly imported certificate:
- Right-click on the start menu and choose Run…
- Type InetMgr.exe and press enter
- In the Connections pane on the left, expand the server > Sites
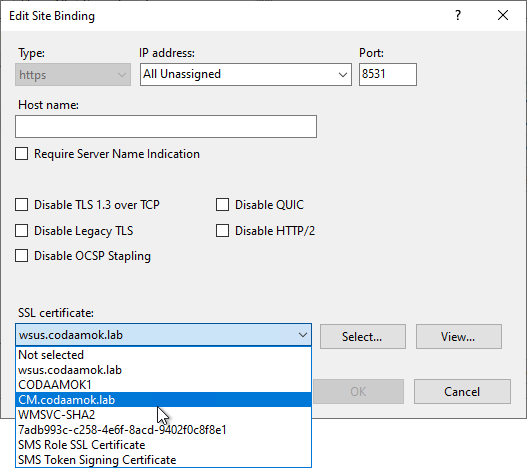
- Right-click on the WSUS Administration site and choose Edit Bindings
- In the dropdown for SSL certificate, choose your new certificate:
Next, you need to reconfigure WSUS HTTPS configuration. This will update the ServerCertificateName registry value to that of the correct SAN in your new certificate:
- Open Command Prompt (cmd.exe) as administrator
- Navigate to C:\Program Files\Update Services\Tools
cd C:\Program Files\Update Services\Tools
- Call the WsusUtil.exe to configuressl, setting your server’s AD FQDN address, as per the SAN on your new certificate:
wsusutil.exe configuressl FqdnOfServer
- Navigate to the below key in the registry and verify the ServerCertificateName value matches the address you entered in the previous step
HKEY_LOCAL_MACHINE\SOFTWARE\Microsoft\Update Services\Server\Setup
At this point, solution 1 is complete and you should now be able to publish third-party updates successfully into WSUS.
You may want to consider the additional follow-up tasks below, which this article will not cover:
- Updating any GPOs in your domain with the setting Specify intranet Microsoft update service location to use your new WSUS server address, e.g. https://FQDN:8531 (i.e. the WSUS server’s AD FQDN address.) If you are using ConfigMgr, then you should not need to do this step as ConfigMgr clients automatically set this WSUS local policy with the correct value via its agent.
- Ensure the endpoints you’re patching with ConfigMgr/WSUS can reach the WSUS server via its FQDN address over ports tcp/8531 and tcp/8530, and the DNS address resolves correctly.
Solution 2: Configure a CIFS Service Principle for your WSUS server with your CNAME alias
This solution is an alternative option for you to consider which can also resolve the issue. However, for this solution to work, your WSUS server must be domain-joined, and you need to be a domain administrator.
- Log in as a domain administrator on either the WSUS server or Domain Controller (DC)
- Launch cmd.exe and execute the below command:
setspn -S cifs/<Alias> <Host>
For example, my alias and ServerCertificateName registry value is wsus.codaamok.lab, and my WSUS server’s Active Directory domain name is cm.codaamok.lab, therefore the command I need to enter is:
setspn -S cifs/wsus.codaamok.lab cm
- Finally, you can either reboot the WSUS server, or run the below klist command in an elevated cmd.exe window:
klist -li 0x3e7 purge
At this point, solution 2 is complete and you should now be able to publish third-party updates successfully into WSUS. There are no additional follow-up tasks or considerations required, unlike in solution 1 above.


