In this video guide, we will cover an error you may encounter when trying to publish third-party software updates to WSUS.
This exception happens when the WSUS UpdateServicesPackages folder or WSUSContent folder doesn’t exist, isn’t shared correctly, not set correctly in the SUSDB, or has incorrect permissions.
Determine if You Are affected by Error: CreateDirectory failed
Depending on the method you are using to publish updates to WSUS, you will see one of the following errors in the PatchMyPC.log, SMS_ISVUPDATES_SYNCAGENT.log, SCUP.log, or UpdatesPublisher.log
An error occurred while publishing an update to WSUS: createdirectory failed
SyncUpdate: Exception Message: CreateDirectory failed
Exception Message: CreateDirectory failed
Step 1: Check if the WSUS Content Shared Directories Exist
If Step 1 looks okay, perform the following check: Open the Computer Management snap-in by opening a run dialog and typing compmgmt.msc

If the WsusContent or UpdateServicesPackages don’t exist you can either manually create them with the appropriate permissions or an easier option may be to move the WSUS content folders to a new folder to reset all settings.
We expect to see that both folders exist, and the paths match those found above in the share dialog.

Step 2: Validate the Permissions on the WsusContent and UpdateServicesPackages Shares
After validating the shares exist, confirm both the WsusContent and UpdateServicesPackages have Allow permissions under the Share Permissions tab for the following local (i.e. non-domain) users and groups:
- NETWORK SERVICE
- WSUS Administrators
- Administrators.
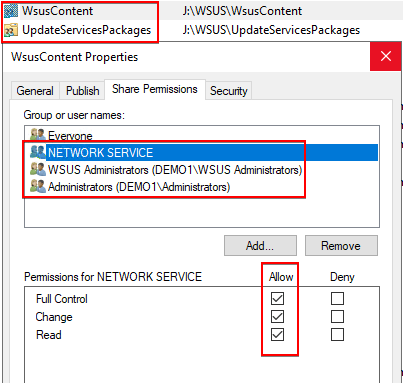
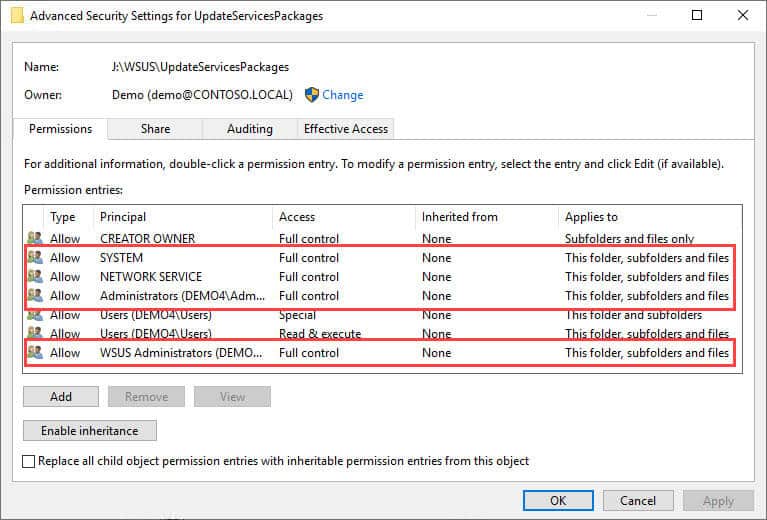
For NTFS permissions on the Security tab, you will need to ensure the Full control permission is applied for the following local (i.e. non-domain) users and groups:
- SYSTEM
- NETWORK SERVICE
- WSUS Administrators
- Administrators
Note: If your WSUS server is configured to use a shared folder for its content, there are more considerations to make for delegating folder permissions:
- If the WSUS content shared folder is remote from the WSUS server, ensure the AD computer account of the WSUS server is in the SMB Share Permission and NTFS Security tabs with Allow / Full Control permissions.
- If the WSUS content shared folder is on the same host as the WSUS server itself, ensure the local identity object SYSTEM is in the SMB Share Permission and NTFS Security tabs with Allow / Full Control permissions.
You can verify if your WSUS is configured to use a shared folder for its content by reviewing step 3 below. If it’s a shared folder, it will use the UNC notation, e.g. servershare.
Step 3: Validate the WSUS Content Folder in the Registry Matches the SUSDB
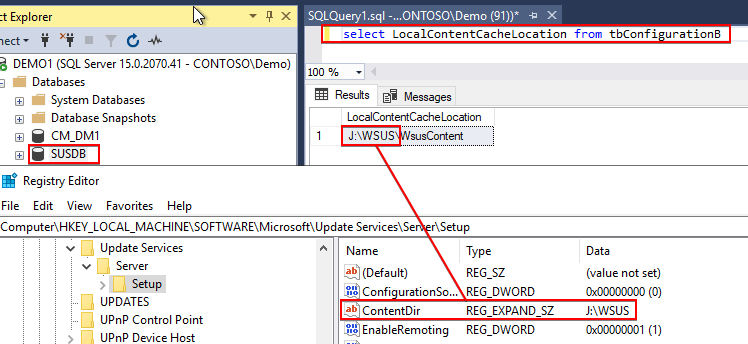
If steps 1 and 2 are correct, you should check the values in the registry match the values in the database (SUSDB).
- To check the WSUS ContentDir in the Registry check: HKLM\SOFTWARE\Microsoft\Update Services\Server\Setup:ContentDir
- To check the value in the SUSDB run the following query in SQL Management Studio against the SUSDB:
Select LocalContentCacheLocation from tbConfigurationB
Ensure the paths resolve to the same root folder as shown below:
If these values don’t match and one is incorrect, you should review the following KB instead specific to this scenario: Failed to sign package; error was: 2147942403
Step 4: If you have HTTPS configured, validate that the SSL Cert contains the correct DNS entries
If you have HTTPS configured in your environment, you need to ensure that the correct DNS names (both alias and FQDN) were added when the SSL Certificate was issued.
Follow these steps to verify if the correct names were added:
1. Go to IIS, select WSUS Administration and click on Bindings
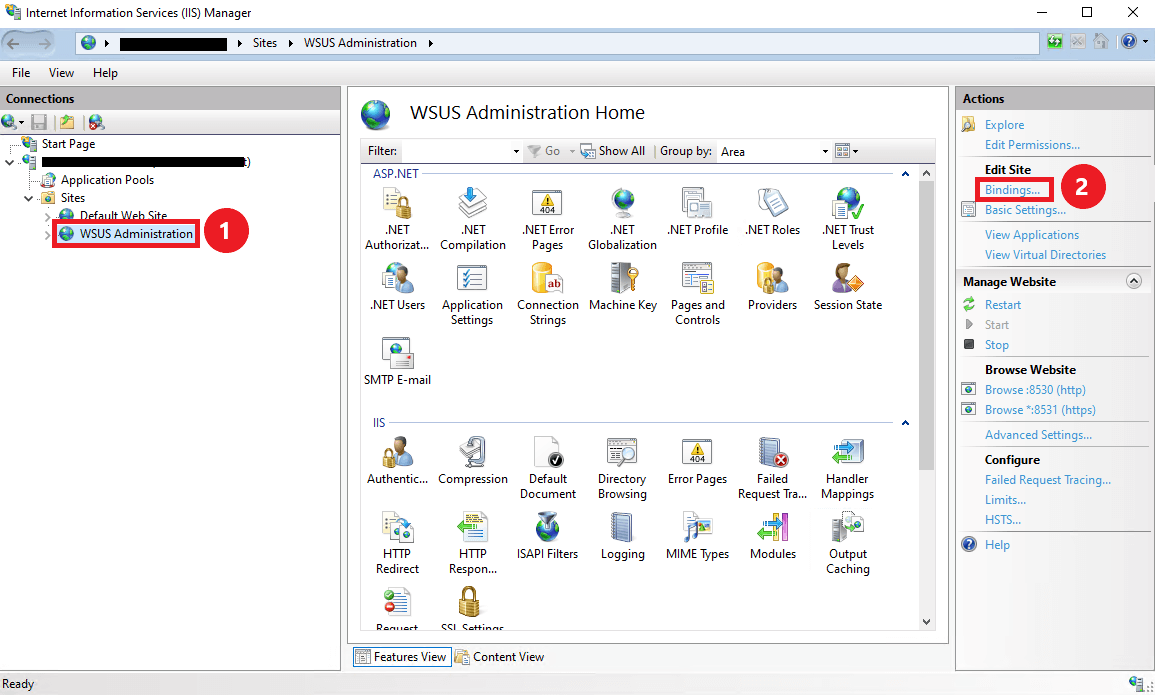
2. Select the https binding and choose Edit.
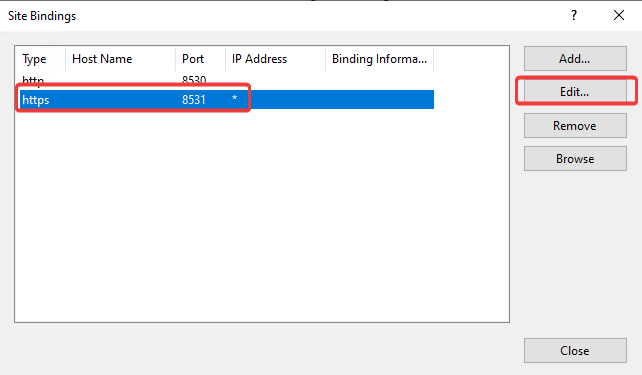
3. Next to your SSL Certificate, press the Vi ew button.
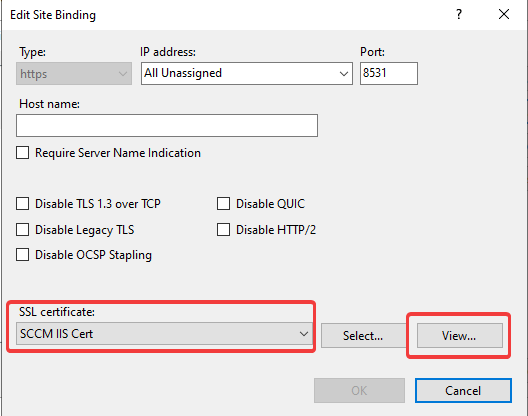
4. Go on the Details tab, and scroll down until you find the Subject Alternative Name. If you click on it, you should find 2 DNS entries, one for the Alias and one for the FQDN.
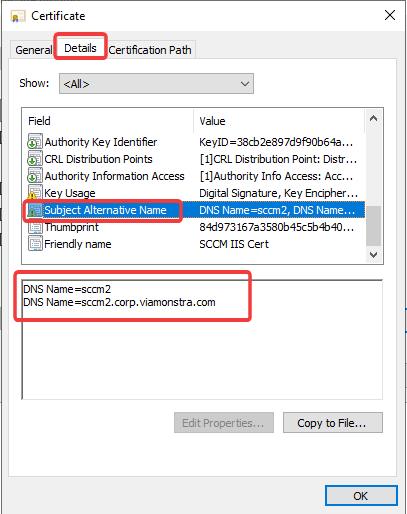
If the wrong names were added when the certificate was issued, you would have to request the certificate again, and this time add the correct DNS names.
You can follow this video guide we posted on our youtube channel for instructions.
Once the new SSL certificate is requested and added, you would have to use the wsusutil.exe command to configuressl again. This is also referenced in the video guide linked above.

Step 5: If you have HTTPS configured and you are using a DNS alias
If WSUS has HTTPS configured and:
- the hostname of the server is not in the certificate’s SAN, and
- there is a DNS record pointing to the WSUS server but it’s not the same address as the server’s AD hostname or FQDN
Then you will need to either:
- Revert the aliasing and issue a new certificate to the server’s AD hostname and FQDN, or…
- Configure a Service Principal so the alias can do kerberos authentication on behalf of the server
Read more about understanding if this is your scenario and details of the solutions here: Using DNS aliases with WSUS and third-party patching
Resolution for the Issues in Step 1 or Step 2 (Video Format)
The video guide goes into more detail about why the updates fail to publish to WSUS with the error “CreateDirectory failed” and the possible resolutions.
If this resolution doesn’t work for you, please use our technical support form here https://patchmypc.com/technical-support
