Microsoft’s current documentation lacks a comprehensive explanation of Enterprise Applications and App Registrations, making it challenging for newcomers to grasp their significance and effectively manage them from a security perspective.
This blog aims to bridge that gap by providing a clear understanding of what an App Registration and Enterprise Application is, empowering users to navigate security operations around app registrations and enterprise applications.
This blog has 7 parts:
Part 1: Understanding Enterprise Applications vs. App Registrations: Differentiating Key Concepts
Part 2: Create Your Own App & Application Registration
Part 3: Investigate Your First App Registration
Part 4: Permissions
Part 5: Register Your Enterprise Application in Another Tenant
Part 6 Security & Application Permissions
Part 7 Conclusion
Part 1: Understanding Enterprise Applications vs. App Registrations: Differentiating Key Concepts
An Enterprise Application acts as a “*linked instance” within your tenant, connected to an App Registration. This App Registration can exist either within your own tenant or in another tenant.
For instance, upon signing up at portal.patchmypc.com and receiving admin approval, an Enterprise Application is automatically created. This application is associated with an App Registration, which is situated in Patch My PC’s Azure tenant.
Let’s create your own Enterprise Application to deepen your comprehension of these concepts.
The term “The Linked Instance” was mentioned on a YouTube channel called BlueScreen Brothers, which you should really check out. Azure – App registration and Enterprise Applications – YouTube
Part 2: Create Your Own App & Application Registration
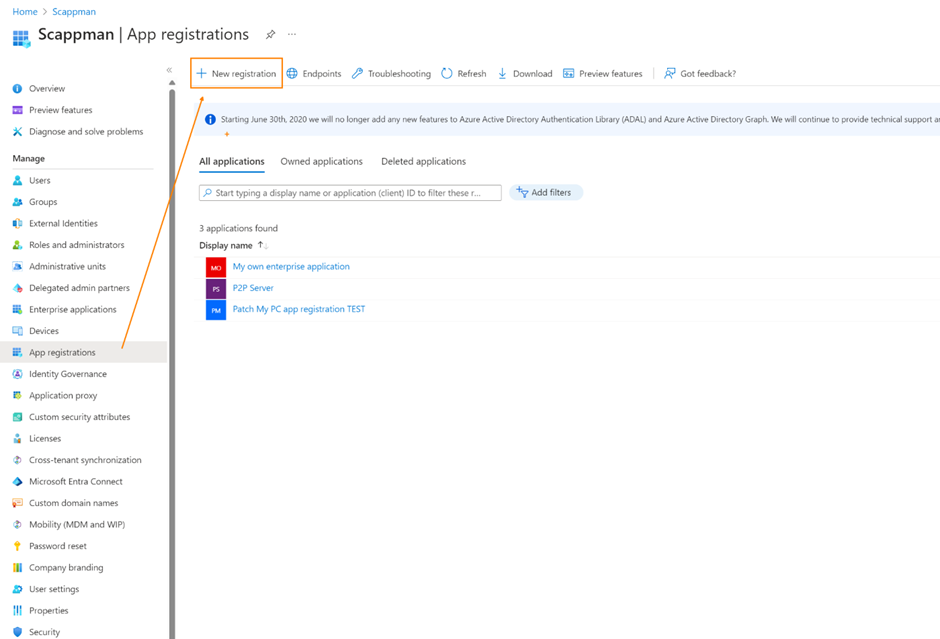
The first step we need to take is to create an App Registration in your Entra ID portal and make a new registration.
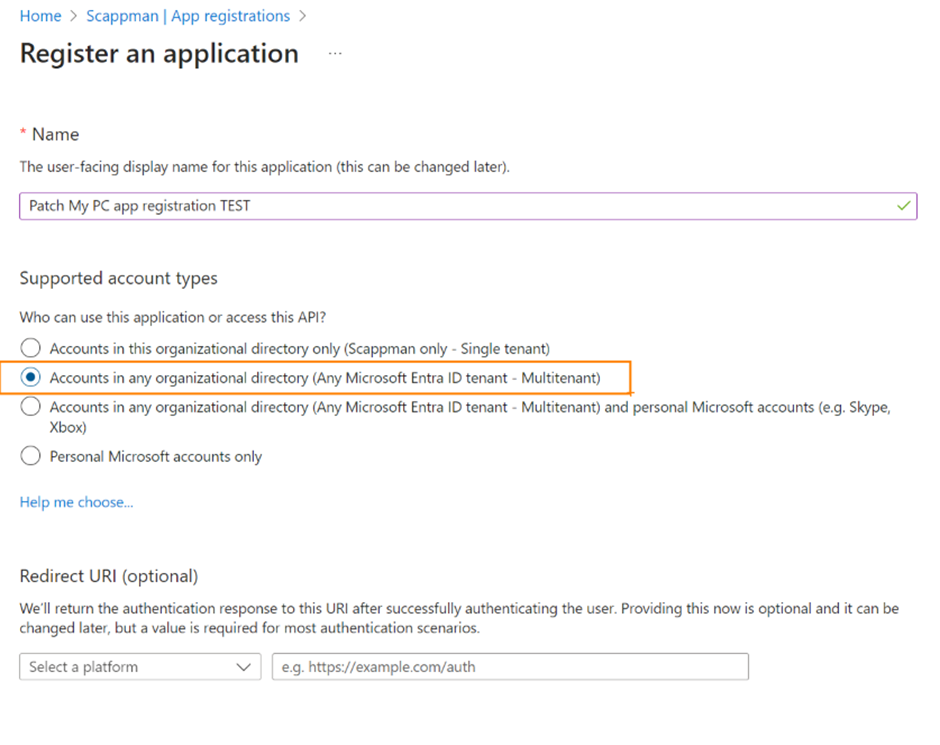
In this example, we opt for the “Accounts in any organizational directory” option, creating a Multi-Tenant App Registration. We kept the Redirect URI field empty for this demonstration.
That was straightforward and easy! You’ve successfully generated your own Multi-Tenant App Registration. Now, let’s delve deeper into specific details.
Part 3: Investigate your first app registration
Let’s look at the overview page of your app registration. Note the Application (client) ID.
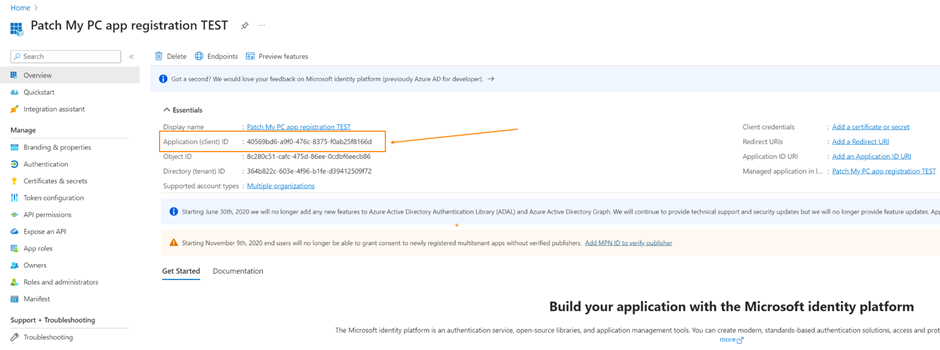
Now comes the surprise. By registering the App Registration, an Enterprise Application was also automatically created.
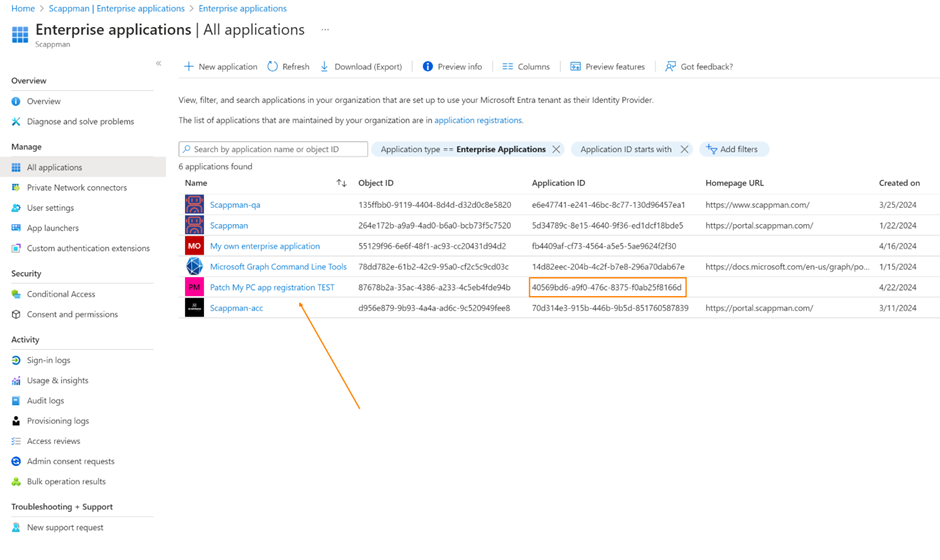
Please note that the Enterprise Application shares the same Application ID as your app registration – in this case, 40569bd6-a9f0-476c-8375-f0ab25f8166d. Now, your Enterprise Application is linked to an App Registration, whether it’s within the same tenant or a different one.
Personally, I find the term “Enterprise Azure Application” confusing. I prefer to describe it as a linked instance within your tenant that connects to an App Registration.
Part 4: Permissions
Understanding API Permissions is crucial, as it sheds light on the security implications of App Registrations and Enterprise Applications.
Now, let’s dive into configuring permissions for our application. Since an Enterprise Application is tied to the core App Registration in your tenant, where should we begin to set up our permissions? Naturally, it’s the App Registration!
Let’s configure permissions specifically for Microsoft Graph:
Navigate to your App Registration once more.
Click on “Add a permission”.
Choose “Microsoft Graph”.

There are two API permissions to choose from.

Delegated permissions
Application permissions
Delegated permissions need the user rights to function. The rights of the signed in user will be used. If the user does not have enough rights, the app will not have access. If the user has enough rights and is logged in, the app will have access on behalf of the user.
Application permissions you give the rights to the service itself. There is no user interaction.
Let’s choose some simple delegated permissions: Email, OpenID, Profile.
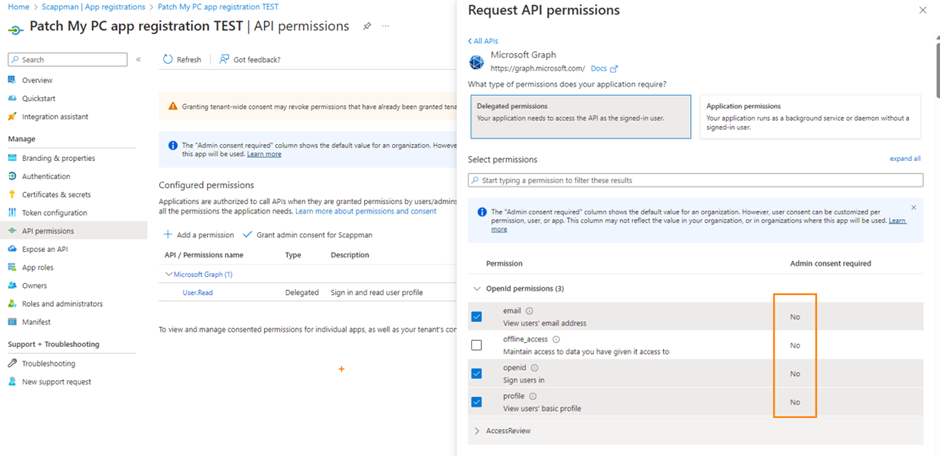
Notice the right column Admin Consent Required. That means that a user who is not an admin can grant consent for the app. These are considered safe permissions that a regular user can consent to.
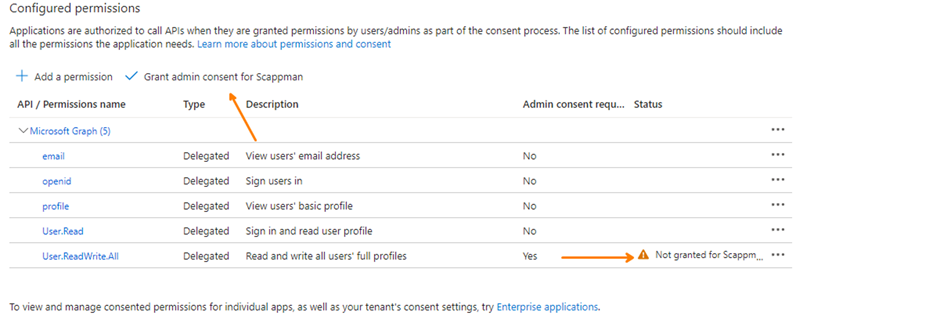
Let’s create a permission that now needs administrator access: User.ReadWrite.All.

I can already approve the consent for this tenant within the App Registration. We don’t need to do that in this example. We are going to link from another tenant to the App Registration.
Part 5: Register your enterprise application in another tenant.
The first set now is to generate a consent URL that we can use in another tenant.
We need the app ID and must use the value “organizations.” More info is here on Microsoft Learn.

The URL must be formatted like this: https://login.microsoftonline.com/{organization}/adminconsent?client_id={client-id}
We change {organization} to organizations (to make it multi tenant) and {client-id} to your application (client) ID.
Which gives you an end result of:
Copy paste the URL in your browser with a web account profile from another tenant, and let’s see what happens.

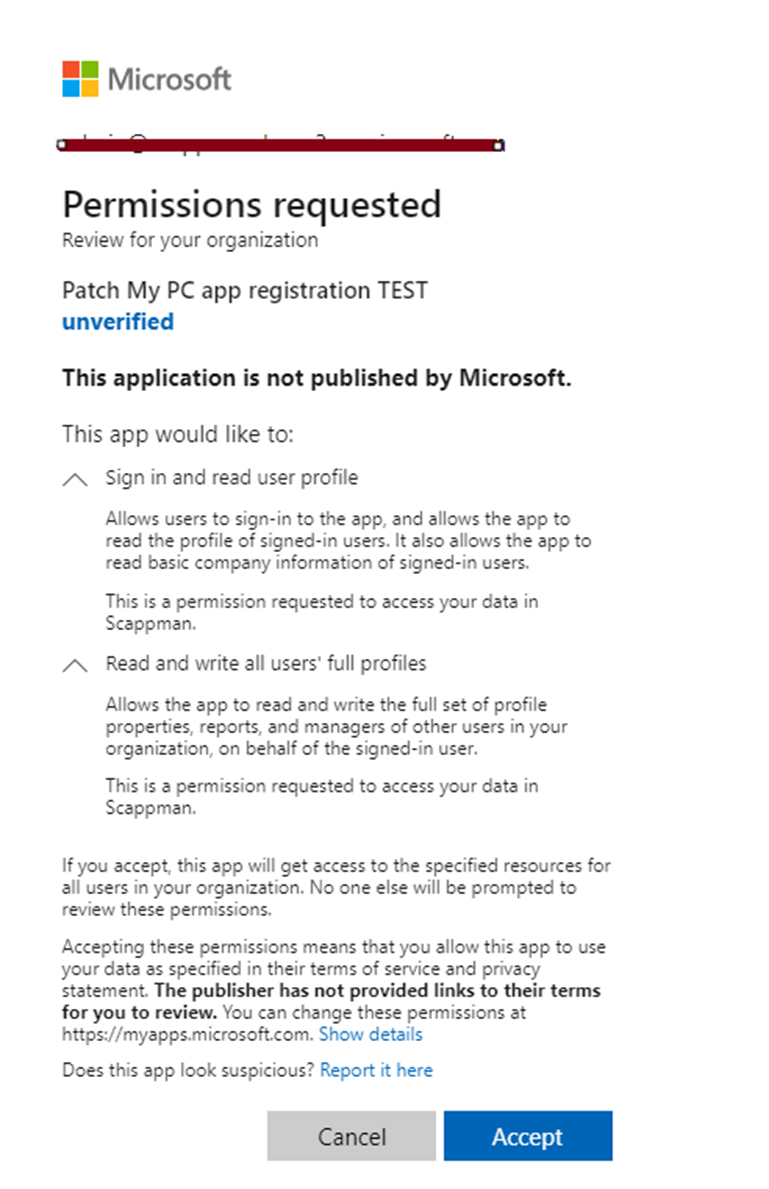
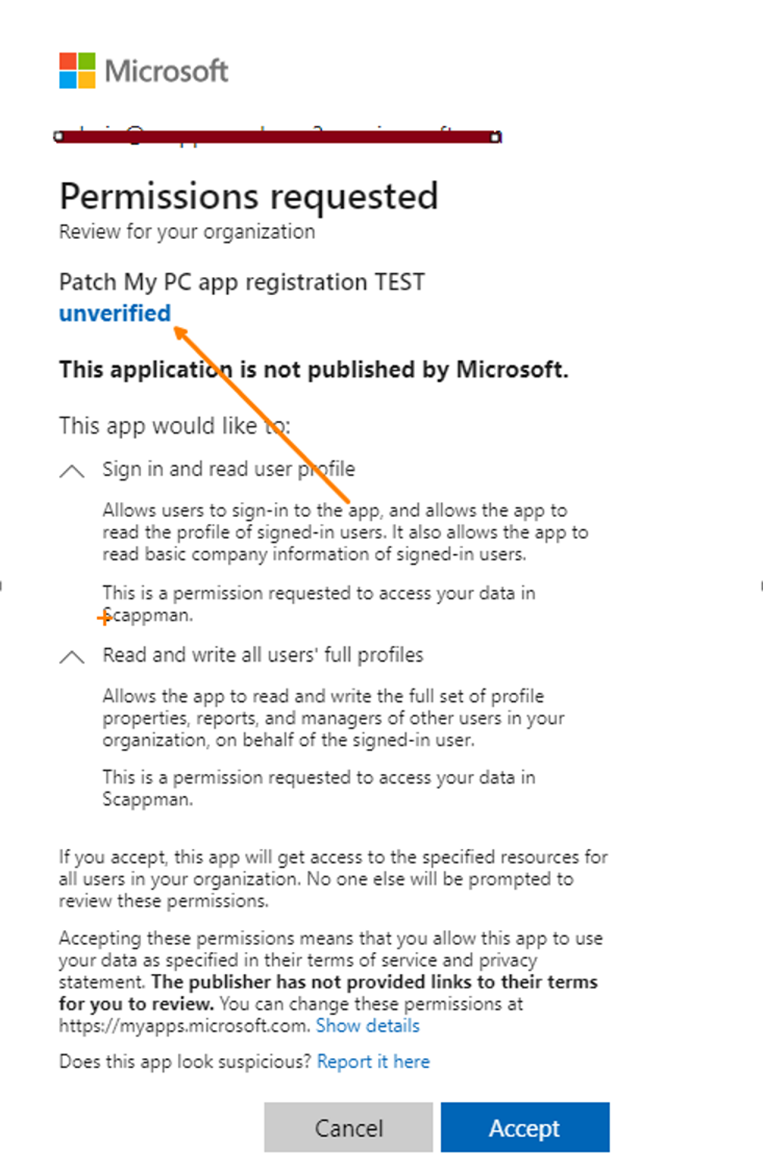
Let’s try to accept with a non-admin user. We get a permission request that’s getting refused because we use delegated rights and we demand an API permission “User.Readwrite.All” that needs admin rights.
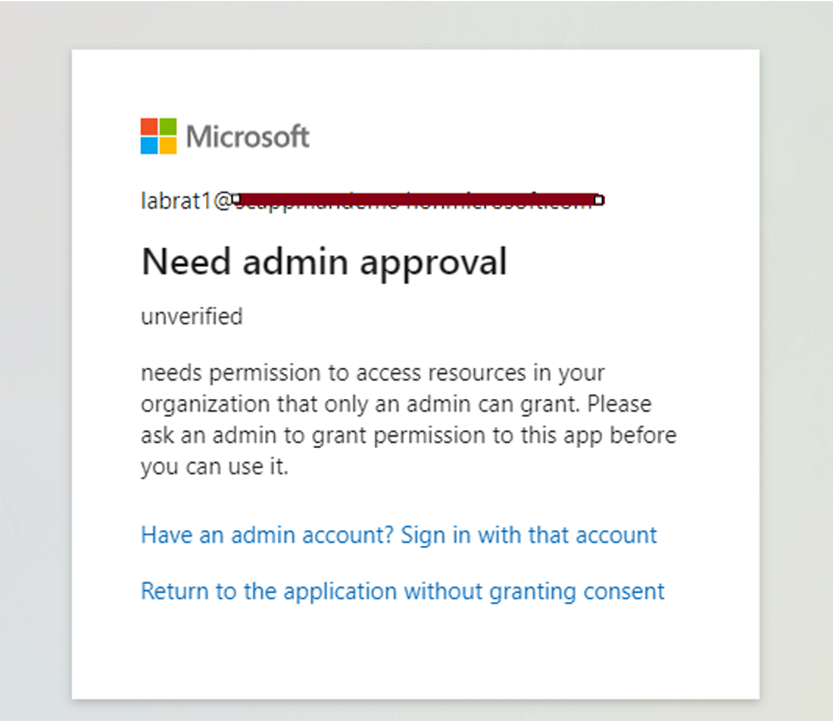
If we switch over to an admin user. We will see now API permissions that we can approve. Let’s click accept.
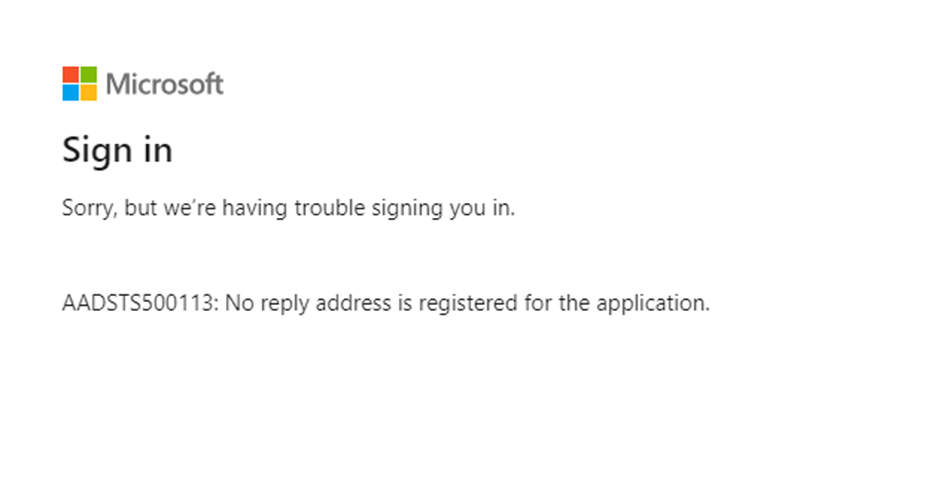
After clicking accept you will see an error because we don’t have a reply url accepted. You can ignore this.
If we go look in our Entra ID environment in our other tenant we will see that we created an Enterprise Application with the same Application ID 40569bd6-a9f0-476c-8375-f0ab25f8166d as our App Registration from the source tenant.

We’ve just established a Service Principal in the alternate tenant. Much like a regular user, a Service Principal possesses specific permissions within your tenant. Thus, instead of crafting a user principal, we’ve generated a service principal; your enterprise application is working as a service principal in the other tenant.
Part 6 Security & Application Permissions
We need to address security concerns because consenting to unverified application API permissions poses real risks. This practice opens avenues for potential phishing attacks to extract external user data or even request global admin access to another tenant.
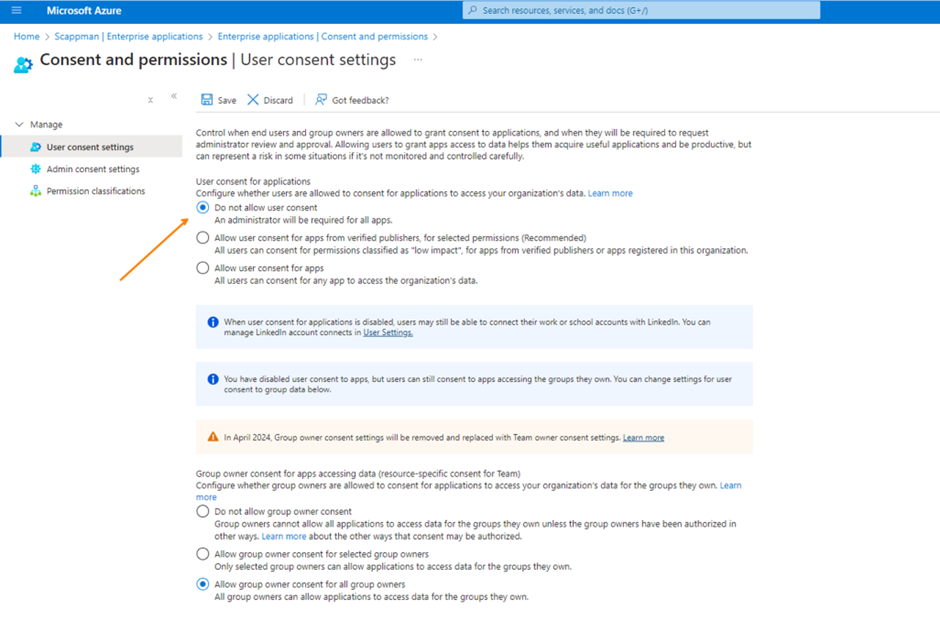
I strongly advise reviewing the consent and permissions page for Enterprise Applications and prohibiting user consent for apps altogether!
When you adjust your enterprise registration in your source tenant to incorporate an application permission rather than a delegated permission for read and write access to all applications in your Intune tenant, additional cautionary notifications will surface. This app registration empowers an external service principal to establish an automated service with the capability to add and remove applications within your tenant. Since it’s not a delegated permission, user login isn’t even required.
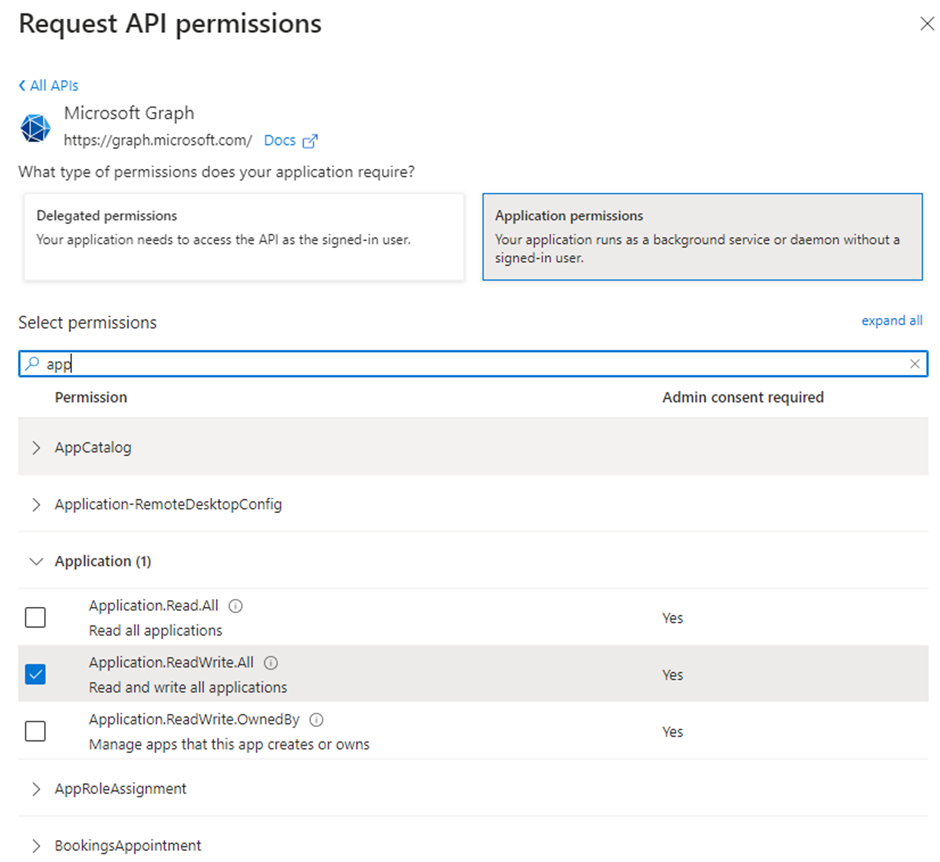
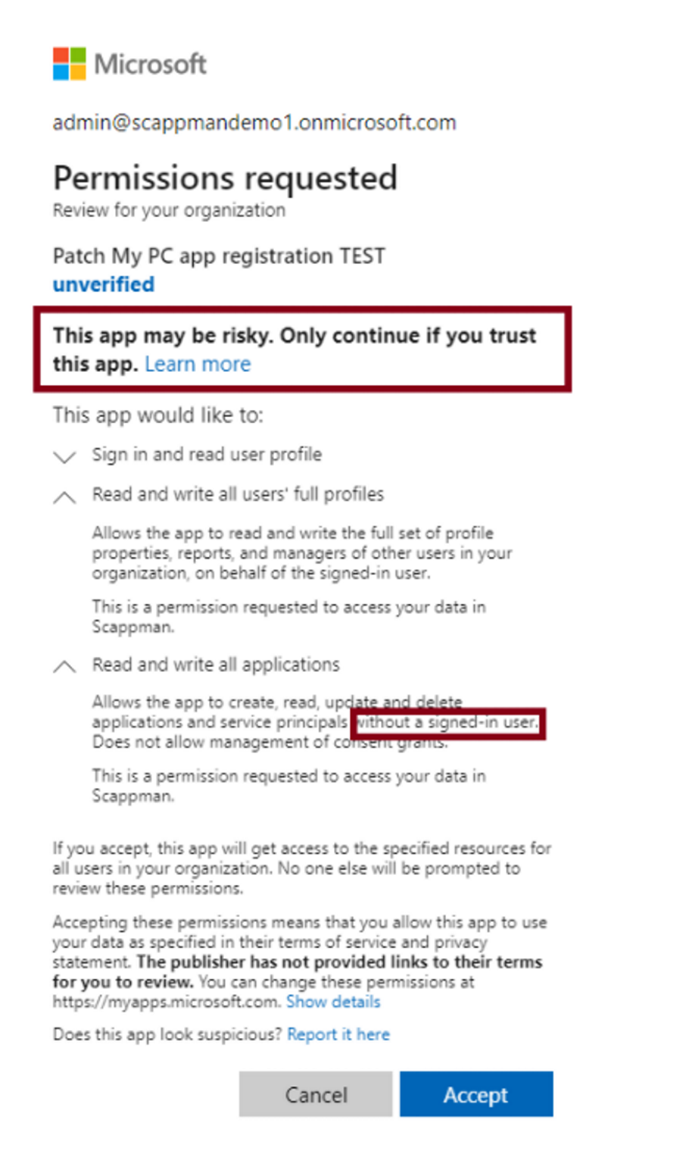
You’d likely agree that it’s crucial to monitor the permissions granted to service principals within your tenant carefully!
Part 7 Conclusion
After reading this blog, I hope you now have a better understanding of the difference between an App Registration and an Enterprise Application. To give you a brief summary:
App Registration is the global definition and configuration of an application.
Enterprise Application is a local instance of the app registration (linked instance) within a specific tenant, used to manage and enforce permissions and policies for that tenant.
To finish the blog, being mindful of granting API permissions is vital due to potential security risks like data exposure and external service principal access. Regularly reviewing and managing permissions with Enterprise Applications is critical to maintaining security.
Feel free to read this article below how Patch My PC is also using an App Registration to integrate the Patch My PC Publisher with your Intune tenant
Azure App Registration | Getting Started (patchmypc.com)
