HomeKnowledge BaseHow to package Microsoft 365 Apps as a Custom AppHow to package Microsoft 365 Apps as a C…
How to package Microsoft 365 Apps as a Custom App
In this article, we walk through how to prepare a Microsoft 365 Apps package for use with the Patch My PC Custom Apps feature.
Microsoft 365 Apps uses a Click to Run installation model that allows you to control update channels, application selection, architecture, language packs, and update behavior. This flexibility provides strong control over how Microsoft 365 Apps is deployed in your environment. It also means that packaging Microsoft 365 Apps requires careful planning, especially when defining configuration XML settings, update strategy, and installation source options.
For detailed guidance on customizing Microsoft 365 Apps installation settings, including supported configuration XML options and command line parameters, refer to the Microsoft documentation for the Office Deployment Tool at https://learn.microsoft.com/deployoffice/overview-office-deployment-tool.
Because there are many configuration combinations available, Patch My PC support is unable to provide assistance with designing or troubleshooting highly customized Microsoft 365 Apps configurations.
View the supporting video on our Learning Hub.
Challenges of Manually Packaging Microsoft 365 Apps for Deployment
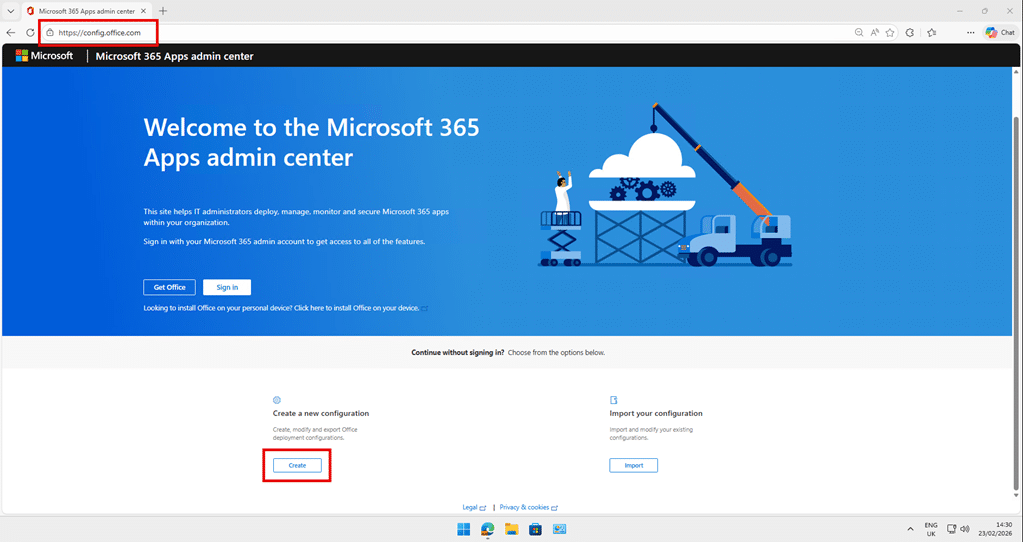
Packaging Microsoft 365 Apps for deployment begins at https://config.office.com, where administrators generate a configuration XML file that defines products, architecture, update channels, languages, and installation behavior.
Once the XML is created, the Office Deployment Tool stub installer is downloaded and combined with the configuration file to build a Win32 application for Intune.
While this process is simple and repeatable, it does not provide a consistent packaging framework. Administrators must manually assemble source files, structure content and manually define install and uninstall commands. Small errors in the XML configuration, command line usage, or content structure can lead to failed installations or unexpected behavior.
Detection logic is another common challenge. Reliable detection often requires custom scripts or registry based logic to accurately validate product versions, architecture, and update channel alignment. Inconsistent or overly simple detection rules can result in false positives or repeated installations.
The process also lacks standardized metadata. Application descriptions, naming conventions, version tracking, and documentation notes are typically entered manually. This creates variability across environments and increases the risk of incomplete or unclear application records.
In short, building Microsoft 365 Apps deployment packages manually can become time consuming and error prone. Without a repeatable and validated approach, organizations may spend significant time troubleshooting packaging inconsistencies, configuration mistakes, or detection failures.
Microsoft 365 Apps Package Structure
A typical M365 Apps package consists of the configuration XML, the Office Deployment Tool setup executable, install/uninstall commands, and a detection method that accurately validates the installed product. In addition, consistent naming, versioning, and descriptive metadata are required to ensure clarity within the Custom App catalog.
The Office Deployment Tool executable is the installation engine used to process the configuration XML. This executable is responsible for downloading and installing Microsoft 365 Apps according to the parameters defined in the XML file.
The setup.exe executable extracted from this package must be included with the application source files and is typically referenced in the install and command line.
Note: It is recommended to download the latest version of the Office Deployment Tool each time you create or update your package. Microsoft regularly releases fixes and enhancements, and using the most recent version helps ensure reliability and supportability.
Configuration.xml
The configuration XML file is generated at https://config.office.com and defines the desired Microsoft 365 Apps deployment settings.
This file specifies the selected products, architecture, update channel, language packs, excluded applications, and update behavior. The configuration XML directly controls how Microsoft 365 Apps is installed and updated on client devices. Careful validation of these settings is required prior to packaging.
Detection Method
A Win32 application requires a reliable detection method to determine whether Microsoft 365 Apps is installed.
Detection can be challenging due to variations in update channels, architecture, language packs, and versioning. When deploying the latest available version, the exact build number may not be known at packaging time. In these scenarios, detection logic often relies on registry keys or product identifiers rather than specific display versions.
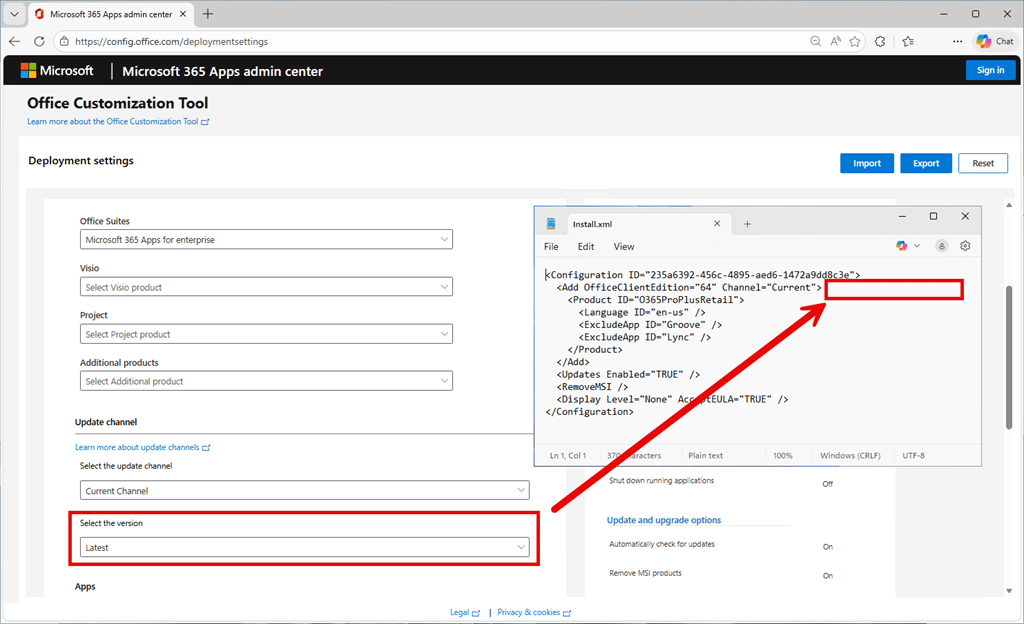
Important note on Version
If the Office configuration XML does not include a specific Version attribute within the Add element, this indicates that the Latest version was selected in the deployment wizard at https://config.office.com.
When Latest is selected, no explicit version is written into the XML. The Office Deployment Tool will install the most current build available for the specified update channel at the time of installation.
Metadata
Accurate and consistent metadata is key to building a high quality M365 Apps packae.
This includes the application name, description, version, publisher information, privacy URL, information URL, ARP display name, and internal notes. Metadata should clearly identify included products such as Visio or Project, as well as any additional language packs or proofing tools. Well defined metadata helps administrators quickly understand the exact Microsoft 365 Apps configuration deployed to devices.
Icon
A clear and recognizable icon improves visibility in the Company Portal and helps end users identify the Microsoft 365 Apps deployment.
Office Data Files
Microsoft 365 Apps can be deployed using either online or offline installation methods.
By default, the Office Deployment Tool streams installation content directly from the Microsoft content delivery network at installation time. This approach keeps the application package lightweight and reduces storage requirements within the Custom App.
Optionally, Office data files can be downloaded and packaged with the application source. This ensures that all required installation content is available locally in the IMECache folder and does not rely on the Office CDN during installation.
Including Office data files significantly increases the package size, typically by approximately 4 GB or more depending on selected products and languages. This increases upload time, storage consumption, and content distribution overhead.
In environments where offline content is required during installation, it may be prudent to compress the Office data files and use a pre-installation script to extract the content to the appropriate directory before executing setup.exe. This approach reduces the uploaded package size and number of additional files while still enabling a fully offline installation experience.
Ongoing Maintenance and Updates
Microsoft 365 Apps is a continuously serviced product. When packaging it as a Custom App, administrators must plan for ongoing maintenance.
If your configuration XML defines a specific Version, that version will age over time. Detection logic based on a fixed build number will eventually require package updates or revisions.
Even when using Latest in the configuration XML, organizations should periodically review:
Update channel alignment
Architecture consistency
Language selections
Detection logic accuracy
Microsoft recommends managing update channels and servicing behavior centrally through the Microsoft 365 Apps admin portal at https://config.office.com.
There are two primary approaches to preparing and deploying Microsoft 365 Apps as a Patch My PC Custom App.
Simple Method This method focuses on manually preparing the package and using the collected information to create and configure the Custom App.
Advanced Method This method uses a Patch My PC helper script to analyze your Office configuration XML and generate the required M365 package files and metadata automatically.
The Advanced Method removes all of the manual discovery work and is intended for administrators who are comfortable with Win32 app packaging, scripting, and deployment concepts. It improves consistency and typically provides more accurate detection logic by identifying and enforcing the specific Office version associated with the selected update channel defined in the configuration XML.
Simple Method: Manually Prepare an Office Package
This method provides full control over how Microsoft 365 Apps is packaged for use as a Patch My PC Custom App. It is best suited for administrators who require complete customization of install behavior, detection logic, metadata, and content structure.
While the overall process is straightforward, it requires the most discovery and validation work. Careful attention to configuration detail, including versioning, detection logic, and uninstall behavior, is critical to ensure a successful and reliable package.
Unlike the automated approach in Advanced Method, this method requires you to manually:
Prepare installation source files
Define install and uninstall commands
Validate detection logic
Confirm version and Apps & Features naming
Configure application metadata
While this approach offers maximum flexibility, it also introduces more opportunities for configuration errors. Careful validation and testing are strongly recommended before deployment.
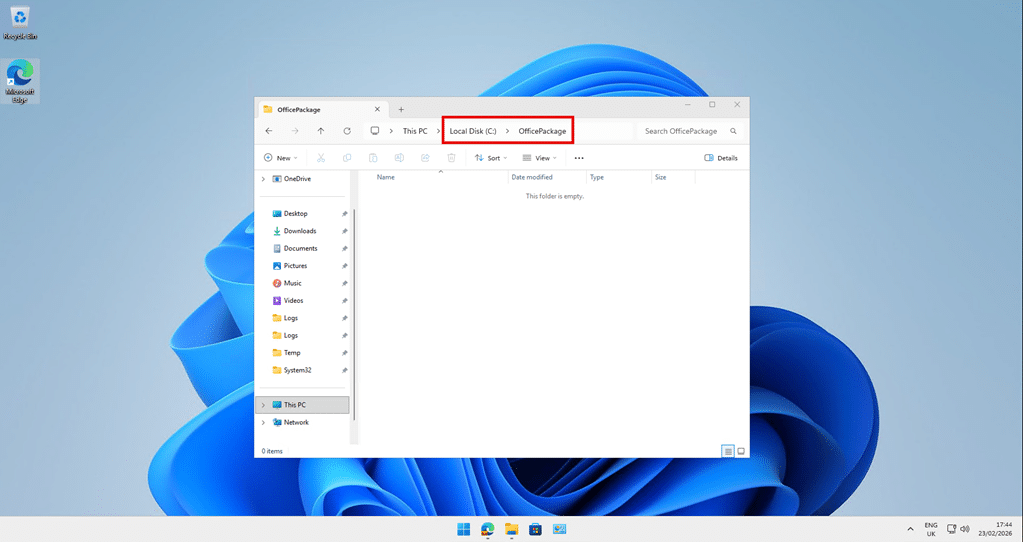
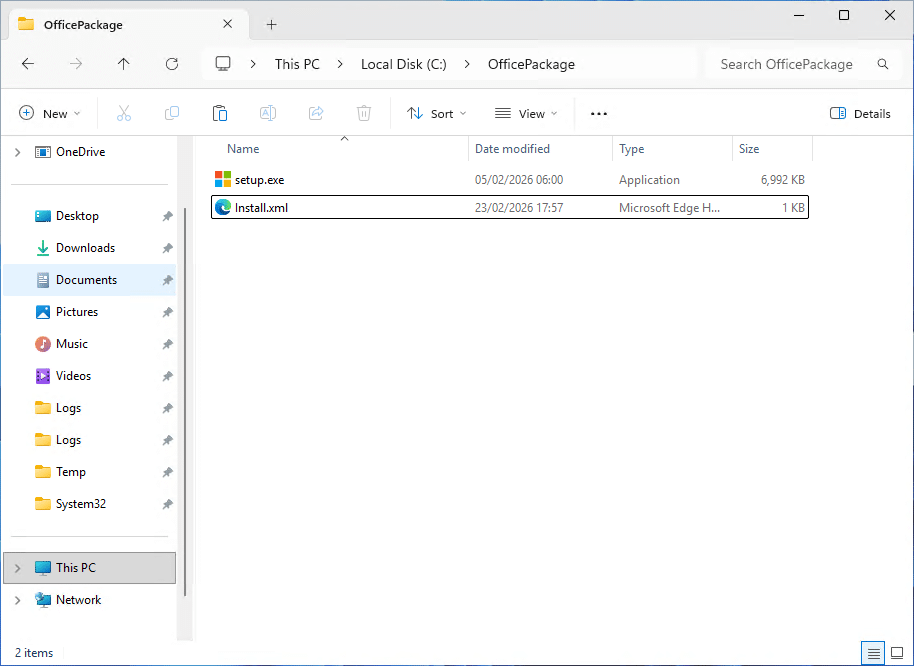
Step 1. Prepare the Package Folder
Create a dedicated source folder where the necessary files required for the Custom App can be stored. In this example, we uses C:\OfficePackage
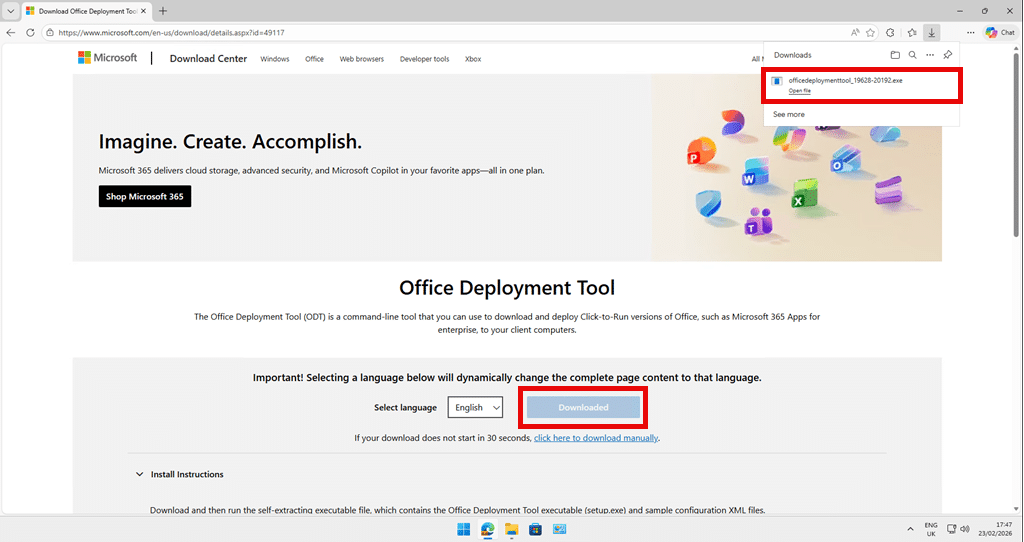
Step 2. Download and extract the Office Deployment Tool
Select the required products, architecture, update channel, languages, and application preferences.
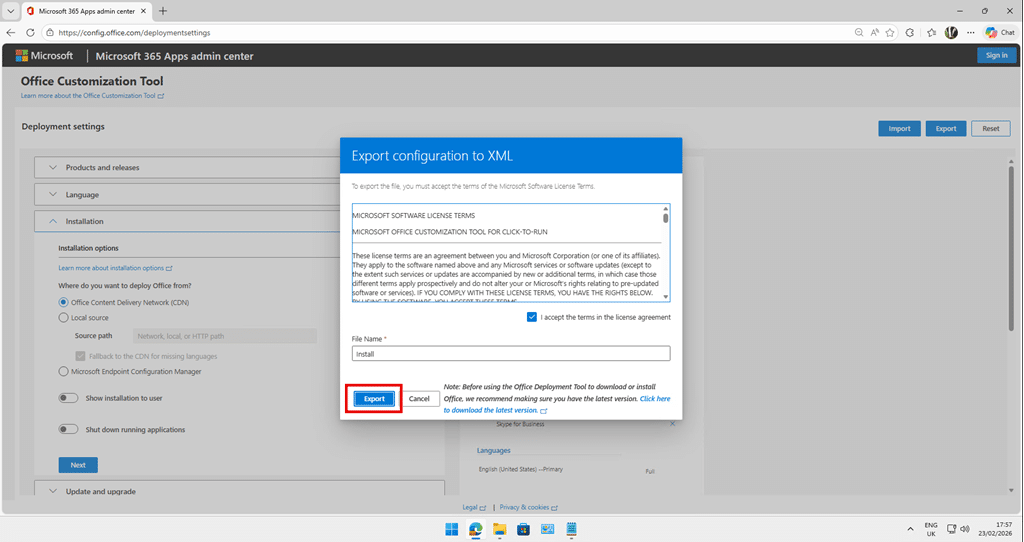
Export the configuration file and save it to your source folder, created in Step 1, as install.xml.
If you already have an existing configuration XML file, copy it into your source folder and rename it to Install.xml to maintain consistent command line references during packaging.
Step 4. Perform a Test Installation to Identify the ARP Display Name
When deploying the Latest version of Microsoft 365 Apps, version based detection cannot be used because the exact build number is not known at packaging time. In this scenario, detection must rely on the Installed Apps name.
Because the DisplayName can vary depending on selected products, architecture, and language, it is important to perform a test installation to determine the exact uninstall entry that will be created.
It is recommended to use a test virtual machine or Windows Sandbox to perform this validation. This ensures a clean environment and prevents conflicts with existing Office installations.
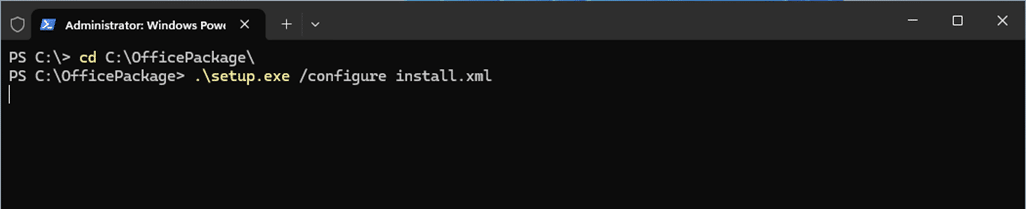
Open Windows Terminal as Administrator.
Change directory to the folder created in Step1, containing setup.exe and Install.xml.
Run the installation command:
cd C:\OfficePackage
.\setup.exe /configure Install.xml
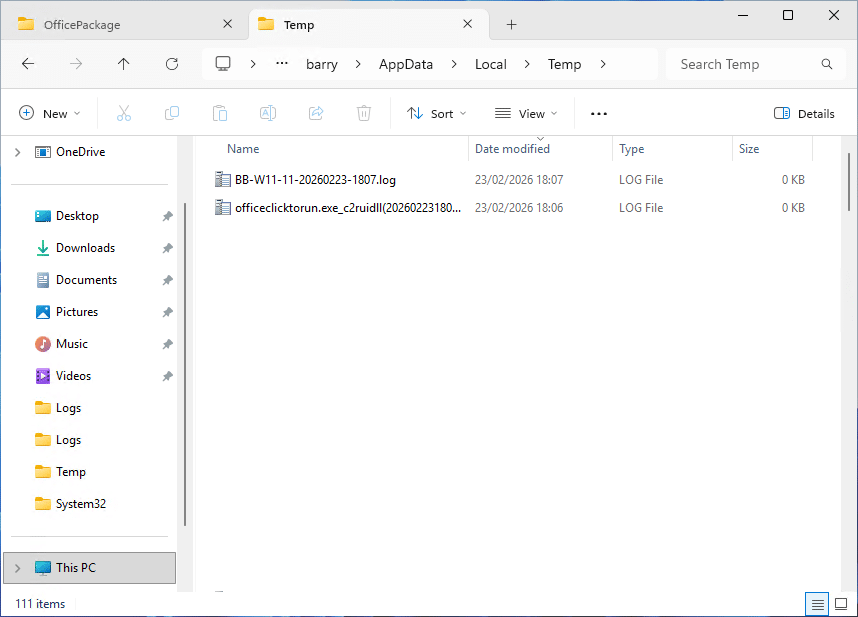
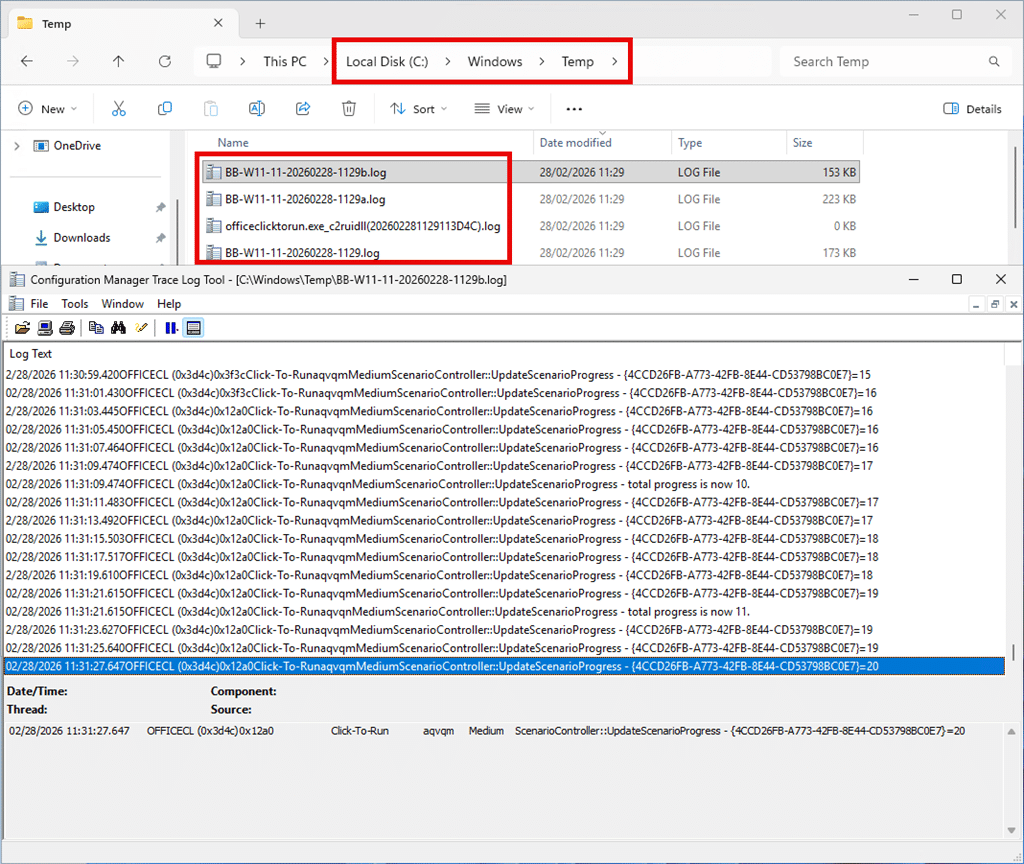
Log files are generated in the %temp% directory during installation which is useful for monitoring the installation and/or troubleshooting.
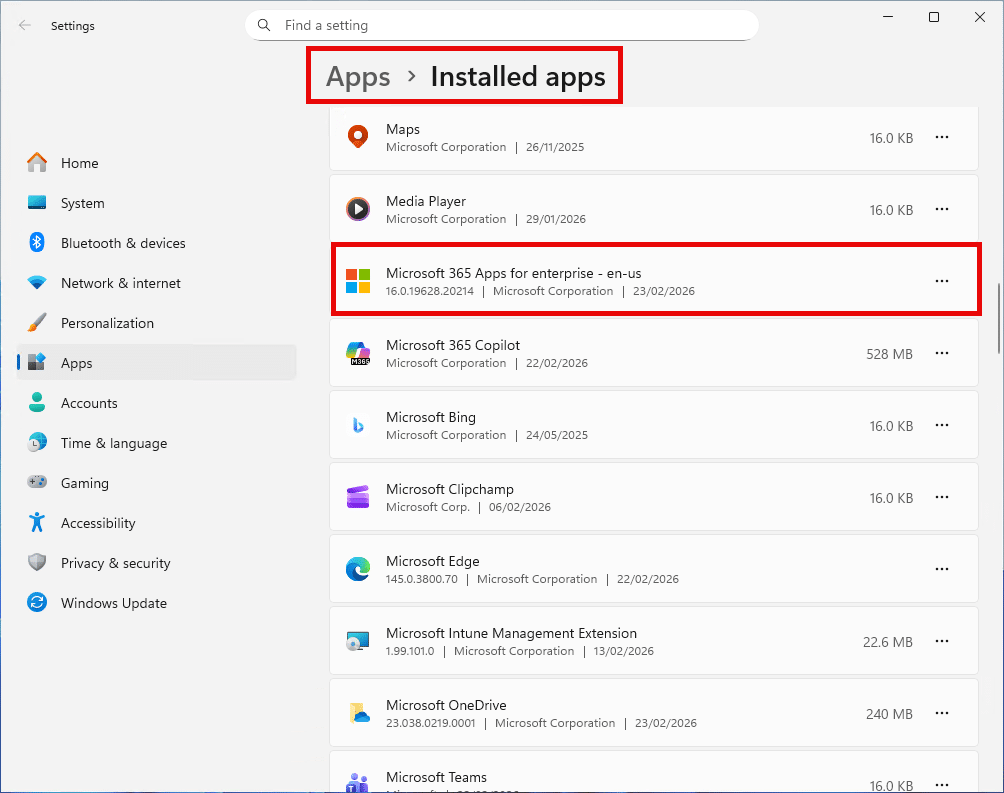
After installation completes, open the Installed apps page in the Windows Settings app.
Locate the Microsoft 365 Apps entry and record the exact application name and version as displayed.
Step 5. Create an Uninstall XML from the Install XML
When packaging Microsoft 365 Apps with the Office Deployment Tool, administrators typically begin by generating an install XML from https://config.office.com.
What is often overlooked is that the uninstall XML must be created separately. The uninstall configuration is not automatically generated and must be manually derived from the install XML.
Creating a separate uninstall XML is not strictly required. Customers can rely on the built in uninstall method of the Patch My PC ScriptRunner. This method removes software based on the Apps and Features name and version criteria defined in the Custom App configuration.
However, Microsoft 365 Apps installations often register multiple entries in Apps and Features. This can occur when multiple products, language packs, or proofing tools are installed. As a result, several uninstall entries may exist under the uninstall registry path.
When using name and version based removal only, the uninstall process may target a single matching entry rather than removing all Office components installed by the original configuration XML.
If the intent is to fully remove everything deployed by the install.xml, it is recommended to use a dedicated uninstall XML with setup.exe for the uninstall command. While this introduces slightly more complexity, it ensures that all defined Product IDs and associated languages are cleanly and consistently removed.
There are 2 methods to create an Uninstall XML. Manually or with a helper PowerShell function.
Option 1: Manually create an Uninstall XML
To manually create an Uninstall XML:
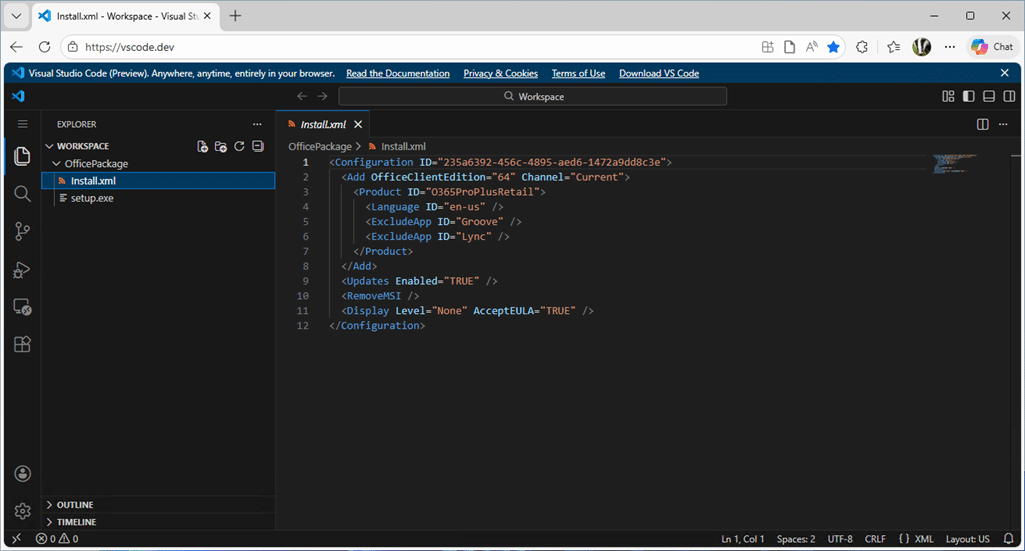
Open Install.xml in a text editor. You can use Visual Studio Code locally, or simply open https://vscode.dev in your browser and load the file there. The built in formatting makes it easier to clearly see the XML structure and modify it correctly.
Save a copy of the file as Uninstall.xml in the same folder as Install.xml.
Replace the <Add> Element with <Remove>
Delete all attributes from the Add element such as:
OfficeClientEdition
Channel
Version
Remove Installation Only Elements such as:
<ExcludeApp>
<Updates>
<RemoveMSI>
Keep silent display settings such as:
<Display Level="None" AcceptEULA="TRUE"/>
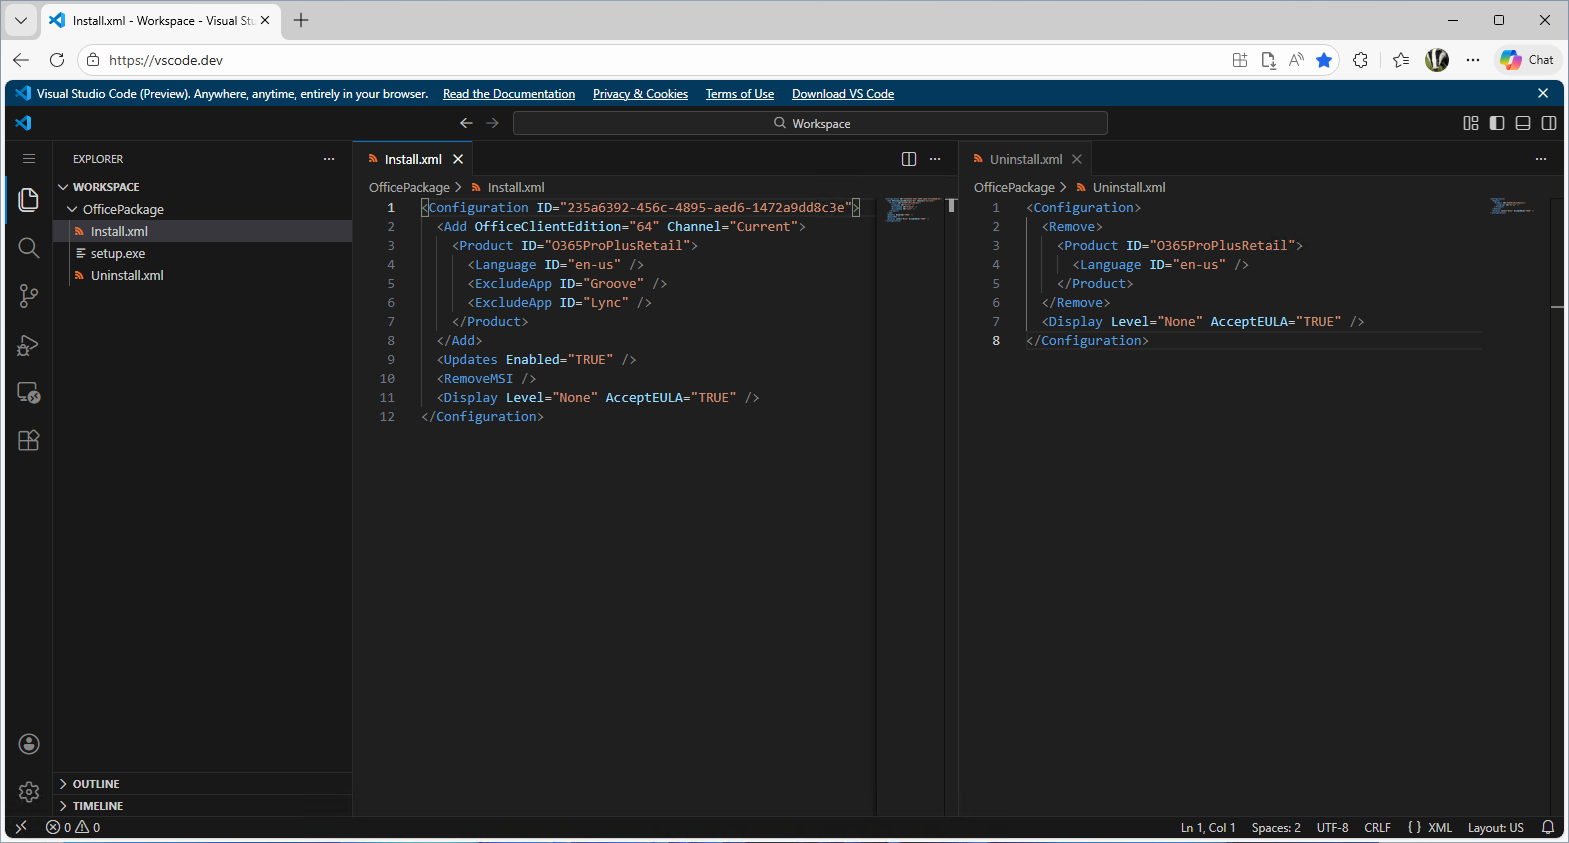
Regardless of the original complexity of the install XML, the final uninstall XML should be simplified to something like this structure:
The example below shows an Uninstall.xml manually generated from an existing Install.xml.
Option 2: Create an Uninstall XML using a helper PowerShell function
You can use the following helper function in PowerShell to automatically generate the uninstall XML based on the criteria found in the install XML. To generate the uninstall XML:
Open Windows Terminal or PowerShell
Copy and past the function below into the terminal window and press enter.
function New-OfficeUninstallXml {
    param(
        [Parameter(Mandatory = $true)]
        [ValidateScript({ Test-Path $_ -PathType Leaf })]
        [string]$InstallXML,
        [Parameter(Mandatory = $true)]
        [string]$OutputPath
    )

    try {
        Write-Host ("Creating Office uninstall XML from source: {0}" -f $InstallXML) -ForegroundColor Green

        # Load source XML
        [xml]$sourceXml = Get-Content -Path $InstallXML -Raw

        $addNode = $sourceXml.Configuration.Add
        if (-not $addNode) {
            Write-Host ("Uninstall XML generation skipped: source XML contains no Add node") -ForegroundColor Yellow
            return $null
        }

        $productNodes = @($addNode.Product) | Where-Object { $_ }
        if (-not $productNodes -or $productNodes.Count -eq 0) {
            Write-Host ("Uninstall XML generation skipped: no products found in source XML") -ForegroundColor Yellow
            return $null
        }

        # Build a fresh XML document to avoid string-casting issues
        $doc = New-Object System.Xml.XmlDocument
        $xmlDecl = $doc.CreateXmlDeclaration("1.0", "UTF-8", $null)
        $doc.AppendChild($xmlDecl) | Out-Null

        $root = $doc.CreateElement("Configuration")
        $doc.AppendChild($root) | Out-Null

        # Create Remove node populated from source products/languages
        $removeNode = $doc.CreateElement("Remove")

        foreach ($product in $productNodes) {
            $productElement = $doc.CreateElement("Product")
            if ($product.ID) {
                $productElement.SetAttribute("ID", $product.ID)
            }

            $languages = @($product.Language) | Where-Object { $_ }
            foreach ($lang in $languages) {
                if ($lang.ID -and $lang.ID -ne "MatchPreviousMSI") {
                    $langElement = $doc.CreateElement("Language")
                    $langElement.SetAttribute("ID", $lang.ID)
                    $productElement.AppendChild($langElement) | Out-Null
                }
            }

            $removeNode.AppendChild($productElement) | Out-Null
        }

        $root.AppendChild($removeNode) | Out-Null

        # Add silent display settings (match sample UX/EULA)
        $displayNode = $doc.CreateElement("Display")
        $displayNode.SetAttribute("Level", "None")
        $displayNode.SetAttribute("AcceptEULA", "TRUE")
        $root.AppendChild($displayNode) | Out-Null

        # Save uninstall XML
        $uninstallFileName = if ($script:DefaultUninstallConfigName) { $script:DefaultUninstallConfigName } else { "Uninstall.xml" }
        $uninstallXmlPath = Join-Path $OutputPath $uninstallFileName
        $doc.Save($uninstallXmlPath)

        return $uninstallFileName
    }
    catch {
        Write-Host ("Failed to create Office uninstall XML: {0}" -f $_.Exception.Message) -ForegroundColor Yellow
        return $null
    }
}
In the same console window, execute the function to create an uninstall XML by running the following command, using the path for the Office Package as the OutputPath:
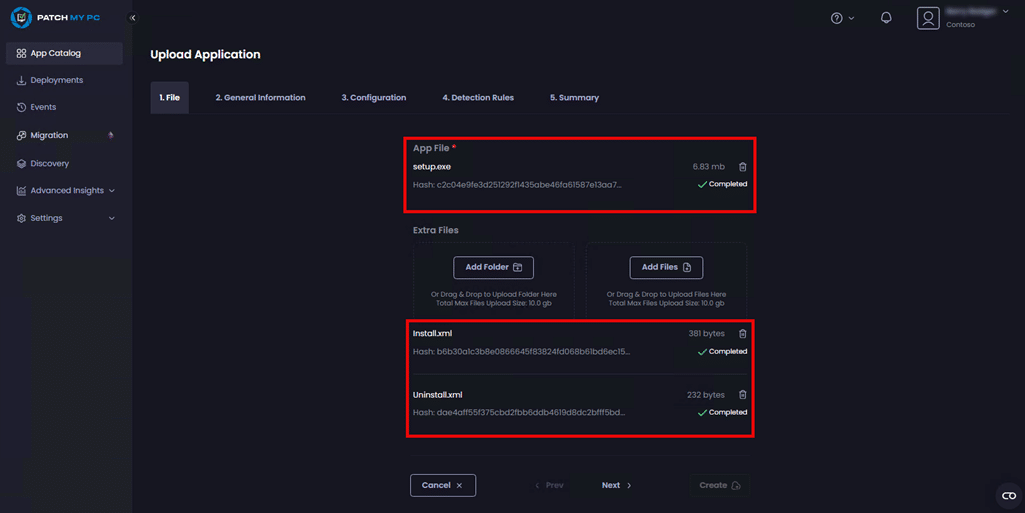
Add setup.exe as the Primary Install File and both install.xml and uninstall.xml as Extra Files.
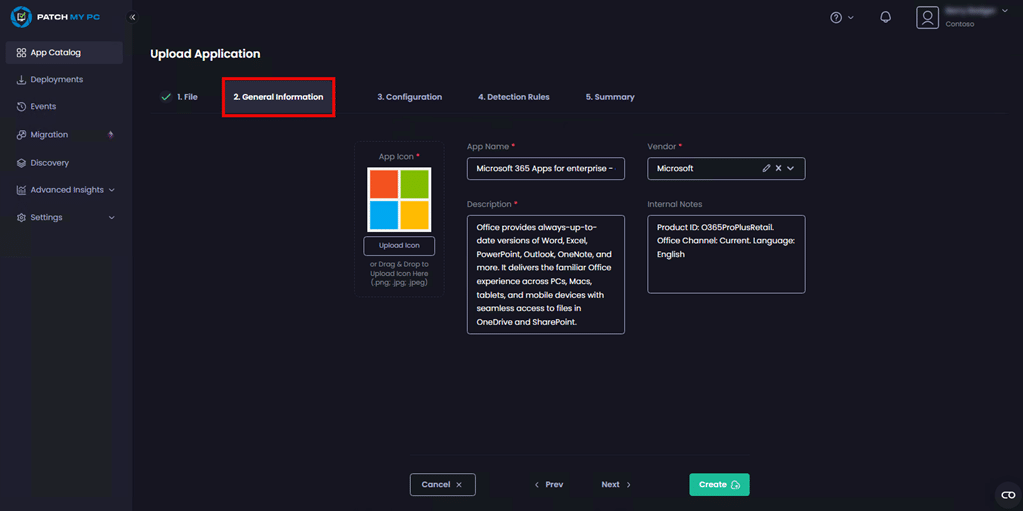
Step 7: Configure General Information
On the General Information tab, configure the following items:
Field
Value
App Icon
Upload a 512 × 512 px logo (PNG, JPG, or BMP format) for Microsoft 365 Apps
App name
Use the value obtained in step Method 1a (Step 4) Example: Microsoft 365 Apps for enterprise - en-us
Vendor
Microsoft
Description
Provide a description of the M365 Apps. Example: Office provides always-up-to-date versions of Word, Excel, PowerPoint, Outlook, OneNote, and more. It delivers the familiar Office experience across PCs, Macs, tablets, and mobile devices with seamless access to files in OneDrive and SharePoint.
Internal Notes
Add a note that indicates to the administrator an overview of this Office configuration based on Install.xml. Example: Product ID: O365ProPlusRetail. Office Channel: Current. Language: English
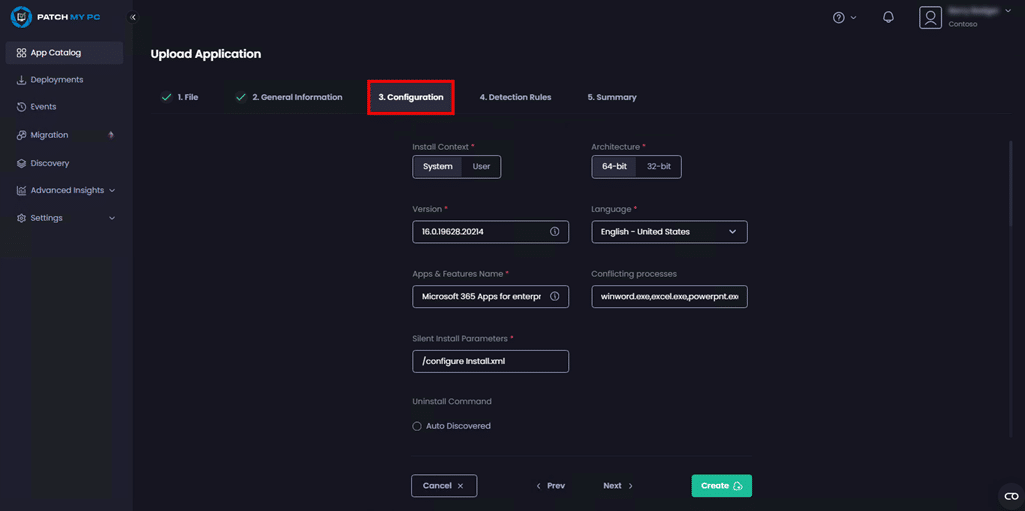
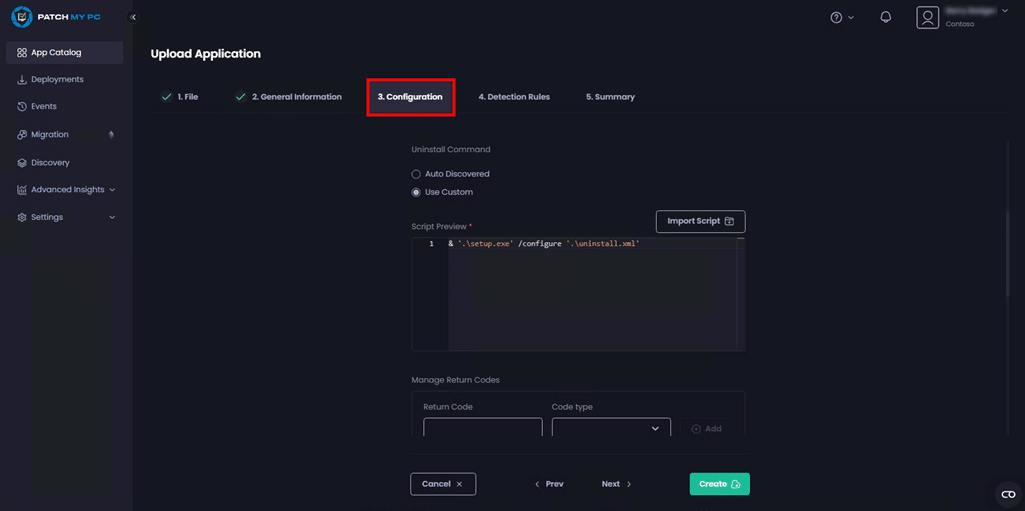
Step 8: Configure Advanced Options
On the Configuration tab, configure the following items:
Field
Value
Install Context
System
Architecture
64-bit
Version
Use the value obtained in step Method 1a (Step 4) Example: 16.0.19628.20214
Apps & Features Name
Use the value obtained in step Method 1a (Step 4) Example: Microsoft 365 Apps for enterprise - en-us
Language
Select the main language of Office being deployed. Example: English - United Stated
Use Custom Add the following command in the Script Preview field: & '.\setup.exe' /configure '.\uninstall.xml'
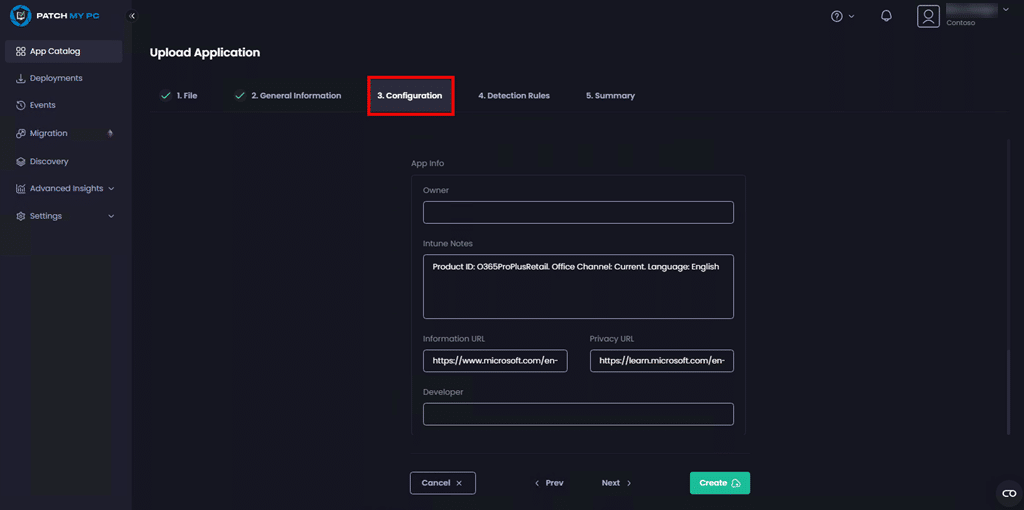
Intune Notes
Add a note that indicates to the administrator an overview of this Office configuration based on Install.xml. Example: Product ID: O365ProPlusRetail. Office Channel: Current. Language: English
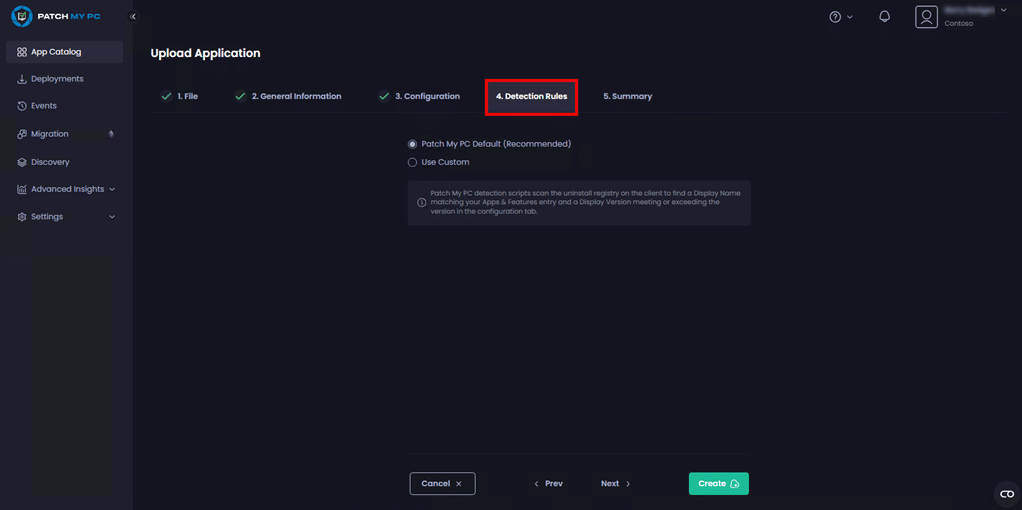
On the Detection Rules tab, leave Patch My PC Default (Recommended) selected.
Patch My PC Default (Recommended) uses a detection script that scans the uninstall registry on the client device. It looks for an entry where the Display Name matches the name shown in Apps & Features and where the Display Version is equal to or greater than the version specified in the Configuration tab (as noted in Method 1a, Step 4).
Step 10: Create and Deploy the Custom App
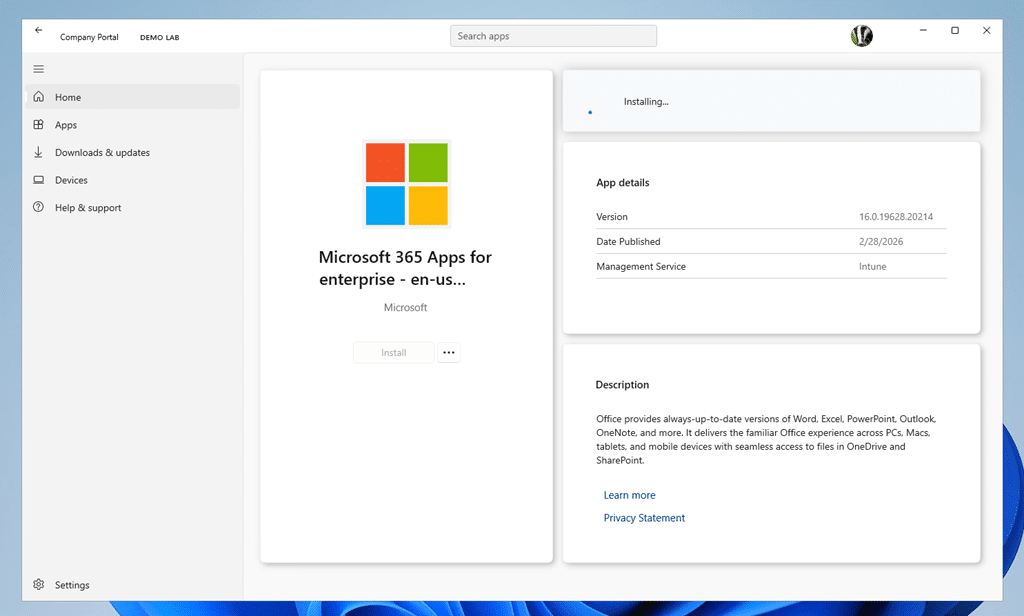
Click the Create button to create the M365 Apps Custom App. You can now deploy and manage your Custom App in the same way as other Patch My PC Cloud apps.
We recommend first assigning the application to a test group as required before proceeding with a broader deployment. This allows you to validate that the installation behaves as expected from the Company Portal experience.
Note: The M365 installation log file is generated in the C:\Windows\Temp folder which is useful for installation troubleshooting. Manually customizing the Install.xml or Uninstall.xml increases the chance of a failed Office installation and uninstallation.
Advanced Method: Generate the Microsoft 365 Apps Package Using the Patch My PC Helper Script
The Advanced Method automates much of the manual effort outlined in Simple Method approach. Instead of manually assembling setup files, defining detection logic, and building uninstall configurations, this approach uses a Patch My PC helper script/tool to analyze your Office configuration XML and generate the required package components automatically.
This method is recommended when:
You want a repeatable and consistent packaging process
You want to reduce the risk of XML or command-line errors
You are deploying the Latest version but still want reliable version tracking
The helper tool reads your Install.xml file, validates the selected update channel, determines the appropriate Office build version, and generates:
A structured package folder
Install and uninstall configuration files
Validated install and uninstall commands
Detection logic aligned to the selected Office build
Recommended application metadata
This significantly reduces manual guesswork and improves packaging consistency across environments.
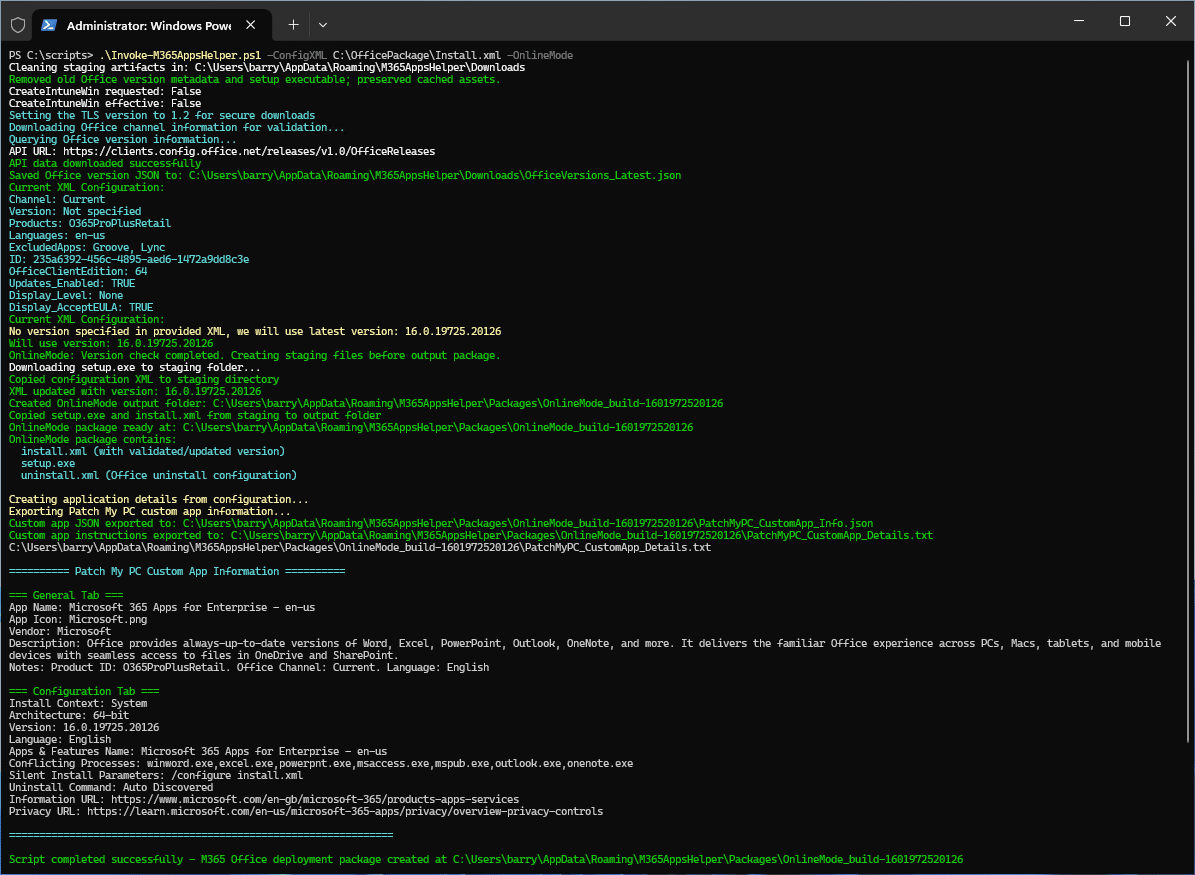
Open Windows Terminal or PowerShell and navigate to the folder where Invoke-M365AppsHelper.ps1 was downloaded.
The script supports two packaging modes depending on your deployment requirements.
Option A: Online Mode (Recommended)
Online mode creates a lightweight package. Office installation files are streamed directly from the Microsoft CDN during installation. This is the recommended approach for most environments.
If -OnlineMode is not specified, the script generates a fully offline package. Office installation files are contained within and downloaded in the Win32 app package, allowing installation to occur without devices reaching out to the Microsoft Office CDN during deployment.
By pre-packaging the Office data files in the Win32 app, administrators can ensure that installation traffic flows through their designed content distribution or caching architecture rather than each device downloading content directly from Microsoft.
Important: Offline mode significantly increases package size (typically 3-4 GB or more depending on selected products and languages).
Behavior in Offline Mode:
Downloads required Office data files
Compresses Office content into a ZIP archive
Generates a PreScript.ps1 for extraction during deployment
Prepares a fully self-contained deployment package
Step 3: Observe the resultant Deployment Package
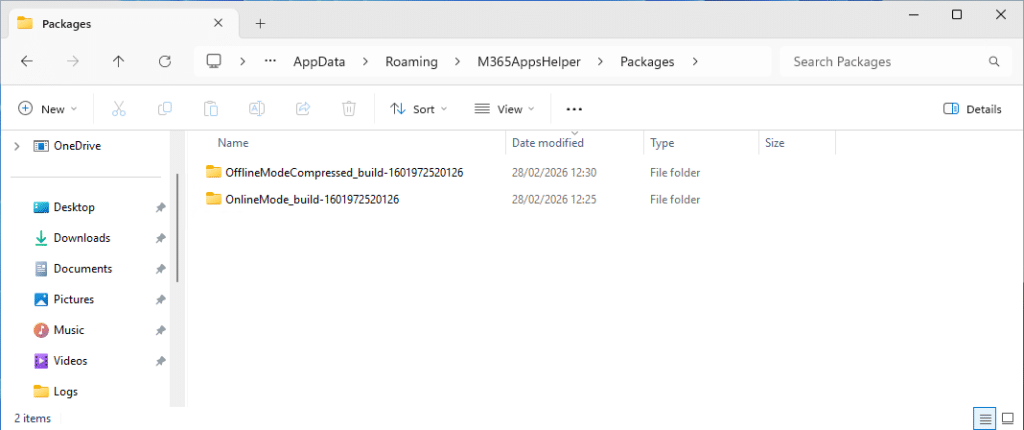
After running the script (either in Online or Offline mode), the generated deployment package can be found in the output folder. By default, packages are created under:
%APPDATA%\M365AppsHelper\Packages
Each execution creates a uniquely named build folder, for example:
OnlineMode_build-<OfficeVersion>
OfflineModeCompressed_build-<OfficeVersion>
This allows multiple builds to coexist without overwriting previous packages.
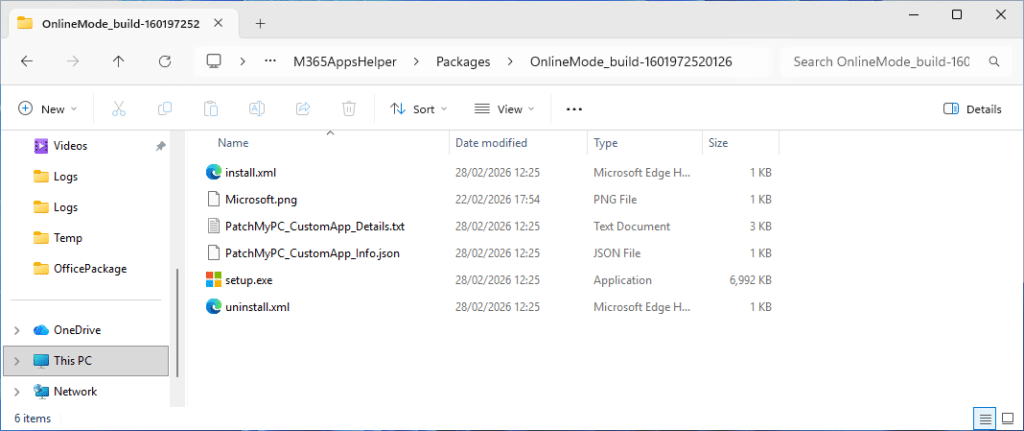
Online Mode Output
The online mode folder will contain:
setup.exe
install.xml
uninstall.xml
Microsoft.png
PatchMyPC_CustomApp_Details.txt
PatchMyPC_CustomApp_Details.json
Office content is not downloaded in this mode. Devices will stream content from the Microsoft CDN during installation.
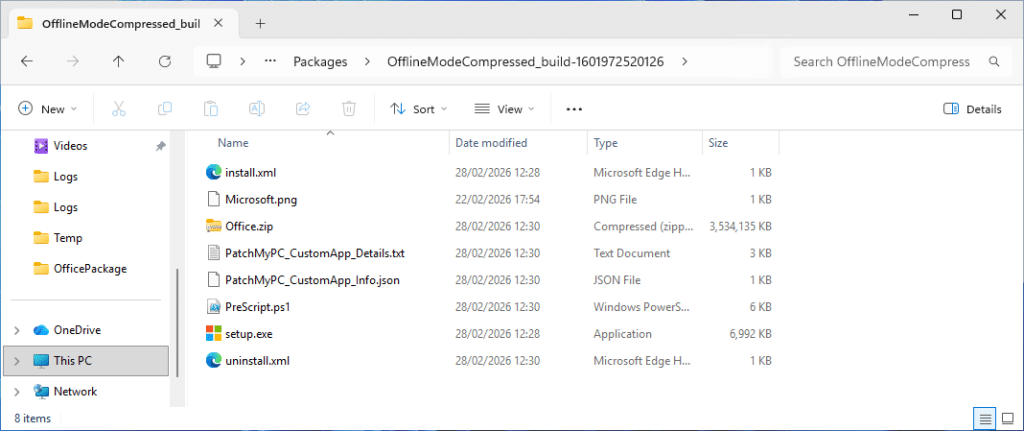
Offline Mode Output
The offline mode folder will contain:
setup.exe
install.xml
uninstall.xml
Microsoft.png
Office.zip (compressed Office data files)
PreScript.ps1 (extracts content during deployment)
PatchMyPC_CustomApp_Details.txt
PatchMyPC_CustomApp_Details.json (simple reference for advanced users)
This package is fully self-contained and does not require Office CDN access during installation
Step 4: Observe the Resultant Deployment Instructions
In addition to the deployment package files, the script generates a text file named PatchMyPC_CustomApp_Details.txt.
This file contains all required information and step-by-step instructions needed to create the Custom App in Patch My PC Cloud.
The generated file includes:
Primary install file reference
Additional files to upload
App icon name
Application name and vendor
Description and internal notes
Install context and architecture
Version information
Apps & Features name
Conflicting processes
Silent install parameters
Uninstall command
Information and privacy URLs
Detection rule guidance
Deployment Guidance (Including how to leverage the pre-script to uncompress the Office data files during installation).
This file serves as a deployment blueprint for advanced users who are comfortable with Win32 app concepts, scripts, and packaging workflows.
You can follow the step-by-step instructions in the text file when creating the Custom App in the Patch My PC Cloud portal. Review the contents carefully before proceeding to ensure the metadata, commands, and configuration match your intended Microsoft 365 Apps deployment.