Review the Doc article on creating custom apps in Patch My PC Cloud — https://docs.patchmypc.com/patch-my-pc-cloud/custom-apps
In this video, we explore the Custom Apps feature in Patch My PC Cloud. This powerful capability lets you package and publish your own software to ConfigMgr or Intune using the Publisher, or directly to Intune using the Cloud.
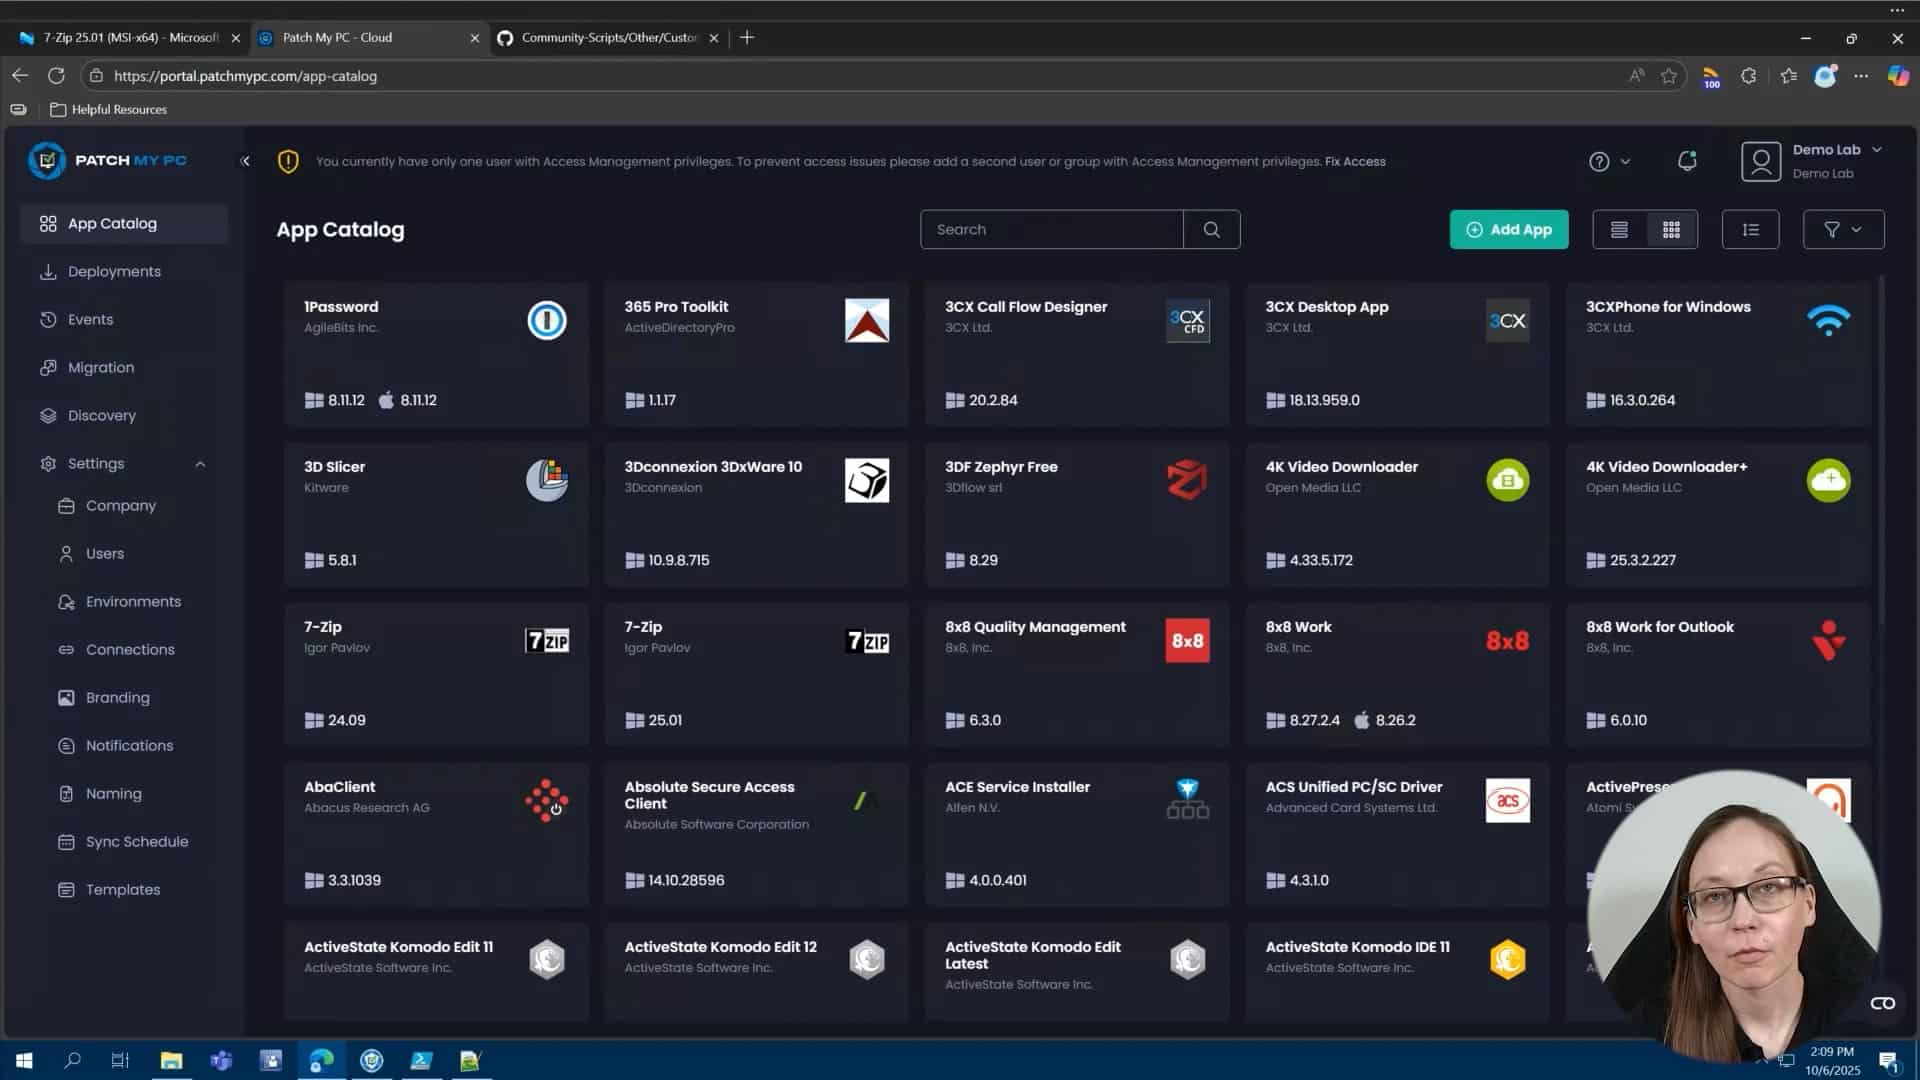
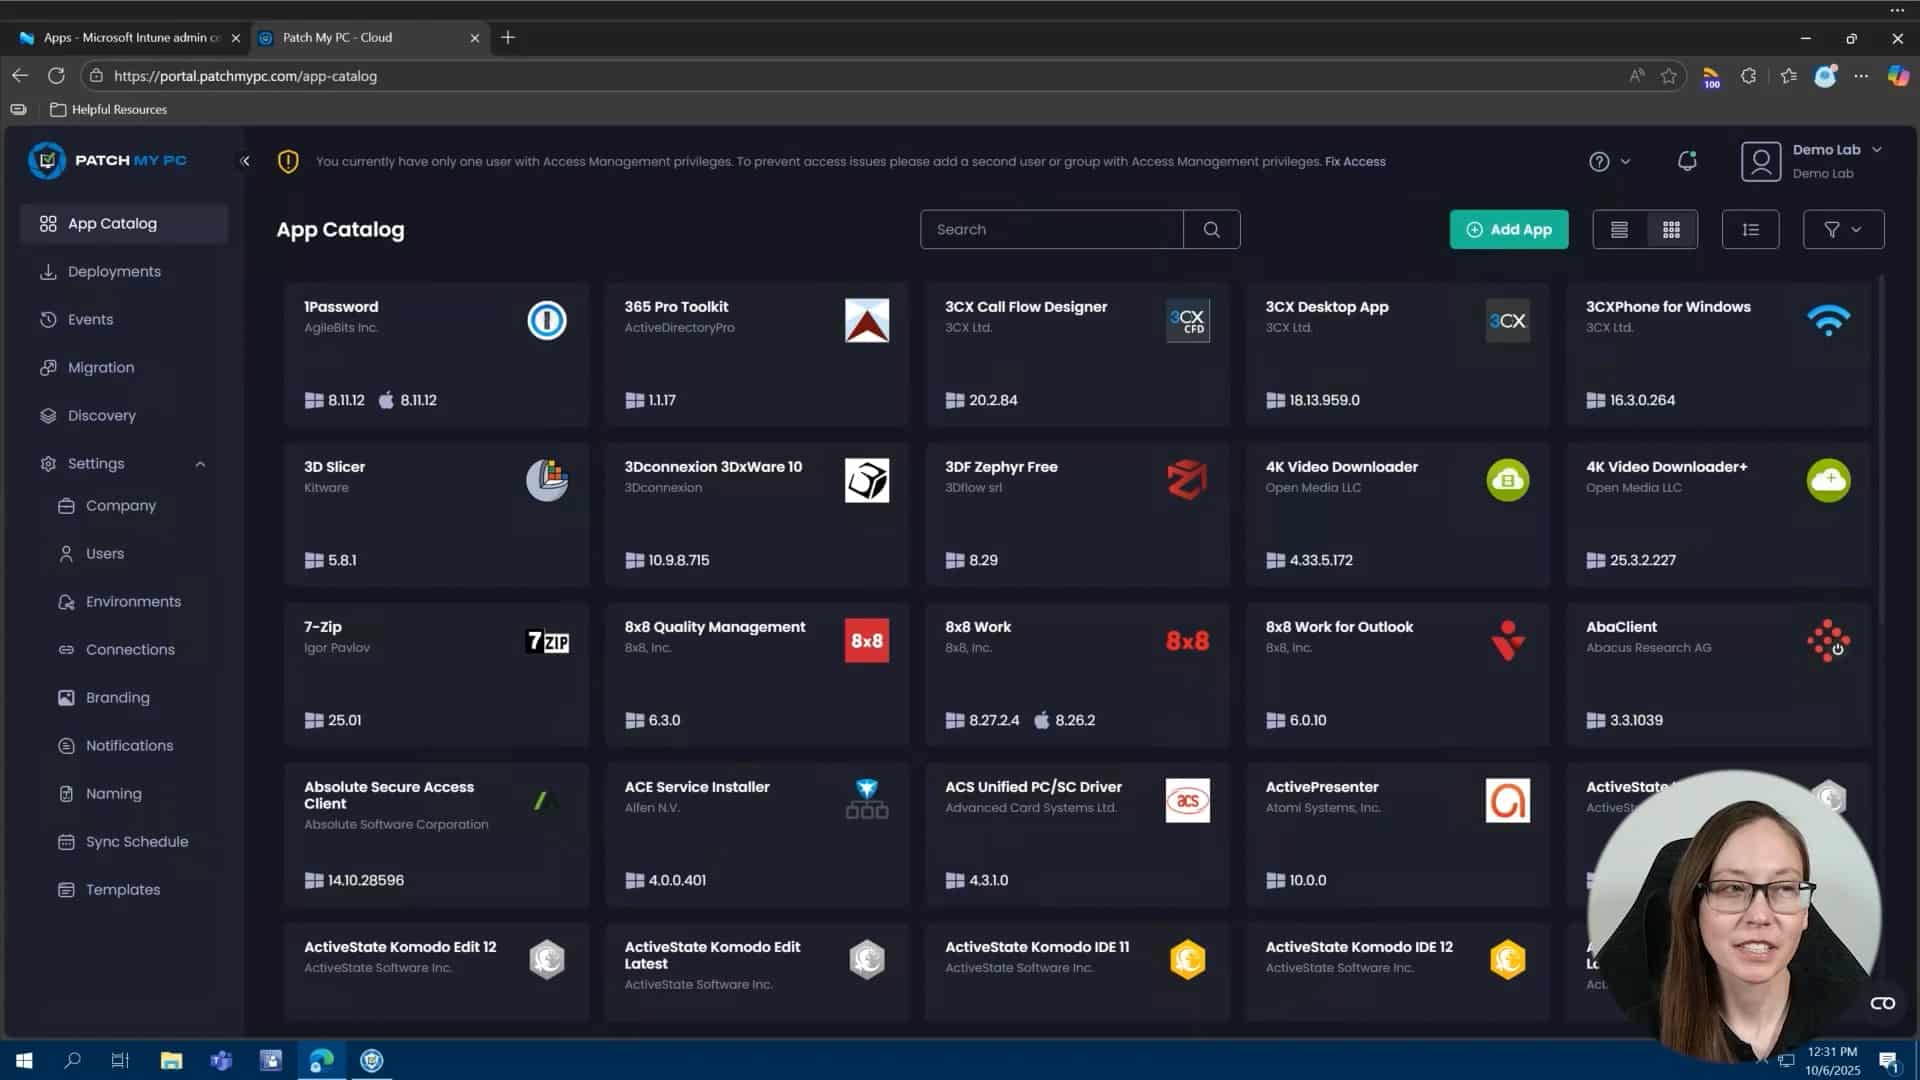
Hi, my name is Melissa, and today I want to walk you through creating custom apps. Maybe you have a homegrown application or an application that’s just not in our catalog. As long as the primary installer is an MSI or an EXE, you can easily create a custom app with Patch My PC. I have a couple of common examples of custom apps that I want to walk through. The first one is a simple MSI.rnrnThen after that, we’re going to use an EXE and I’m going to show you the custom apps helper tool, which can pull some of the needed information from the registry for your application. And then finally, I’m also going to show you a custom app using the PowerShell app deploy toolkit or the PSADT. rnrnThe custom apps feature is in our cloud portal. So we’re going to start there. You first create the custom app and you’ll need to be onboarded to the cloud in order to see this feature. So you see here, this green button, add app. That’s where you would add your custom app. And we’re about to go through that process. You can also connect the cloud to the publisher. Once you’ve created your custom apps, you can sync those custom apps with the publisher and deploy them via the publisher and customize them to configuration managers as an application and to Intune as an application in an update. I’ll show you that process as well. rnrnFor the first custom app, I do want to do a pretty easy MSI. So you saw me hit add application. All this is going to do is show you a couple of tabs in order to upload the primary installation files and any needed extra files, which is on this first tab. The second tab is going to be any icons, app name, vendor and description. So basic application information. You will have to provide this unlessrnrnFor example, with this MSI, you’ll see it’ll upload and grab some of that information by default without having to upload that information. Configuration is going to go into the detection. So if you do use Patch My PC built-in detection methods, all of the information here, the version, language, apps and features name will all go in architecture and install context will all play a part in where we are looking in the registry for this application after it’s installed and matching that information. rnrnThis is super important. You’ll notice an MSI like what I’m about to do. We’ll pull all this information for you, but if you were to use an EXE, you may have to use what we have, our custom app script or helper tool in order to get some of this information. Finally, you have the silent installation parameters. And then we also have a new feature, which I’m going to show here today. The ability to add and append the basic uninstall parameters. So what we’re doing by default, when you hit uninstall or you assign this as an uninstallation, what it’s going to do is going to pull that uninstall string from the registry. If you need to add anything else to it, like a silent command line parameter, you can easily add that here. I’ll show you an example of that here in a second. Okay. So let’s actually get into adding a custom app.rnrnSo the very first custom app I’m going to do is this return on investment tool MSI. So I’m to go ahead and upload this. I don’t have any additional files and folders for this particular custom app. So I’ve just uploaded my primary installation file, which is that MSI. You’ll notice it’s already pulling a lot of this information for me. Very, very helpful here. And I’ll go through an example of a custom app that does not have some of this information and going through that process.rnrnSo that’s pretty straightforward. have the app name, vendor and description, as well as the icon. Let’s get into the configuration. So this application is going to be a 64 bit system installer. have the apps and features name. This is what is showing in the display name in the registry. And we also have our conflicting processes, our silent installation parameters and the version. I’m going to go ahead and leave the uninstall command as automatic.rnrnWe do also have the ability to add detection rules. So one of the benefits of using the custom app feature is that it’s going to add by default Patch My PC detection methods. Also, it’s going to add the Patch My PC requirement script if needed for updates, and it’s going to add the ability to pull Patch My PC logging. So it’s going to build that all into your custom app for you.rnrnYou also have the option if needed to build out custom detection. Now keep in mind only the Patch My PC default detection method is supported with the publisher. So if you use custom, you can deploy this application to Intune via the cloud portal, but it will not be supported on the publisher side.rnrnSo you have the ability to configure a manual detection rule, custom script. So if I hit manually, you have a couple of options here, including file and registry-based detection. So you have a lot of options here. I’m gonna switch this back to default and hit create. This is going to build that custom app and it’s going to add it back to my catalog. So one of the easiest ways to find this, you’ll notice this source, this is going to be my tenants or my demo lab that I’ve onboarded here. If I hit this filter, it’s going to show me all of my custom apps. So I have my return on investment tool that I just created. And I also have this seven application that I’ve created as a custom app. From here, all I’d have to do is hit deploy.rnrnAnd you’ll notice I’ll have the same exact configurations, including pre and post scripts, additional files, app information, and installation parameters. So all of those will be available to me here. And then under assignments, I have the same assignment options as well. So I can just build this out with my standard all users and I can deploy this out.rnrnOkay. One more thing before we kind of go into the next, custom app, you’ll notice I already uploaded that or I created that return on investment tool. So if I hit refresh here, I have connected into my cloud from the publisher. So under config manager apps, you’re now seeing an all custom products and I will see both of my custom apps as options here for config manager applications.rnrnIntune applications and Intune updates. So those are all available for me in the publisher.rnrnOkay, let’s go back and the next thing I want to show you is you’ll notice I have 7-Zip created as a custom app. So if I go back and filter by my custom apps.rnrnHit deploy. I am going to go ahead and deploy this because I do want to show an update. So let’s go ahead and get this published.rnrnOkay, so let’s say you have a custom app, in this case, 7-Zip. And you’ll notice that version of 7-Zip is actually old. So what do we do when there’s a new version of a custom app? So what I want to show you is how easy it is to update a custom app. All you have to do is you’ll notice I found the 7-Zip application in my catalog. I’ll just hit add version. This screen looks identical to the previous screen. So you have your… ability to add your file configuration and detection rules. rnrnYou notice it’s not also asking me to create the same, upload an icon and stuff like that. I would have to do that if I was creating an EXE from scratch, which we’ll all show you here shortly, but this is super easy to do. So all you have to do is add your primary installation file. So if I go to my downloads, where I’ve downloaded my 7-Zip 2501. Hit open. If I go to configuration, some of this information is being pulled from my previous custom app that I’ve uploaded. But I do want to show you our custom apps helper tool real quick. So we do have a tool in GitHub, our Patch My PC GitHub called the custom apps helper tool.rnrnAll you do is you download it. I’m going to run it. What it’s going to do is show you everything that’s in the registry for installed applications. You’ll see here’s my 7-zip 2501. I am going to hit OK here. And then I actually see all the helpful information here that I need for my configurations tab. So that’s a really easy way to find all this information out.rnrnSo let’s go ahead and finish this out. So we have 2501 for my version. It’s pulling those conflicting processes, the apps and features name. Now 7-zip has the version in the app and the display name, which is why we’ve had a wild card here, which will allow me to keep the same app and features name over versions. So as versions change, it’s a good example of that. Silent installation parameter is going to be the same and it’s 64 bit.rnrnSo we should be good to go there. I’m going to keep the default patch my PC for detection and let’s go ahead and hit save. Now what’s going to happen here is it’s going to wait till that sync time to actually pull in that new version. And since I already have this deployed, it’s going to update that deployment automatically for me. I can also go back to my deployments and speed that up a little bit by hitting sync or recreate here.rnrnOkay, so the final custom app I want to show you is how to use the PowerShell AppDeploy Toolkit as a custom app. So in this particular scenario, I have built out a PSADT version 4 that is installing Notepad++. So let’s go ahead and build that out as a custom app. In this case, this is just a good example as a starting point on how to do this. We get this question a lot in support.rnrnSo let’s actually, I want to show you the base, um, actual package that I have built from the PS app deploy. So let’s make this a little bit bigger here. So this is for notepad plus plus. If I open this up, I have my PS one, my EXE, and then all of these support files as well. So what I’m going to do here as my primary installer is going to be the invoke app, deploy toolkit.exe.rnrnSo you can easily drag and drop. So what I’m gonna do is drag and drop that over here. And then another easy way to add your extra files, I wanna make sure that I’m adding everything, but that EXE that I just uploaded as my primary, I can easily drag and drop that over here as well. So let’s go ahead and do that.rnrnSo that’s the main difference here. So this is a good example of a primary EXE, but also has a ton of additional files here. So I went ahead and just have to make sure that PS1 is there and those files and all of your supporting files and folder structure for the PSADT.rnrnUnder general information, this is going to be very similar to just using a EXE and, regardless of the PSADT. So I do have to upload the app icon. I do have my icons here. Let’s go ahead and do that for notepad plus plus app name is notepad plus plus. And I did use the custom apps helper tool to pull this information, but I have it pre populated here for notepad plus plus. So this is super straightforward.rnrnWe’ll do notepad++64.rnrnDescription can be whatever you want. in this case, I’m going to do notepad plus pct demo. Configuration is the important stuff for your detection. So we’re actually going to copy and paste a lot of this stuff over.rnrnVersion is 885.rnrnI’ll do English.rnrnConflicting processes is also really simple. So it’s just notepad++.exe, but that was information that was pulled from that tool. And then the silent installation parameter. This is where, because I’m using a PSADT package, this is going to be slightly different than if I was just uploading notepad++.exe here. So I’m actually going to pass the defaults for the PSADT. That’s gonna be deployment type and you saw here, deployment type install, deploy mode interactive. So I’ve uploaded that here.rnrnGoing to use the Patch My PC default for the detection rules as well. And we’ll go ahead and create that.rnrnAwesome, so let me take a look at all of our custom apps that we’ve created. So we created a standard MSI custom app. We updated an EXE based custom app for 7-Zip from 24.09 to 25.01. And then we also created a PSADT based custom app as well. We’ll walk through that process.rnrnSo hopefully after seeing all of this you feel a little bit more confident about building out your own custom apps. You can always reach out to us if you have any questions. Thanks for your time.
Using Pre/Post Scripts in Patch My PC

Review the Doc article on Using Pre and Post Scripts in Patch My PC Cloud — https://docs.patchmypc.com/patch-my-pc-cloud/cloud-deployments/deploy-an-app-using-cloud/cloud-configurations-deployment-tab/cloud-scripts-deployments
In this video, we explore how Patch My PC Cloud and Patch My PC Publisher let you take advantage of pre- and post-scripts to customize application deployments. You’ll see how to integrate your own scripts, extend functionality, include extra fiels with your deployment and tailor installations to your environment.
Hi, my name is Melissa. And today I am going to walk you through customizing your third party apps and updates with scripting and extra files. I have a couple of examples that I want to show you how to leverage pre and post scripts in both the cloud portal and the publisher. Then we’ll go through adding extra files like an MST file to your deployments. I’ll wrap this video up with an example of using both scripts and extra files together, which includes a pre and post script that references an extra file.rnrnWe’ll start out in the cloud portal. The very first thing I want to show you is adding.rnrnand a postscript to my Google Chrome deployment. So let’s go ahead and edit my existing deployment here. I’ve selected to deploy the 64-bit MSI for Google Chrome.rnrnThe configurations tab is where you can add all of your extra tools, including pre and post scripts and extra files. So for this particular deployment for Google Chrome, you’ll notice if I hit add, you’ll see extra scripts. Scripting is already selected here. So we’ll go ahead and take a look at my post install script. So all I’ve done here is set a Google Chrome homepage.rnrnSo what I can do is just hit import and I can import a existing script, which is what I’ve done here. So if I go to scripts, add my Google Chrome homepage, it’s gonna go ahead and import that. will select the script format that the script is already written in. Now this is a text editor in our cloud portal. So I could actually change this to something else if I wanted to and edit that script once I import it. I can also write a script from scratch.rnrnReal quick here under script formats, we do support PowerShell, Batch, VBScript, and CMD formats. I can also easily pass arguments into my script. This particular script doesn’t require additional parameters to be passed, but if it did, I could easily add those arguments here. I do have an example later of how you might be able to use that. Let’s go ahead and hit save here.rnrnAnd then I’ve already got this assigned out, so we can go ahead and hit save in order to deploy this.rnrnLet’s move over to the on-prem publisher and induce the same thing here.rnrnNow pre and post scripts are going to be in the same spot. So you see manage custom pre and post scripts. It’s going to look very similar. All I have to do is open this up and then I browse to my PowerShell script and add that as my post installation script for Google Chrome.rnrnAll right, so that was a simple post installation script that we’ve added for Google Chrome that sets that homepage. You’ll see here, I have a couple other examples. The other example I want to go through real quick is VLC media player. So let’s go ahead and edit this deployment here as well. Starting in the cloud, you’ll notice I picked the 64 bit EXE. A very common requirement for VLC media player is if you want the latest version,rnrnsince the vendor is supporting the EXE up to version 3.0.21 at the time of this recording. If you already have the MSI installed, the next step is to remove the MSI as a pre-installation script and then install the EXE. So what I’ve done here is I’ve set this up for the 64-bit EXE, which has the latest version of VLC Media Player. Gonna hit next here, same thing, going into my scripting tool.rnrnIf I hit edit, do have, and this is from our GitHub, but what I’ve done is I’ve downloaded this PowerShell script. What it’s going to do is it’s going to look in the registry to see if there is an existing windows installed or MSI for VLC. If it finds it, so you’ll go through here. If it does find it, it will remove it and then move forward with the installation that I’ve set up here for the deployment of the VLC media player EXE.rnrnSo I’m going to go ahead and hit save. Same thing, I’ve already assigned this out. So I’ll go ahead and save to get that deployed. Let’s switch again over to the publisher and do the exact same thing. This is going to look very similar to what we just did for Chrome. Again, I want to deploy the EXE out. So I’m going to go to manage pre and post scripts, run that pre-installation script where this is an uninstall script that’s going to run prior to the installation of VLC. So if any MSIs for VLC media player is detected as installed on the device, you will find it and uninstall it prior to running that full install for the EXE. And then you’re good to go.rnrnOkay. So before we do, and I do have an example of leveraging both extra files and a post installation script, but before we get there, I do want to go over adding additional files. So a great example is something like Snagit where you may have an MST file should you be deploying the MSI for Snagit. So I’m going to go ahead and hit edit here. Now this deployment is the 64 bit MSI for Snagit 2025.rnrnWhat I’ve done is I’ve downloaded the TechSmith deployment tool and I’ve used the Snagit 2025 MSI to build out my MST file. Once that MST file is built, all I have to do here is go to extra files. So you’ll notice there is a section here for extra files. And you’ll see it’s also telling me I have a dependency for Snagit, which is really helpful. And then let’s go back over to extra files.rnrnOkay, so I can add an extra folder, an extra file. And in this case, because it is an MSI that I’m customizing here, I will be able to add an MST file, which is what I’ve done here. So my snagit.mst that I’ve customized for this deployment, I’ve already uploaded this. So now I’m good to go. So this is a perfect example of just needing an extra file with this particular deployment and not really needing a scripting as well.rnrnalready assigned that out. Let’s go ahead and hit save. And before we get to our final example, I do want to show on the publisher side, let’s go to Snagit 2025, that MSI option. And then you’ll notice there’s a section here for manage MST transformation file.rnrnSo if I go there, I’ve already browsed and uploaded my MST file, which I can do that one more time.rnrnThere we go. All good to go. I’ve added my MST file. You’ll notice when I right click this, that little checkbox next to that option is already selected. So I’m good to go there. Go ahead and hit apply. Awesome. So, so far we’ve gone through some pretty basic pre-installation scripts, post-install scripts, just extra scripts in general. And we’ve also gone through an example of using extra files in a deployment.rnrnLet’s do an example of using both. So what I’m going to do here is I have a post script that runs for notepad plus plus that requires a zip file and it’s looking for a zip file that I’m going to upload as an extra file and just kind of going through how to actually accomplish that. So let’s start in the cloud. I can doing the 64 bit EXE for notepad plus plus. This time I need to enable two additional tools here at the same time, so we’ll enable scripts and extra files.rnrnLet’s go and look at that extra file. So in this case for notepad plus plus, uh, there’s a couple of customizations that you may need to do. So the first one is going to be plugins. So any plugins that you do want to support, you can easily download those from a notepad plus plus on GitHub and then leverage a post install script to install those plugins after notepad plus plus updates or installs. So this is kind of what I’ve done here. Another good example is languages. And so maybe you want to.rnrnNoped++, the actual window itself to be in a different language. So, and you want to support potentially even multiple languages. You’d be able to do this, use a similar concept that I’ve built out here with Compare Plus with your languages as well.rnrnOkay. So you’re seeing here, I’ve went ahead and downloaded my compare plus plugin, which is a zip file. So I easily uploaded that as an extra file. So you’ll see here, if I go to my downloads, I can just add this here as an extra file. Once that’s done, the additional piece that I need to do, because all that extra file is going to do if notepad plus plus is not going to leverage those files natively during the install.rnrnthen what I’ll have to do is add some logic in a script that’s going to not only take that zip file, but also expand it, extract it to the correct directory and put all those files in the correct spot on the local device so that when I launch, my user launched Notepad++ after the deployment or update, they will have that plugin available.rnrnSo what I’ve done here is a post install script. It’s pretty simple. Hit edit here. Again, this is a PowerShell script, but you’ll see here I’m adding a new directory, which is in that notepad++ program files directory under plugins. And this is specifically for the compare plus plugin. The next step is to extract or expand that zip file, which is going to be in the root of my installation directory. So PS script root and is added as an extra file.rnrnto the correct folder that I just created in the line above. So it’s going to take everything in that zip file, expand it and put it in that compare plus plugin folder for me. And that’s all going to happen after a notepad++ installs.rnrnYou could use a similar logic for just about anything that requires a zip file to be extracted after the install.rnrnalso assign this out. All right. And one more thing before we finish this up, let’s do this in the publisher. So I’m going to go to notepad plus plus.rnrnYou’ll be able to add your pre and post script and extra files all in the same spot. So I’m adding my notepad plugins.ps1 as that post script, which does the exact same thing we kind of looked at for the cloud deployment. And then I have my zip file already added as an additional file.rnrnAwesome. we’ve covered both the cloud and the publisher using extra files, using scripting, and then using both extra files and a post install script to customize your third party apps and updates.
Connect Publisher to Patch My PC Cloud

Review the Doc article on Connecting Publisher to Patch My PC Cloud — https://docs.patchmypc.com/patch-my-pc-cloud/cloud-administration/manage-cloud-connections/add-a-connection
In this video, we show you how to connect Patch My PC Publisher to Patch My PC Cloud. Once Publisher is connected to Patch My PC Cloud, you can manage all of the instances of Publisher connected to your portal. This allows you to leverage Custom Apps in Publisher and enables other cloud features, like Migration
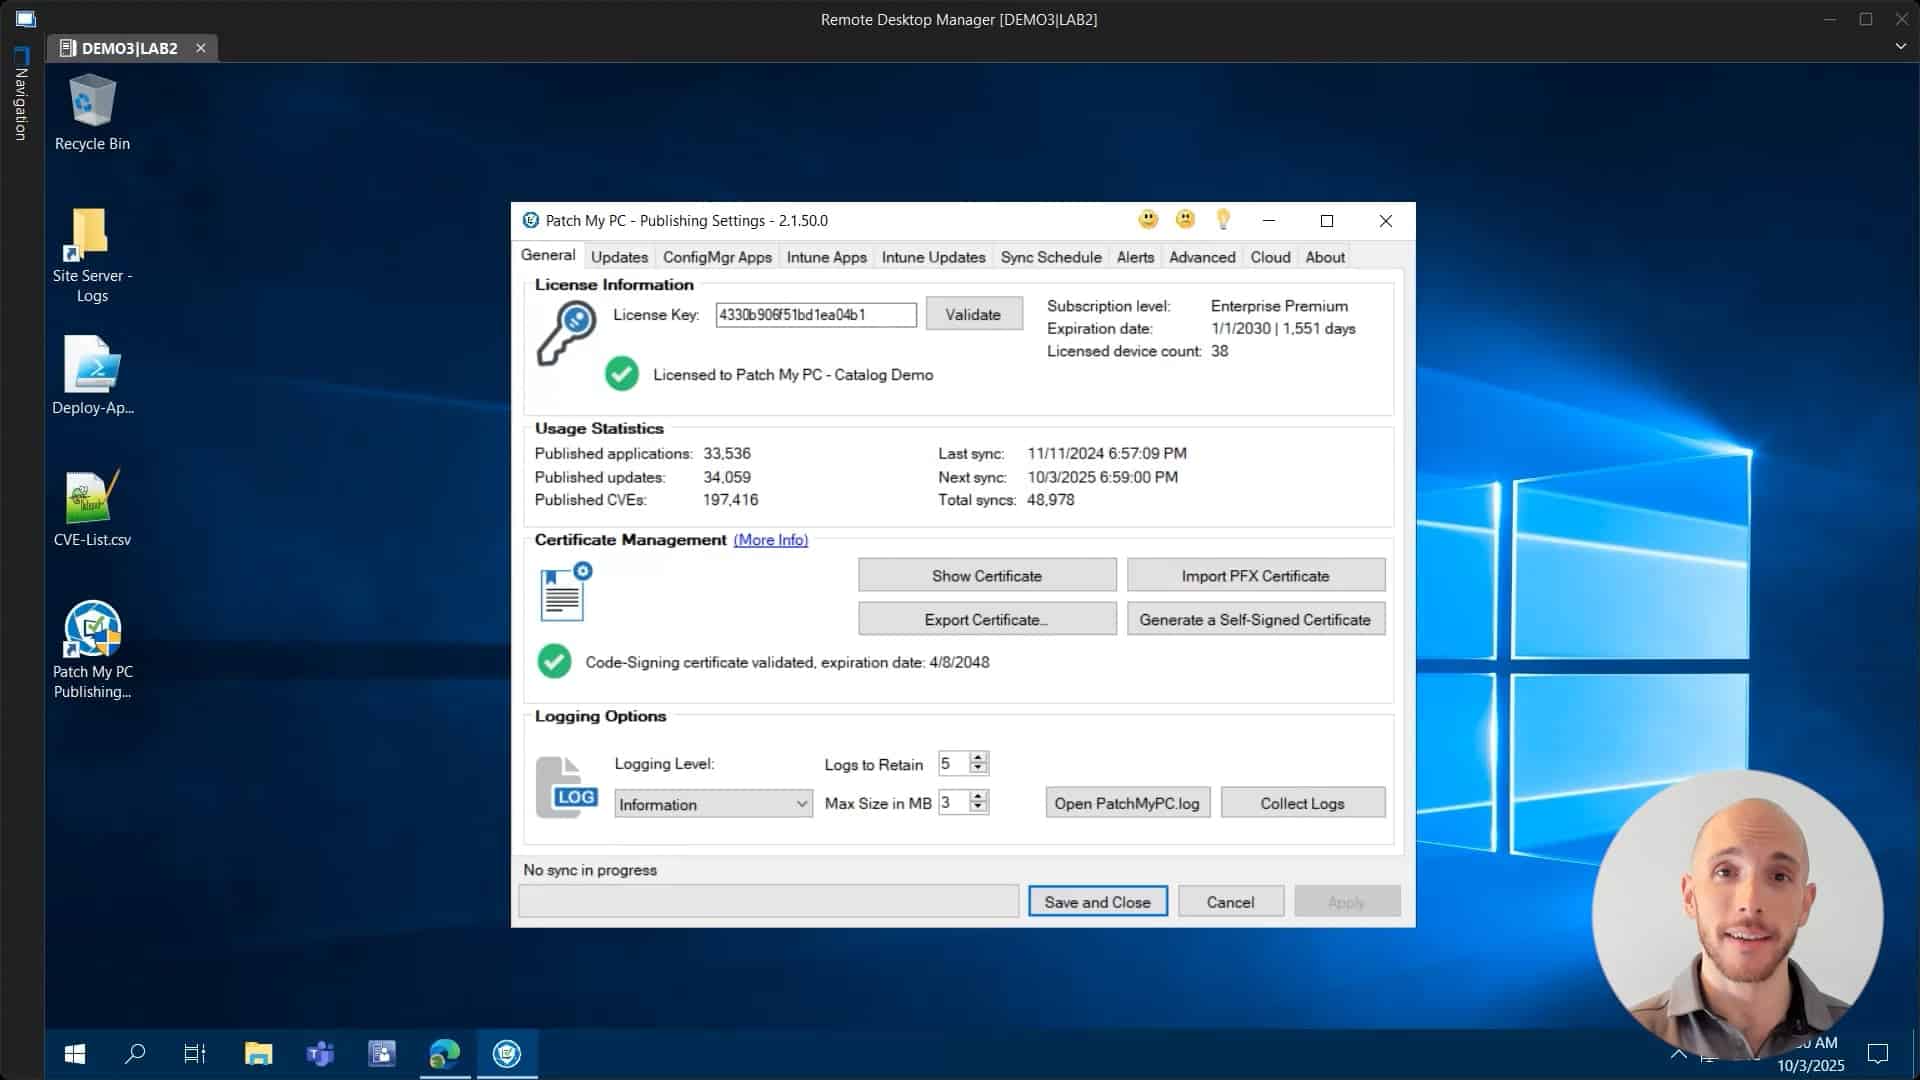
Hi there, my name is Hugo. I’m a customer engineer here for Patch My PC. And today I’m going to talk to you about the cloud connection. So what is the cloud connection? This is what actually allows you to connect your own local on-prem publisher to your own instance of the Patch My PC cloud portal. So all you have to do is to go into your publisher, then you need to click on the cloud tab that you will have here on the right as highlighted on my screen. So let’s click on there right now.rnrnThen you have to fill out the connection name, which can be whatever name you want. It doesn’t really make a big difference. So let’s just call this PMPC connection. In a small note though, as a prerequisite, you will need to have already created your own Patch My PC Clouds portal company. Okay. We also have a video on that. The link will be here below in the description. So you can just have a peek at that, but you need to do that first. Okay. So once you have that, you just have to put a name here. Like I said, click on connect.rnrnthen you’re going to get prompted to log in and you need to use the same account that was used before when you first created the cloud company. Okay, so I’m going to use my own account here, click next, sign in. And as you can see, authentication has been completed and we can now return to the application. So we can close this for now and we can now see a green icon and the connection status as success. So what this feature actually allows us to dornrnis to basically now create custom applications within the cloud company that we can then also publish using the publisher. So if we now just quickly go into the cloud and on the settings we can see other connections, we have our PMPC connection created within the portal. So that’s all for today. Hope that this video was helpful to you. If you have any comments or suggestions, feel free to leave a comment below. And thank you so much for watching. Have a great day.
Patch My PC Power BI Queries

SQL Queries
Client Info
Collection of information about devices including what version of the operating system they are running, and FQDN. Originally we used to gather this from a different view, however this caused numerous reports of duplicate values for large environments due to maintenance tasks not running quickly enough. Instead we dynamically build the content. We also have to handle duplicates caused by OS caption.
WITH NewestOS AS (
SELECT GS_OS_Data.ResourceID
	, TimeStamp
	, Caption0
FROM v_GS_Operating_System as GS_OS_Data
INNER JOIN (SELECT ResourceID
	, MAX(TimeStamp) as MaxDate
	FROM v_GS_Operating_System
	GROUP BY ResourceID
) MaxFilter on  GS_OS_Data.ResourceID = MaxFilter.ResourceID and MaxFilter.MaxDate = GS_OS_Data.TimeStamp
)
SELECT v_R_System.ResourceID
  , v_R_System.Name0
    , v_R_System.Name0 + '.' + v_R_System.Full_Domain_Name0 as Resource_Names0
    , v_R_System.Resource_Domain_OR_Workgr0 AS 'DOMAIN'
    , CASE v_R_System.Client0
            WHEN 1 THEN 'INSTALLED'
            ELSE 'MISSING'
        END AS ClientStatus
    , v_R_System.Client_Version0
    , v_R_System.Last_Logon_Timestamp0
    , CASE NewestOS.Caption0
        WHEN NULL THEN v_R_System.Operating_System_Name_and0
        ELSE NewestOS.Caption0
    END AS OSNAME
    , V_GS_System.SystemRole0
FROM v_R_System
LEFT OUTER JOIN NewestOS on v_R_System.ResourceID = NewestOS.ResourceID
LEFT OUTER JOIN v_GS_System ON v_R_System.ResourceID = v_GS_System.ResourceID
WHERE v_R_System.Operating_System_Name_and0 LIKE '%Microsoft%'
Compliance Info
Collect patch compliance data. Technically the 0 management is not required here, as 0 should never appear in v_Update_ComplianceStatus
We also filter out some information to ensure we are avoiding accidentally capturing software update groups.
SELECT CASE
			WHEN v_Update_ComplianceStatus.Status = '0' THEN 'UNKNOWN'
			WHEN v_UPDATE_ComplianceStatus.Status = '1' THEN 'NOT REQUIRED'
			WHEN v_Update_ComplianceStatus.Status = '2' THEN 'NON COMPLIANT'
			WHEN v_Update_ComplianceStatus.Status = '3' THEN 'COMPLIANT'
			ELSE 'NA'
		END AS 'PatchStatus'
    , v_Update_ComplianceStatus.CI_ID
    , v_UpdateInfo.CIType_ID
    , v_Update_ComplianceStatus.resourceID
	, v_Update_complianceStatus.LastStatusCheckTime
FROM v_Update_ComplianceStatus
LEFT OUTER JOIN v_UpdateInfo on v_Update_ComplianceStatus.CI_ID = v_UpdateInfo.CI_ID
WHERE v_UpdateInfo.CIType_ID = '8' or v_UpdateInfo.CIType_ID = '1'
SUG Info
This query gathers the names of each software update group, and creates a dummy row, for updates that are not in any software update group. This is done to handle a use case with Power BI.
SELECT v_UpdateInfo.CI_ID
, v_UpdateInfo.Title
FROM v_UpdateInfo
WHERE v_UpdateInfo.CIType_ID = '9'
UNION ALL
SELECT '0', '--- Not Limited by Sug ---'
SUG Relation Map
This builds what we call the relation map, and tracks what updates are a member of what group. This is how we then are able to filter our report by software update groups. This data is used as a connection point in the PowerBI data model to join data together.
WITH SUGInfo AS
(
SELECT v_UpdateInfo.CI_ID
FROM v_UpdateInfo
WHERE v_UpdateInfo.CIType_ID = '9'
)
SELECT v_CIRelation.FromCIID
, v_CIRelation.ToCIID
FROM SUGInfo
LEFT OUTER JOIN v_CIRelation ON SUGInfo.CI_ID = v_CIRelation.FromCIID
UNION ALL
select '0' AS [FromCIID], CI_ID FROM v_UpdateInfo
where CIType_ID != 9
Collection Membership
Collections, often represent logical groupings of machines we really care about. As a result, we use this query to build out what machines are a member of what collection so we can allow filtering based on the collection names.
SELECT v_FullCollectionMembership.ResourceID
    , v_FullCollectionMembership.Name
    , v_FullCollectionMembership.ResourceType
    , v_Collection.CollectionID
    , v_Collection.Name AS 'CollectionName'
FROM v_FullCollectionMembership
LEFT OUTER JOIN v_Collection on v_FullCollectionMembership.CollectionID = v_Collection.CollectionId
WHERE v_FullCollectionMembership.ResourceType <> '4' AND v_Collection.Name LIKE 'CollectionFilter'
Update Info
While knowing a CI_ID of an update is nice, you typically want more detailed information. This, collects data for things like the URL for information about the update, the date it was released, and more.
SELECT v_UpdateInfo.CI_ID
	, v_UpdateInfo.CI_UniqueID
    , v_UpdateInfo.ArticleID
	, v_UpdateInfo.Title
    , v_UpdateInfo.InfoURL
	, v_UpdateInfo.DatePosted
	, v_UpdateInfo.DateCreated
	, CASE v_UpdateInfo.IsDeployed
			WHEN 1 THEN 'TRUE'
			ELSE 'FALSE'
		END AS DeploymentState
FROM v_UpdateInfo
WHERE v_UpdateInfo.ArticleID IS NOT NULL AND v_UpdateInfo.ArticleID !=''
Category Info
Some times it really helps to be able to filter a report by the patching vendors. This section gathers who the original author of the patch was.
WITH CATS as(
select  all SMS_UpdateCategoryInstance.LocaleID
    ,SMS_UpdateCategoryInstance.CategoryInstanceName
    ,SMS_UpdateCategoryInstance.CategoryInstance_UniqueID
	,SMS_UpdateCategoryInstance.CategoryInstanceID
from fn_ListUpdateCategoryInstances(1033) AS SMS_UpdateCategoryInstance
where (SMS_UpdateCategoryInstance.CategoryTypeName = N'Company' AND SMS_UpdateCategoryInstance.AllowSubscription = 1)
)

Select CATS.CategoryInstanceName
	, v_updateINfo.CI_ID
from fn_ListCICategoriesAll(1033) as CI_LIST
INNER Join CATS on CI_LIST.CategoryInstanceID = cats.CategoryInstanceID
INNER JOIN v_updateinfo on v_updateinfo.ci_id = ci_list.ci_idUnderstanding the ConfigMgr Application Model

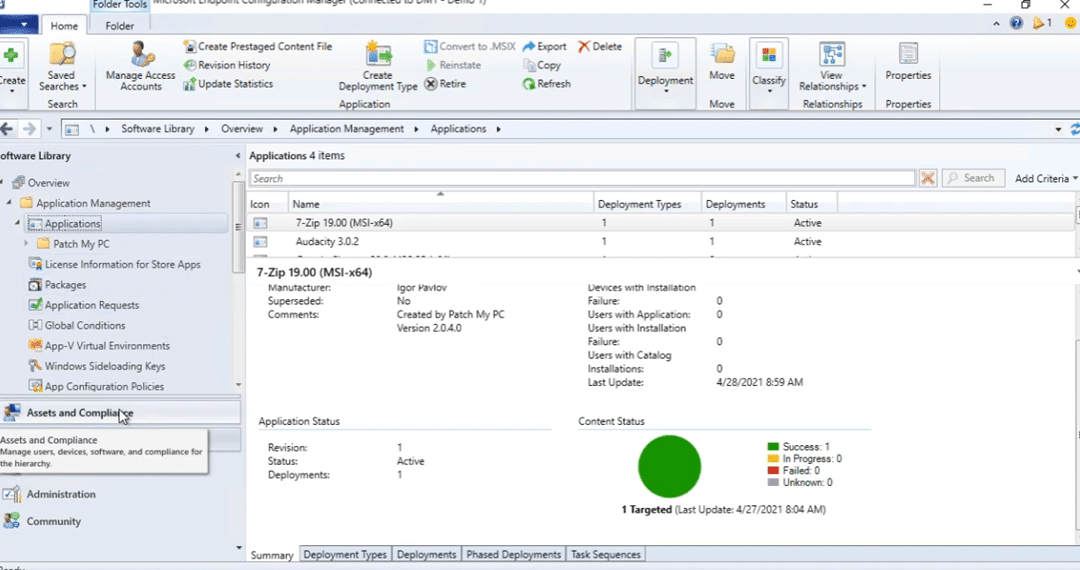
This article walks through the ConfigMgr Application Model, focusing on how it differs from legacy Packages, how to build and deploy applications, and how to troubleshoot using policy evaluation and logs. Let’s start with the high-level differences and move into hands-on functionality and flow.
Key Differences Between Applications and Packages
Applications, introduced in ConfigMgr 2012, offer a smarter and more flexible way to deploy software compared to traditional Packages. Some of the key differences:
- Packages can run content directly from a DP share, with optional programs defined for execution.
- Applications always download content from the DP before execution and include:
- Detection rules to determine install state
- Custom requirements via Global Conditions
- Dependencies and Supersedence logic
- Revisions for version control
Better Software Center experience with icons, names, and dedicated install/uninstall/repair options
Converting Packages to Applications
Common candidates like 7-Zip or C++ redistributables are easy to convert and benefit from detection and self-heal
When building Applications, key features include:
- Software Center customization: Branding, categories, and icons
- Dedicated install/uninstall/repair deployment types
- Detection methods: Including scripts with defined return values (e.g., 0 = installed, 1 = not installed, 2 = retry)
- Requirements and global conditions to define install eligibility
- Dependencies and Supersedence for upgrade paths and runtime prerequisites
- Application Groups (preview feature)
Policy
Once you’ve deployed an application, the next step is understanding how it’s processed on the client—and how to troubleshoot when something doesn’t go as expected.
Policy Retrieval
ConfigMgr clients regularly poll the management point for policy updates. When an application is deployed, the client downloads the policy that includes information such as detection rules, content location, requirements, and install behavior.
Use Support Center
- View active and historical policy
- Watch evaluation as it happens
- Inspect app and deployment state in WMI
- Review client health status
WMI
WMI is where much of the client-side application metadata is stored. You can use it to:
- Verify which applications are detected as installed
- View state for specific deployments
- Confirm requirement evaluations and dependency chains
Key Logs for Troubleshooting
These logs are essential for tracing the lifecycle of an app deployment on a client:
- AppIntentEval.log – Decides should this app be installed?
- AppDiscovery.log – Runs the detection method to see if it’s already installed
- AppEnforce.log – Handles the install process and logs success/failure
Flow
- Notable high-level differences for Packages versus Applications
- [Package only] Copy the content to a package share on the DP
- [Package only] Can install software with the content directly from the DP without downloading
- [Application only] Detection
- [Application only] Custom requirements (global conditions)
- [Application only] Revisions
- User experience in Software Center
- Any one else on the call think of any that are high-level worth mentioning?
- Convert Packages to Applications
- Convert 7-Zip and C++
- Walk-through key Application functionality / features:
- Software Center customisation
- Dedicated install, uninstall and repair functions
- Detection
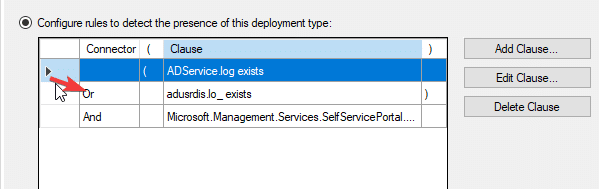
- Scripts and parentheses of operational precedence
- Dependencies
- In Packages too
- Requirements and global conditions
- Basic requirements in Packages too
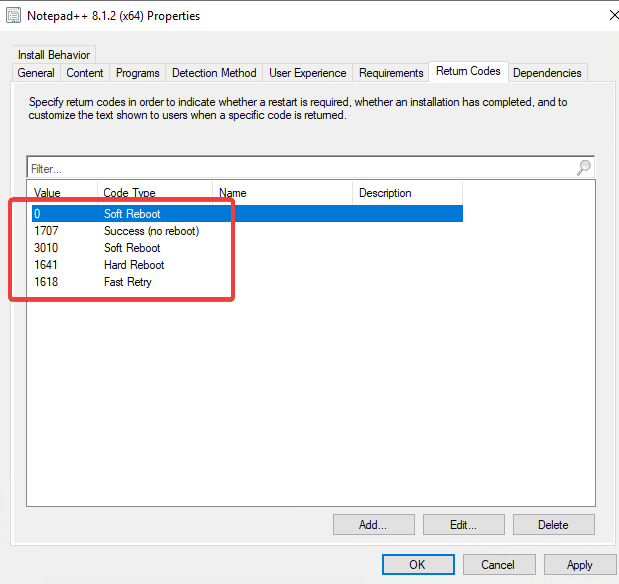
- Return codes
- Supersedence
- Revisions
- Application Groups (pre-release)
- Can’t use in a task sequence!
- Policy & Logs
- <Deploy application to collection>
- Look at a client evaluating policy life using Support Center
- Look at where the client stores applications in WMI
- Logs
- AppIntentEval, AppDiscovery and AppEnforce
- Look at where the server stores applications in WMI
- Final protips or gotcha’s
- Update Content
- Script detection interprets particular outputs as particular results:
https://docs.microsoft.com/en-us/mem/configmgr/apps/deploy-use/create-applications#about-custom-script-detection-methods
Understanding the Software Update Chain

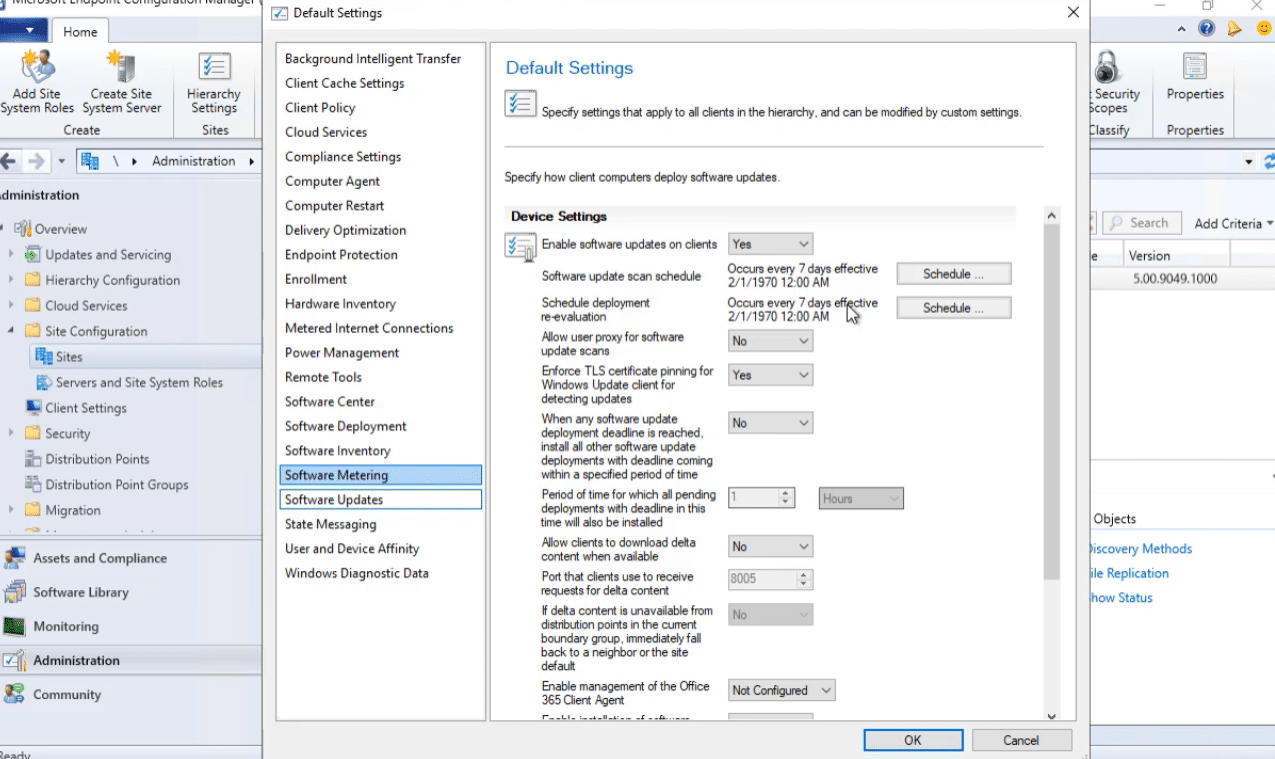
Scenario 1: Configuring Software Update Policy
When you first start off with configuration manager and software updates there are always a lot of questions, what options should l use, how do they work and more.
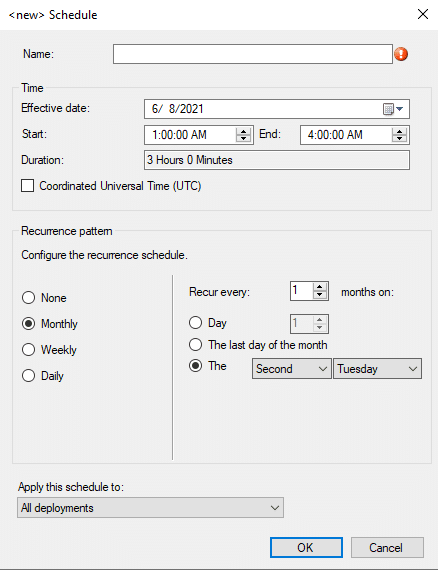
Software Update Scan Schedule
When does this REALLY Happen
- Anytime a NEW software update group is assigned AND machine policy Runs
- Anytime a scheduled instance of Software Update Scan Schedule Hits
- Anytime a Deployment is completed
- Sometimes after a reboot is completed – Depends on assignment configuration
- After a servicing stack update https://docs.microsoft.com/en-us/mem/configmgr/sum/plan-design/plan-for-software-updates#bkmk_ssu
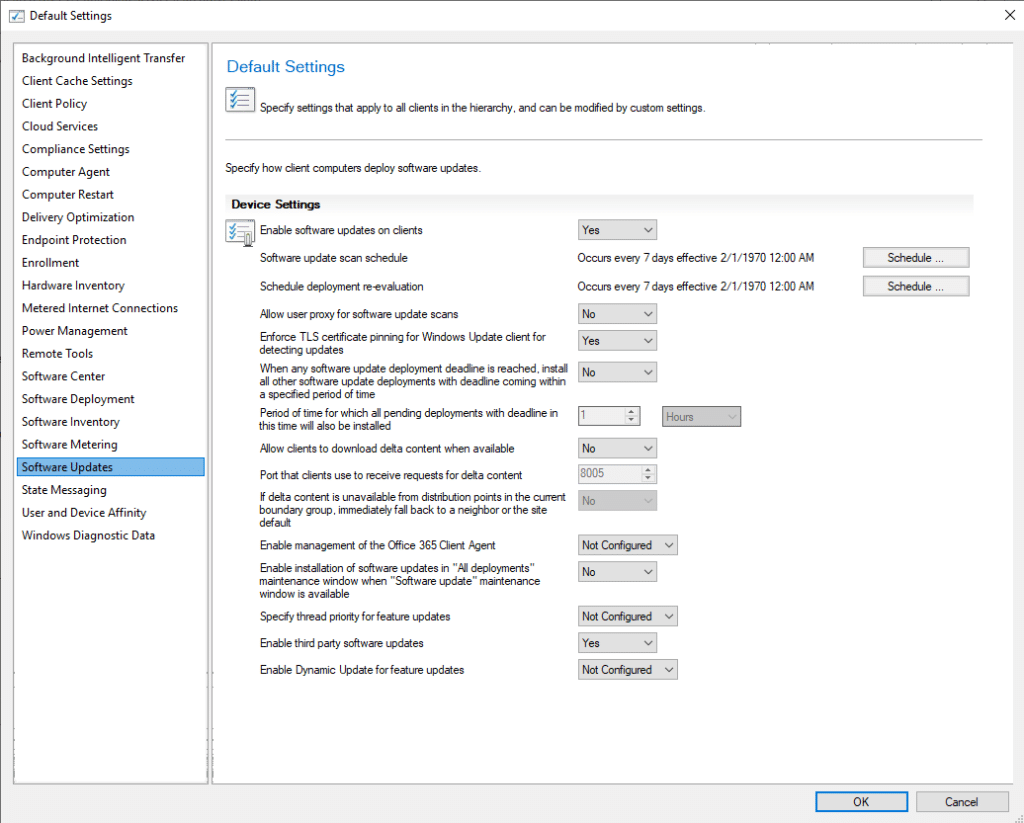
Schedule Deployment Re-evaluation
- This does NOT contact WSUS
- Uses the existing locally stored policies in WMI
WMI Explorer is a fantastic tool to review the classes that are involved in all of this
https://github.com/vinaypamnani/wmie2/releases/tag/v2.0.0.2
To pick up a draggable item, press the space bar. While dragging, use the arrow keys to move the item. Press space again to drop the item in its new position, or press escape to cancel.
To pick up a draggable item, press the space bar. While dragging, use the arrow keys to move the item. Press space again to drop the item in its new position, or press escape to cancel.
| What is It | WMI Path |
|---|---|
| Software Update Objects | MACHINENAMEROOTccmClientSDK:CCM_SoftwareUpdate |
| Update Manager | MACHINENAMEROOTccmClientSDK:CCM_SoftwareUpdatesManager |
| Update CI Assignment | MACHINENAMEROOTccmPolicyMachineActualConfig:CCM_UpdateCIAssignment |
| Maintenance Windows | MACHINENAMEROOTccmPolicyMachineActualConfig:CCM_ServiceWindow |
| Cient Policy | MACHINENAMEROOTccmPolicyMachineActualConfig:CCM_SoftwareUpdatesClientConfig |
Enable Third Party Updates
When you set this option to Yes, it sets the policy for Allow signed updates for an intranet Microsoft update service location and installs the signing certificate to the Trusted Publisher store on the client.
Delta Updates
Explanation from microsoft.com
Set this option to Yes to allow clients to use delta content files. This setting allows the Windows Update Agent on the device to determine what content is needed and selectively download it.
- Before enabling this client setting, ensure Delivery Optimization is configured appropriately for your environment. For more information, see Windows Delivery Optimization and the Delivery Optimization client setting.
- This client setting replaces Enable installation of Express installation files on clients. Set this option to Yes to allow clients to use express installation files. For more information, see Manage Express installation files for Windows 10 updates.
- When this option is set, delta download is used for all Windows update installation files, not just express installation files.
- When using a CMG for content storage, the content for third-party updates won’t download to clients if the Download delta content when available client setting is enabled.
Deltaldownload.log – is the log file that tracks this behavior
Maintenance Windows
When you set this option to Yes, and the client has at least one “Software Update” maintenance window defined, software updates will install during an “All deployments” maintenance window.
By default, this setting is set to No. This value uses the same behavior as before: if both types exist, it ignores the window.
Scenario 2: Maintenance Windows
Types of Windows
To pick up a draggable item, press the space bar. While dragging, use the arrow keys to move the item. Press space again to drop the item in its new position, or press escape to cancel.
To pick up a draggable item, press the space bar. While dragging, use the arrow keys to move the item. Press space again to drop the item in its new position, or press escape to cancel.
| Value | Type |
|---|---|
| 1 | All Deployment Service Window |
| 2 | Program Service Window |
| 3 | Reboot Required Service Window |
| 4 | Software Update Service Window |
| 5 | Task Sequences Service Window |
| 6 | Corresponds to non-working hours |
How To Schedule a Maintenance Window
Finding Maintenance Windows in ConfigMgr
SELECT  sw.Name AS [MW Name],
	Sw.CollectionID,
    sw.Description,
    sw.StartTime,
    sw.Duration AS 'Duration Minutes',
    sw.IsEnabled AS 'MW Enabled',
    sys.Name0 AS ServerName,
	sys.Resource_Domain_OR_Workgr0,
    sys.Operating_System_Name_and0 AS OperatingSystem
FROM  dbo.v_ServiceWindow AS sw INNER JOIN
      dbo.v_FullCollectionMembership AS fcm ON sw.CollectionID = fcm.CollectionID
INNER JOIN  dbo.v_R_System sys ON fcm.ResourceID = sys.ResourceID
WHERE  (sys.Name0 = 'DEMO6')
ORDER BY [MW Name], sys.Name0
The not really maintenance window
Business hours, and clients.
Log File on the Client
servicewindowmanager.log
https://docs.microsoft.com/en-us/mem/configmgr/sum/understand/software-updates-introduction
Understanding How ConfigMgr Interacts with WSUS
Scenario 1: Installing a New Software Update Point
When you install a new software update point, the following will take place!
The Install Flow of new Software Update Point (SUP)
To pick up a draggable item, press the space bar. While dragging, use the arrow keys to move the item. Press space again to drop the item in its new position, or press escape to cancel.
To pick up a draggable item, press the space bar. While dragging, use the arrow keys to move the item. Press space again to drop the item in its new position, or press escape to cancel.
| Component/Log | Log Line Text |
|---|---|
| sitecomp.log | Starting service SMS_SERVER_BOOTSTRAP_DEMO1 with command-line arguments “DM1 D:Program FilesMicrosoft Configuration Manager /install D:Program FilesMicrosoft Configuration Managerbinx64rolesetup.exe SMSWSUS “… |
| SUPSetup.log | SMSWSUS Setup Started…. |
| SUPSetup.log | Supported WSUS version found |
| SUPSetup.log | Installation was successful. |
| WSUSCtrl.log | Attempting connection to local WSUS server |
| WSUSCtrl.log | Successfully connected to local WSUS server |
| WCM.log | WSUS Server configuration has been updated. Updating Group Info. |
| WCM.log | Subscribed Update Categories <?xml version=”1.0″ ?>~~<Categories>~~ |
| WCM.log | Configuration successful. Will wait for 1 minute for any subscription or proxy changes |
| WCM.log | Setting new configuration state to 2 (WSUS_CONFIG_SUCCESS) |
Once the software update point installation is completed, a list of products/categories won’t happen until the first successful SUP sync.
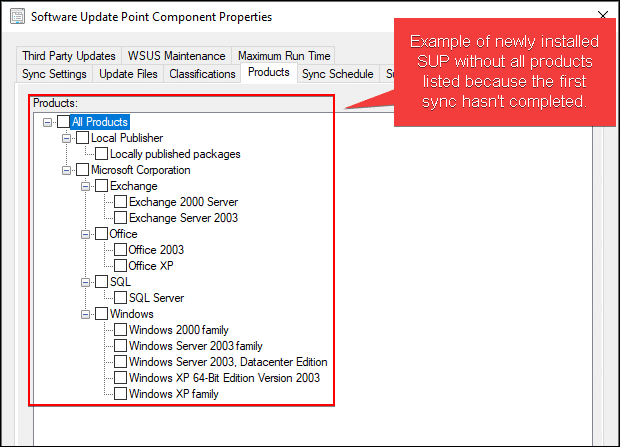
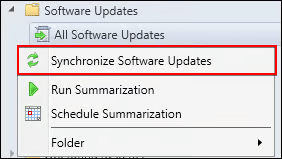
You can right-click All Software Updates and click Synchronize Software Updates to start the first sync.
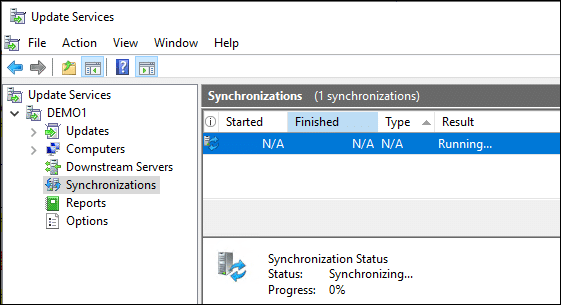
The first synchronization can take a while to complete!
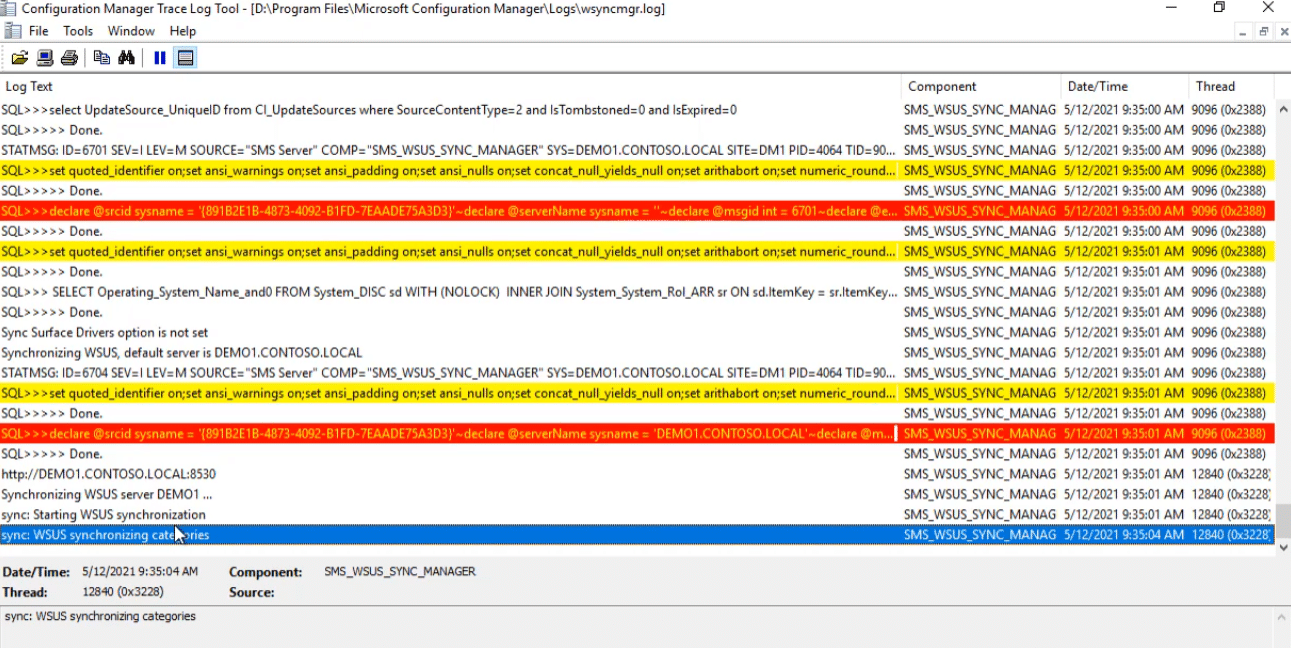
The table below lists the flow to verify the first synchronization and population of the WSUS catalog/categories. The log lines below are with debug and verbose logging enabled. You log lines may not contain this level of data.
First SUP Synchronization Flow
To pick up a draggable item, press the space bar. While dragging, use the arrow keys to move the item. Press space again to drop the item in its new position, or press escape to cancel.
To pick up a draggable item, press the space bar. While dragging, use the arrow keys to move the item. Press space again to drop the item in its new position, or press escape to cancel.
| Component/Log | Log Line Text |
|---|---|
| wsyncmgr.log | Starting Sync |
| wsyncmgr.log | Synchronizing WSUS server DEMO1 … |
| wsyncmgr.log | sync: Starting WSUS synchronization |
| wsyncmgr.log | sync: WSUS synchronizing categories |
| wsyncmgr.log | Synchronizing SMS database with WSUS, default server is DEMO1.CONTOSO.LOCAL |
| wsyncmgr.log | Synchronizing SMS database with WSUS server DEMO1 … |
| wsyncmgr.log | sync: Starting SMS database synchronization |
| wsyncmgr.log | sync: SMS synchronizing categories |
| wsyncmgr.log | sync: SMS synchronizing categories, processed 0 out of 246 items (0%) |
| wsyncmgr.log | sync: SMS synchronizing categories, processed 246 out of 246 items (100%) |
| wsyncmgr.log | declare @refd xml = N'<?xml version=”1.0″ encoding=”utf-16″?><Categories><Category Id=”Product:7e903438-3690-4cf0-bc89-2fc34c26422b” /><Category Id=”Product:e903c733-c905-4b1c-a5c4-3528b6bbc746″ />…… |
| wsyncmgr.log | Done synchronizing SMS with WSUS Server DEMO1 |
| wsyncmgr.log | Set content version of update source {891B2E1B-4873-4092-B1FD-7EAADE75A3D3} for site DM1 to 10 |
Tip: During the first sync, the longest part will be WSUS pulling the catalog for Microsoft Update.
Scenario 2: How ConfigMgr Database Sync from WSUS Database
The ConfigMgr database pulls the update catalog from the WSUS database. Below, you can find more details about how this happens.
Sync Flow for ConfigMgr Sync from WSUS
In our example below, we manually triggered a sync using the step above.
To pick up a draggable item, press the space bar. While dragging, use the arrow keys to move the item. Press space again to drop the item in its new position, or press escape to cancel.
To pick up a draggable item, press the space bar. While dragging, use the arrow keys to move the item. Press space again to drop the item in its new position, or press escape to cancel.
| Component/Log | Log Line Text |
|---|---|
| wsyncmgr.log | Wakeup by inbox drop |
| wsyncmgr.log | select cat.CategoryInstance_UniqueID, cat.CategoryInstanceName from fn_ListUpdateCategoryInstances(9) cat where cat.AllowSubscription=1 and cat.IsSubscribed=1 and cat.IsParentSubscribed=0 order by 1 |
| wsyncmgr.log | Read SUPs from SCF for DEMO2.CONTOSO.LOCAL |
| wsyncmgr.log | Synchronizing SMS database with WSUS, default server is DEMO2.CONTOSO.LOCAL |
| wsyncmgr.log | Synchronizing SMS database with WSUS server DEMO2 … |
| wsyncmgr.log | Syncing updates arrived after 03/05/2021 21:07:43 |
| wsyncmgr.log | Requested categories: Company=Patch My PC, Product=Windows 10, version 1903 and later, UpdateClassification=Security Updates, UpdateClassification=Updates, UpdateClassification=Critical Updates |
| wsyncmgr.log | sync: SMS synchronizing categories, processed 378 out of 378 items (100%) |
| wsyncmgr.log | sync: SMS synchronizing updates |
| wsyncmgr.log | sync: SMS synchronizing updates, processed 0 out of 30 items (0%) |
| wsyncmgr.log | select CI_UniqueID, RevisionNumber, LastModifiedDate=convert(nvarchar, DateLastModified, 126)+N’Z’, IsDeployed~from v_UpdateCIs~where CIType_ID in (1,8) and IsExpired=0 and UpdateSource_ID=16777217 and CI_UniqueID=’6ec13d2d-306c-41fe-83bf-9789346721bf’ |
| wsyncmgr.log | insert vCI_ConfigurationItems (CI_UniqueID, CIVersion, ModelID, CIType_ID, PolicyVersion, Precedence, DateCreated, DateLastModified, LastModifiedBy, CreatedBy, ContentSourcePath, PermittedUses, IsBundle, IsHidden, IsUserDefined, IsEnabled, IsExpired, SourceSite, ApplicabilityCondition, CI_CRC, IsTombstoned) values (‘6ec13d2d-306c-41fe-83bf-9789346721bf’, 200, 16780004, 8, 1, 0, ’05/11/2021 18:15:49′, ’05/11/2021 18:15:49′, N”, N”, N”, 0, 1, 0, 0, 1, 0, ‘DM2’, ‘<ApplicabilityRule ExpressionLanguage=”Custom” Handler=”{2DB70103-3DFB-4806-85B0-B27B561284BB}”><UpdateId>6ec13d2d-306c-41fe-83bf-9789346721bf</UpdateId><CISource><Id>{CA3F999B-7A81-43BF-912C-56E267C1E565}</Id><Version>9</Version></CISource><ProductId>b3c75dc1-155f-4be4-b015-3f1a91758e52</ProductId></ApplicabilityRule>’, ‘c02abc2’, 0) |
| wsyncmgr.log | insert into CI_DocumentStore (DocumentIdentifier, Body, IsVersionLatest, DocumentType) values (‘c344e7f6-f83b-4693-8c02-41b2e072127e’, ”, 0, 0)~;select SCOPE_IDENTITY() |
| wsyncmgr.log | sync: SMS synchronizing updates, processed 30 out of 30 items (100%) |
| wsyncmgr.log | sync: SMS performing cleanup |
| wsyncmgr.log | Done synchronizing SMS with WSUS Server DEMO2 |
| wsyncmgr.log | Updated 60 items in SMS database, new update source content version is 9 |
Here’s an example of us querying an update in the ConfigMgr database that was synchronized:
select * FROM CI_DocumentStore where DocumentIdentifier = 'c344e7f6-f83b-4693-8c02-41b2e072127e'Scenario 3: WSUS Cleanup in ConfigMgr
Below are some key points mentioned in the video related to the cleanup.
Key Point for WSUS Maintenance in ConfigMgr
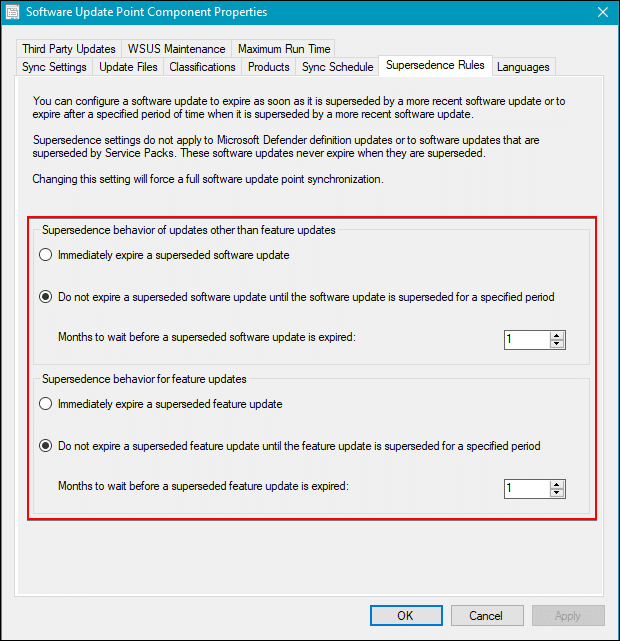
The setting in the Supersedence Rules tab determines how long an update needs to be superseded before it will be expired.
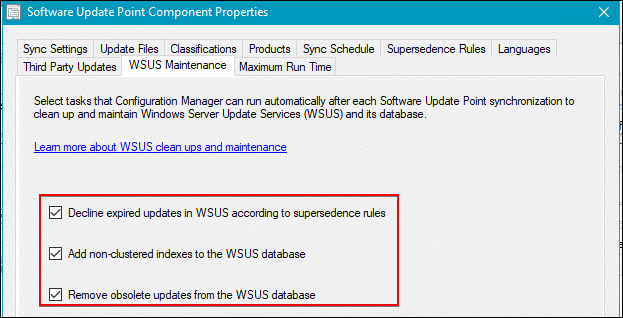
This setting in the WSUS Maintenance tab will determine if expired updates should be declined (improves WSUS performance and health).
Log Files for ConfigMgr Cleanup Task for WSUS
To pick up a draggable item, press the space bar. While dragging, use the arrow keys to move the item. Press space again to drop the item in its new position, or press escape to cancel.
To pick up a draggable item, press the space bar. While dragging, use the arrow keys to move the item. Press space again to drop the item in its new position, or press escape to cancel.
| Component/Log | Log Line Text |
|---|---|
| wsyncmgr.log | sync: SMS performing cleanup |
| wsyncmgr.log | Removed 54 unreferenced updates |
| wsyncmgr.log | Starting cleanup on WSUS, default server DEMO2.CONTOSO.LOCAL |
| wsyncmgr.log | Cleaning up WSUS server DEMO2 … |
| wsyncmgr.log | nclLocalizedPropertyID Index Already exists in column LocalizedPropertyID on table tbLocalizedPropertyForRevision. Did Not Create Index.Server: DEMO2, DataBase: SUSDB |
| wsyncmgr.log | nclSupercededUpdateID Index Already exists in column SupersededUpdateID on table tbRevisionSupersedesUpdate. Did Not Create Index.Server: DEMO2, DataBase: SUSDB |
| wsyncmgr.log | Done Indexing SUSDB. Custom indexes were created if they didn’t exist previously. DEMO2 |
| wsyncmgr.log | sync: SMS performing cleanup |
| wsyncmgr.log | Cleanup processed 57 total updates and declined 27 |
| wsyncmgr.log | Done Declining updates in WSUS Server DEMO2 |
| wsyncmgr.log | Starting Deletion of ObseleteUpdates |
| wsyncmgr.log | 0 update(s) were deleted from SUSDB in Server: DEMO2 Database: SUSDB |
| wsyncmgr.log | Deletion Completed |
| wsyncmgr.log | Updated 54 items in SMS database, new update source content version is 11 |
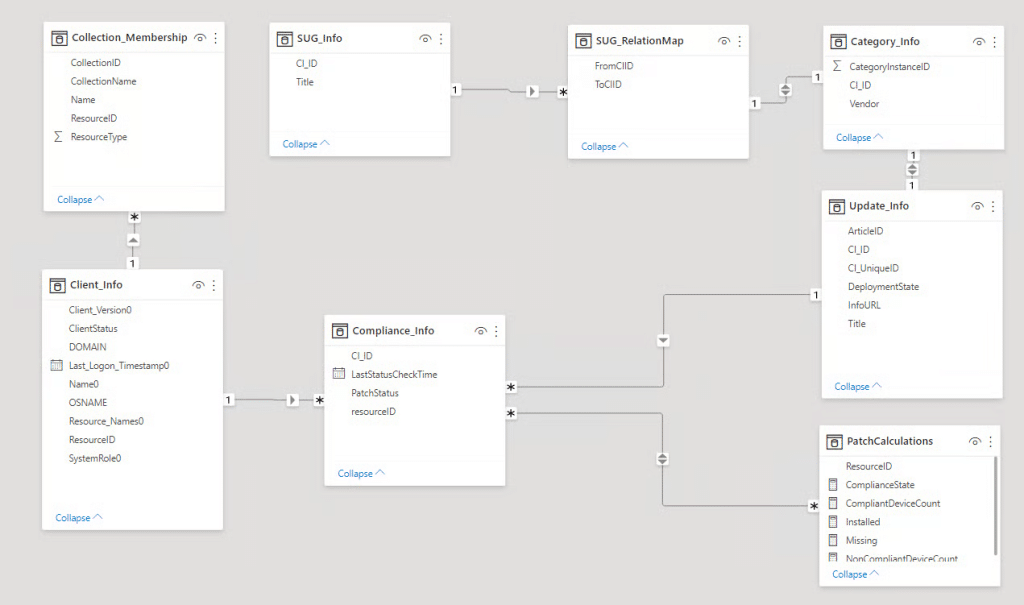
Scenario 4: View Update Views in the Database in Relationships
Determining Compliance
Quick dive into getting compliance data. The below query is an example of how you can retrieve the compliance status of updates for all machines in SQL. This view pulls from a few different points of interest.
To pick up a draggable item, press the space bar. While dragging, use the arrow keys to move the item. Press space again to drop the item in its new position, or press escape to cancel.
To pick up a draggable item, press the space bar. While dragging, use the arrow keys to move the item. Press space again to drop the item in its new position, or press escape to cancel.
| View Name | Purpose |
|---|---|
| v_Update_ComplianceStatus | Get compliance state for a CI_ID and a ResourceID (filtered) |
| v_UpdateInfo | Get real world Update Info |
| v_StateNames | Get the human meatning of state values |
SELECT CASE
			WHEN v_Update_ComplianceStatus.Status = '0' THEN 'UNKNOWN'
			WHEN v_Update_ComplianceStatus.Status = '1' THEN 'NOT REQUIRED'
			WHEN v_Update_ComplianceStatus.Status = '2' THEN 'NON COMPLIANT'
			WHEN v_Update_ComplianceStatus.Status = '3' THEN 'COMPLIANT'
			ELSE 'NA'
		END AS 'PatchStatus'
	, v_Update_ComplianceStatus.Status
    , v_Update_ComplianceStatus.CI_ID
    , v_Update_ComplianceStatus.resourceID
	, v_Update_complianceStatus.LastStatusCheckTime
    , v_StateNames.StateName
    , v_stateNames.StateDescription
FROM v_Update_ComplianceStatus
LEFT OUTER JOIN v_UpdateInfo on v_Update_ComplianceStatus.CI_ID = v_UpdateInfo.CI_ID
LEFT OUTER JOIN v_StateNames on v_Update_ComplianceStatus.Status = v_StateNames.StateID
WHERE v_UpdateInfo.CIType_ID = '8' and v_StateNames.TopicType = '500'
The other side of the coin when you get ALL the data.
To pick up a draggable item, press the space bar. While dragging, use the arrow keys to move the item. Press space again to drop the item in its new position, or press escape to cancel.
To pick up a draggable item, press the space bar. While dragging, use the arrow keys to move the item. Press space again to drop the item in its new position, or press escape to cancel.
| View Name | Purpose |
|---|---|
| v_Update_ComplianceStatusAll | Get compliance stat for a CI_ID and a ResourceID (ALL) |
Note the query below can return a massive data set when run in production.
SELECT CASE
			WHEN v_Update_ComplianceStatusAll.Status = '0' THEN 'UNKNOWN'
			WHEN v_Update_ComplianceStatusAll.Status = '1' THEN 'NOT REQUIRED'
			WHEN v_Update_ComplianceStatusAll.Status = '2' THEN 'NON COMPLIANT'
			WHEN v_Update_ComplianceStatusAll.Status = '3' THEN 'COMPLIANT'
			ELSE 'NA'
		END AS 'PatchStatus'
	, v_Update_ComplianceStatusAll.Status
    , v_Update_ComplianceStatusAll.CI_ID
    , v_Update_ComplianceStatusAll.resourceID
	, v_Update_ComplianceStatusAll.LastStatusCheckTime
    , v_StateNames.StateName
    , v_stateNames.StateDescription
FROM v_Update_ComplianceStatusAll
LEFT OUTER JOIN v_UpdateInfo on v_Update_ComplianceStatusAll.CI_ID = v_UpdateInfo.CI_ID
LEFT OUTER JOIN v_StateNames on v_Update_ComplianceStatusAll.Status = v_StateNames.StateID
WHERE v_UpdateInfo.CIType_ID = '8' and v_StateNames.TopicType = '500'
Software Update Group Relationships
Software update groups are typically what we filter against as we typically have a group that we are targetting for a specific month.
Get Software Update Group Names, and their CI’s.
SELECT v_UpdateInfo.CI_ID
	, v_UpdateInfo.Title
FROM v_UpdateInfo
WHERE v_UpdateInfo.CIType_ID = '9'
Mapping the relationship of all updates in a software update group.
WITH SUGInfo AS
(
	SELECT v_UpdateInfo.CI_ID
	FROM v_UpdateInfo
	WHERE v_UpdateInfo.CIType_ID = '9'
)
SELECT v_CIRelation.FromCIID
	, v_CIRelation.ToCIID
FROM SUGInfo
LEFT OUTER JOIN v_CIRelation ON SUGInfo.CI_ID = v_CIRelation.FromCIID
Stringing it all together.
Configuration Manager – Content Troubleshooting
Scenario 1: Succesful Content Lookup Workflow
Pre-Conditions:
- Healthy ConfigMgr client.
- The client is in a boundary.
- There is a Distribution Point associated with the boundary group.
- The content is distributed successfully to the DP.
- The software / update / package is deployed to the device.
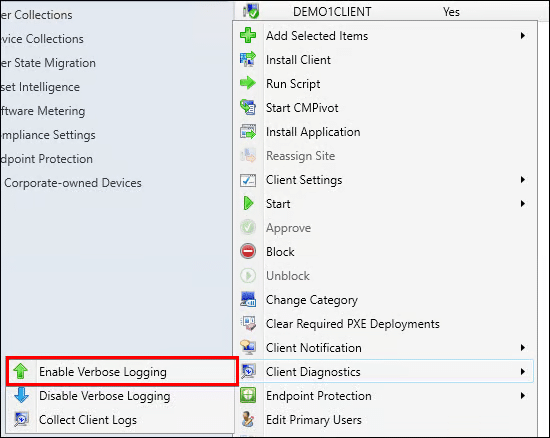
- Enable verbose logging on the site system with the MP role and the client
Successful Content Lookup Flow
There are many moving parts when a content location request is sent to the management point and processes by a ConfigMgr client. Here are some key snippets of how this happens.
| Log File | Log Text |
|---|---|
| DataTransferService.log | BITSHelper, remote name = http://DEMO1.CONTOSO.LOCAL:80/SMS_DP_SMSPKG$/9c93cbee-aabc-4daf-996a-4580daa09c87/sccm?/debcf2da-e7da-4c50-b718-fc95ffe40c9d_1.cab, local name = C:Windowsccmcache1debcf2da-e7da-4c50-b718-fc95ffe40c9d_1.cab |
| DataTransferService.log | Job: {C54E37D3-BFDE-4629-AC82-32E6CE733750}, Total Files: 1, Transferred Files: 0, Total Bytes: 79417630, Transferred Bytes: 262144 |
| CAS.log | CContentAccessService::NotifyDownloadProgressEx – downloaded size 52480, total size 77556 |
| CAS.log | The hash we are verifying is SDMPackage:<Content ContentId=”9c93cbee-aabc-4daf-996a-4580daa09c87″ Version=”1″><FileContent Name=”debcf2da-e7da-4c50-b718-fc95ffe40c9d_1.cab” Hash=”78A05BCA9CCA039C62C1B2D494281E72ED864BD9″ HashAlgorithm=”SHA1″ Size=”79417630″/></Content> |
| CAS.log | Hash verification succeeded for content 9c93cbee-aabc-4daf-996a-4580daa09c87.1 downloaded under context System |
| DataTransferService.log | Job: {C54E37D3-BFDE-4629-AC82-32E6CE733750}, Total Files: 1, Transferred Files: 1, Total Bytes: 79417630, Transferred Bytes: 79417630 |
| DataTransferService.log | DTSJob {C54E37D3-BFDE-4629-AC82-32E6CE733750} successfully completed download. DataTransferService 4/27/2021 8:21:18 AM 2612 (0x0A34) |
| DataTransferService.log | DTS job {C54E37D3-BFDE-4629-AC82-32E6CE733750} has completed: |
| DataTransferService.log | Elapsed time : 5 seconds |
| ContentTransferManager | CCTMJob::EvaluateState(JobID={C17823B5-A8A9-48F8-8375-64CFC55869CB}, State=Success) |
Tip
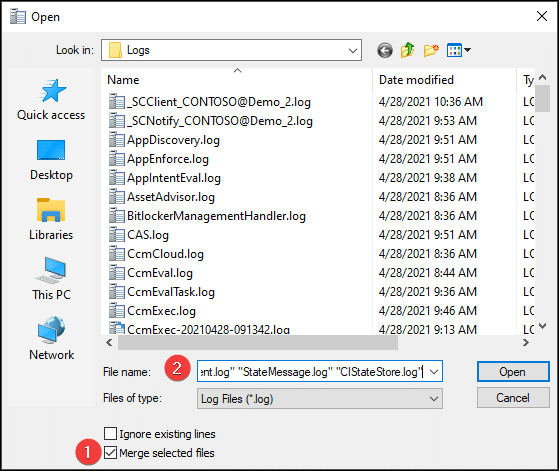
You can open all content logs at once in CMTrace.exe by adding the following files: “CAS.log” “CIAgent.log” “CIDownloader.log” “CIStateStore.log” “ClientLocation.log” “CMBITSManager.log” “ContentTransferManager.log” “DataTransferService.log” “DCMAgent.log” “LocationServices.log” “StateMessage.log” “UpdatesDeployment.log”
Snippets of Location Request
Example of the management point MP_Location.log calling the stored procedure MP_GetContentDPInfo
<ServerNameList>
    <ServerName LocalityEx="256" Fallback="0">DEMO1.CONTOSO.LOCAL</ServerName>
</ServerNameList>,SMSUpdate,00000000,CONTOSO.LOCAL,CONTOSO.LOCAL,<ClientLocationInfo LocationType="SMSUpdate" DistributeOnDemand="0" UseAzure="0" AllowWUMU="0" UseInternetDP="0" AllowHTTP="1" AllowSMB="1" AllowMulticast="1" AllowSuperPeer="1" DPTokenAuth="1">
<ADSite Name="DEFAULT-FIRST-SITE-NAME"/>
<Forest Name="CONTOSO.LOCAL"/>
<Domain Name="CONTOSO.LOCAL"/>
<IPAddresses>
    <IPAddress SubnetAddress="192.168.10.0" Address="192.168.10.35"/>
</IPAddresses>
<Adapters>
    <Adapter Name="Ethernet" IfType="6" PhysicalAddressExists="1" DnsSuffix="" Description="Microsoft Hyper-V Network Adapter"/>
</Adapters>
<BoundaryGroups BoundaryGroupListRetrieveTime="2021-04-28T15:00:21.637" IsOnVPN="0">
    <BoundaryGroup GroupID="16777218" GroupGUID="ad36e248-a857-45e6-ab82-c179bb680b18" GroupFlag="0"/>
</BoundaryGroups>
</ClientLocationInfo>,<BoundaryGroups BoundaryGroupListRetrieveTime="2021-04-28T15:00:21.637" IsOnVPN="0">
<BoundaryGroup GroupID="16777218" GroupGUID="ad36e248-a857-45e6-ab82-c179bb680b18" GroupFlag="0"/>
</BoundaryGroups>)
Tip
The Fallback=”0″ or Fallback=”1″ controls if fallback is allowed. To learn more about fallback see this Microsoft Doc.
Example of a content location request from the client sent to the management point in CAS.log
<ContentLocationRequest SchemaVersion="1.00" BGRVersion="1" ExcludeFileList="">
    <Package ID="UID:9c93cbee-aabc-4daf-996a-4580daa09c87" Version="1" DeploymentFlags="9223372036855300962"/>
    <AssignedSite SiteCode="DM1"/>
    <ClientLocationInfo LocationType="SMSUpdate" DistributeOnDemand="0" UseAzure="0" AllowWUMU="0" UseInternetDP="0" AllowHTTP="1" AllowSMB="1" AllowMulticast="1" AllowSuperPeer="1" DPTokenAuth="1">
        <ADSite Name="Default-First-Site-Name"/>
        <Forest Name="CONTOSO.LOCAL"/>
        <Domain Name="CONTOSO.LOCAL"/>
        <IPAddresses>
            <IPAddress SubnetAddress="192.168.10.0" Address="192.168.10.35"/>
        </IPAddresses>
        <Adapters>
            <Adapter Name="Ethernet" IfType="6" PhysicalAddressExists="1" DnsSuffix="" Description="Microsoft Hyper-V Network Adapter"/>
        </Adapters>
        <BoundaryGroups BoundaryGroupListRetrieveTime="2021-04-28T15:00:21.637" IsOnVPN="0">
            <BoundaryGroup GroupID="16777218" GroupGUID="ad36e248-a857-45e6-ab82-c179bb680b18" GroupFlag="0"/>
        </BoundaryGroups>
    </ClientLocationInfo>
</ContentLocationRequest>
Example of Content location reply from the management point to the client in the client’s CAS.log
<ContentLocationReply SchemaVersion="1.00" BGRVersion="1">
    <BoundaryGroups BoundaryGroupListRetrieveTime="2021-04-27T14:21:06.263" IsOnVPN="0">
        <BoundaryGroup GroupID="16777218" GroupGUID="ad36e248-a857-45e6-ab82-c179bb680b18" GroupFlag="0"/>
    </BoundaryGroups>
    <ContentInfo PackageFlags="0" DeploymentFlags="9223372036855300962">
        <ContentHashValues/>
    </ContentInfo>
    <Sites>
        <Site>
            <MPSite SiteCode="DM1" MasterSiteCode="DM1" SiteLocality="LOCAL" IISPreferedPort="80" IISSSLPreferedPort="443"/>
            <LocationRecords>
                <LocationRecord LocalityEx="BOUNDARYGROUP" DPFallbackIn="PT0M">
                    <URL Name="http://DEMO1.CONTOSO.LOCAL/SMS_DP_SMSPKG$/9c93cbee-aabc-4daf-996a-4580daa09c87" Signature="http://DEMO1.CONTOSO.LOCAL/SMS_DP_SMSSIG$/9c93cbee-aabc-4daf-996a-4580daa09c87.1.tar" Capability="0"/>
                    <ADSite Name="Default-First-Site-Name"/>
                    <IPSubnets>
                        <IPSubnet Address="192.168.10.0"/>
                        <IPSubnet Address=""/>
                    </IPSubnets>
                    <Metric Value=""/>
                    <Version>9040</Version>
                    <Capabilities SchemaVersion="1.0">
                        <Property Name="SSLState" Value="0"/>
                    </Capabilities>
                    <ServerRemoteName>DEMO1.CONTOSO.LOCAL</ServerRemoteName>
                    <DPType>SERVER</DPType>
                    <Windows Trust="1"/>
                </LocationRecord>
            </LocationRecords>
        </Site>
    </Sites>
    <RelatedContentIDs/>
</ContentLocationReply>
Here’s a snippet of the download options for a software update download request in UpdatesDeploymentAgent.log
<DownloadOptions>
    <Priority>Foreground</Priority>
    <DPLocality>10</DPLocality>
    <Timeout>
        <Location>604800</Location>
        <Download>86400</Download>
        <PerDPInactivity>0</PerDPInactivity>
        <TotalInactivity>0</TotalInactivity>
        <UseBranchCache>true</UseBranchCache>
        <PersistOnWriteFilterDevices>false</PersistOnWriteFilterDevices>
        <OverrideServiceWindows>false</OverrideServiceWindows>
    </Timeout>
</DownloadOptions>
A point of interest is DPLocality flag determines how the client obtains distribution points, according to distribution point locality. Possible values are:
To pick up a draggable item, press the space bar. While dragging, use the arrow keys to move the item. Press space again to drop the item in its new position, or press escape to cancel.
To pick up a draggable item, press the space bar. While dragging, use the arrow keys to move the item. Press space again to drop the item in its new position, or press escape to cancel.
| Value | UInt32 |
|---|---|
| DP_DOWNLOAD_FROM_LOCAL | 4 |
| DP_DOWNLOAD_FROM_REMOTE | 6 |
| DP_NO_FALLBACK_UNPROTECTED | 17 |
| DP_ALLOW_WUMU | 18 |
| DP_ALLOW_METERED_NETWORK | 19 |
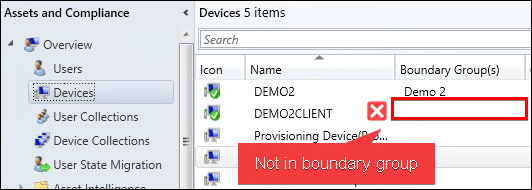
Scenario 2: Failed Content Lookup Due to Boundary Misconfiguration
Pre-Conditions:
- Healthy ConfigMgr client.
- The client is NOT in a boundary.
- There is a Distribution Point associated with the boundary group the client is NOT in.
- The content is distributed successfully to the DP.
- The software / update / package is deployed to the device.
- Enable verbose logging on the site system with the MP role and the client
Ways to identify when a Client is not in Boundary Group
If a client is not in a boundary group here are some snippets that can be helpful.
To pick up a draggable item, press the space bar. While dragging, use the arrow keys to move the item. Press space again to drop the item in its new position, or press escape to cancel.
To pick up a draggable item, press the space bar. While dragging, use the arrow keys to move the item. Press space again to drop the item in its new position, or press escape to cancel.
| Log File | Log Description |
|---|---|
| LocationServices.log | Client is not in any boundary group and ConfigMgr is no longer managing WindowsDO GPO. Set WindowsDO GPO to default values. Mode = LAN. GroupID = empty |
| CAS.log | The number of discovered DPs(including Branch DP and Multicast) is 0 |
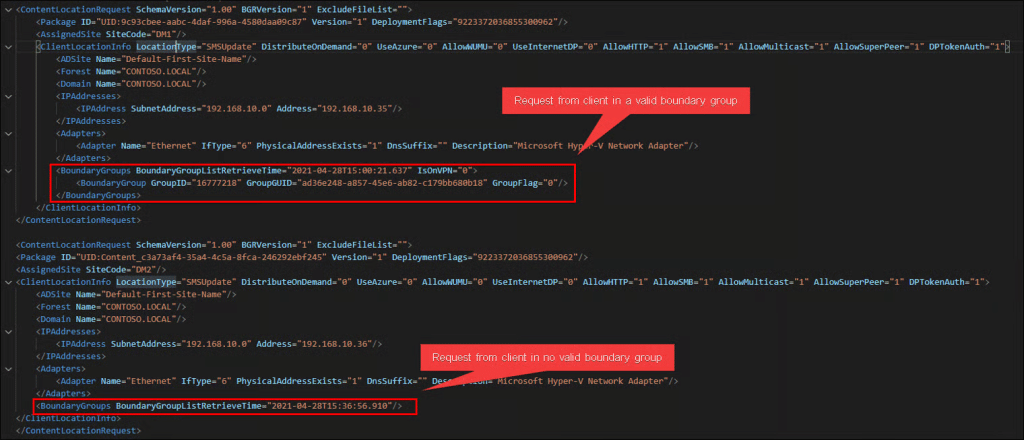
In the content location request in the CAS.log, you will also notice the BoundaryGroup element doesn’t contain the fields GroupID, GroupGUID, or GroupFlag.
Tip
Search the text “ContentLocationRequest” in the CAS.log to find location requests performed on the client-side logs.
In the CAS.log here is an example of a response from the management point when the client is in no boundary group, and fallback is disabled, and no content was found.
<ContentLocationReply SchemaVersion="1.00" BGRVersion="1" ContentFlags="86016" HashAlgorithm="32780" AlgorithmPreference="4" Hash="5230AF02CF06BDD36CDD10FD13C4DF795F465E46FC47E1B1A00E44E2589AA6AD" ExcludeFileListHash="" RelatedContentID="">
    <BoundaryGroups BoundaryGroupListRetrieveTime="2021-04-28T15:36:56.910"/>
    <ContentInfo/>
    <Sites>
        <Site>
            <MPSite SiteCode="DM2" MasterSiteCode="DM2" SiteLocality="FALLBACK"/>
            <LocationRecords/>
        </Site>
    </Sites>
    <RelatedContentIDs/>
</ContentLocationReply>
We can compare this to the response received in the CAS.log when the content was found and the client is in a boundary group.
<ContentLocationReply SchemaVersion="1.00" BGRVersion="1">
    <BoundaryGroups BoundaryGroupListRetrieveTime="2021-04-28T15:00:21.637" IsOnVPN="0">
        <BoundaryGroup GroupID="16777218" GroupGUID="ad36e248-a857-45e6-ab82-c179bb680b18" GroupFlag="0"/>
    </BoundaryGroups>
    <ContentInfo PackageFlags="0" DeploymentFlags="9223372036855300962">
        <ContentHashValues/>
    </ContentInfo>
    <Sites>
        <Site>
            <MPSite SiteCode="DM1" MasterSiteCode="DM1" SiteLocality="LOCAL" IISPreferedPort="80" IISSSLPreferedPort="443"/>
            <LocationRecords>
                <LocationRecord LocalityEx="BOUNDARYGROUP" DPFallbackIn="PT0M">
                    <URL Name="http://DEMO1.CONTOSO.LOCAL/SMS_DP_SMSPKG$/9c93cbee-aabc-4daf-996a-4580daa09c87" Signature="http://DEMO1.CONTOSO.LOCAL/SMS_DP_SMSSIG$/9c93cbee-aabc-4daf-996a-4580daa09c87.1.tar" Capability="0"/>
                    <ADSite Name="Default-First-Site-Name"/>
                    <IPSubnets>
                        <IPSubnet Address="192.168.10.0"/>
                        <IPSubnet Address=""/>
                    </IPSubnets>
                    <Metric Value=""/>
                    <Version>9040</Version>
                    <Capabilities SchemaVersion="1.0">
                        <Property Name="SSLState" Value="0"/>
                    </Capabilities>
                    <ServerRemoteName>DEMO1.CONTOSO.LOCAL</ServerRemoteName>
                    <DPType>SERVER</DPType>
                    <Windows Trust="1"/>
                </LocationRecord>
            </LocationRecords>
        </Site>
    </Sites>
    <RelatedContentIDs/>
</ContentLocationReply>
If the content is not found, you will be able to note the following line in StateMessage.log
State message(State ID : 5003) with TopicType 1702 and TopicId ScopeId_CA3F999B-7A81-43BF-912C-56E267C1E565/DeploymentType_677dac51-d2a2-4bbd-aeb0-4b845aa288cd/1 has been recorded for S-1-5-21-1880864260-2612682489-34998949-6112

Scenario 3: Download Failure Due to Content Distribution Failure
This scenario covers some of the basics in troubleshooting content that has failed to distribute to a distribution point.
Log Files for Troubleshooting Content Distribution in ConfigMgr
To pick up a draggable item, press the space bar. While dragging, use the arrow keys to move the item. Press space again to drop the item in its new position, or press escape to cancel.
To pick up a draggable item, press the space bar. While dragging, use the arrow keys to move the item. Press space again to drop the item in its new position, or press escape to cancel.
| Log File | Log Text |
|---|---|
| distmgr.log | Records details about package creation, compression, delta replication, and information updates. It can also include other activities from the distribution manager component. For example, installing a distribution point, connection attempts, and installing components. For more information on other functionality that uses this log, see Service connection point and OS deployment. |
| PkgXferMgr.log | Records the actions of the SMS_Executive component that is responsible for sending content from a primary site to a remote distribution point. |
https://docs.microsoft.com/en-us/troubleshoot/mem/configmgr/components-and-threads
Example of Error if the Source Folder Doesn’t Exist or the Site Server Doesn’t Have Access
To pick up a draggable item, press the space bar. While dragging, use the arrow keys to move the item. Press space again to drop the item in its new position, or press escape to cancel.
To pick up a draggable item, press the space bar. While dragging, use the arrow keys to move the item. Press space again to drop the item in its new position, or press escape to cancel.
| Log File | Log Text |
|---|---|
| distmgr.log | The source directory \demo3SourcesApplicationsIgor Pavlov7-Zip (x64) – MSI Installaad16824-5471-4dd8-ae69-f71167d7051d doesn’t exist or the SMS service cannot access it, Win32 last error = 2 |
| distmgr.log | Failed to take snapshot of one or more contents in package DM300013 |
Scenario 4: Download Failure Due to Invalid Content
For scenario 4, we delete a file directly from the FileLib and modify a file directly in the FileLib. We will cover the content library in a future video. This builds off of scenario 3 by showing specific failure scenarios.
The fix for this type of scenario may be as simple as performing an ‘update content’ or ‘redistribute’ the content which is failing. Other times you may have to validate antivirus exclusions on your endpoints and servers. Using the log files to identify what type of error is occurring will be key to resolving the issue and determine where the issue lies.
Example of Error if the Hash of the Downloaded File Does Not Match the Expected Hash
To pick up a draggable item, press the space bar. While dragging, use the arrow keys to move the item. Press space again to drop the item in its new position, or press escape to cancel.
To pick up a draggable item, press the space bar. While dragging, use the arrow keys to move the item. Press space again to drop the item in its new position, or press escape to cancel.
| Log File | Log Text |
|---|---|
| CAS.log | Failed to do hash verification with preference : 4. Try to verify at next hash algorithm |
| CAS.log | Download failed for content Content_ebb608a6-a6a7-4384-b168-63a0f446b7fb.1 under context S-1-5-21-1880864260-2612682489-34998949-6112, error 0x80091007 |
| DCMAgent.log | appState: DownloadFailed |
The above log files and lines would be helpful from the client when determining if there is a hash mismatch issue. It is good to note that the hash mismatch may not be due to a corrupt file in the Content Library, but it is still worth investigating. This can also commonly be due to Antivirus on the endpoint which lacks the prover exclusions for example.
Example of Error if a File is Missing from the Content Library When a Client Requests It
To pick up a draggable item, press the space bar. While dragging, use the arrow keys to move the item. Press space again to drop the item in its new position, or press escape to cancel.
To pick up a draggable item, press the space bar. While dragging, use the arrow keys to move the item. Press space again to drop the item in its new position, or press escape to cancel.
| Log File | Log Text |
|---|---|
| DataTransferService.log | [CCMHTTP] ERROR: URL=http://DEMO4.CONTOSO.LOCAL:80/SMS_DP_SMSPKG$/Content_ac0256aa-503f-48f1-bfa0-972d685cf50d.1, Port=80, Options=224, Code=0, Text=CCM_E_BAD_HTTP_STATUS_CODE |
| DataTransferService.log | Successfully queued event on HTTP/HTTPS failure for server ‘DEMO4.CONTOSO.LOCAL’. |
| DataTransferService.log | Error sending DAV request. HTTP code 404, status ‘Not Found’ |
| DataTransferService.log | GetDirectoryList_HTTP(‘http://DEMO4.CONTOSO.LOCAL:80/SMS_DP_SMSPKG$/Content_ac0256aa-503f-48f1-bfa0-972d685cf50d.1’) failed with code 0x800705b4. |
| DataTransferService.log | Error retrieving manifest (0x800705b4). |
| IIS Logs on DP | 2021-04-29 02:25:19 192.168.10.22 PROPFIND /SMS_DP_SMSPKG$/Content_ac0256aa-503f-48f1-bfa0-972d685cf50d.1 – 80 CONTOSODEMO4CLIENT$ 192.168.10.38 SMS+CCM+5.0 – 404 0 0 1704 2 |
Log Files for Troubleshooting
Client Logs
To pick up a draggable item, press the space bar. While dragging, use the arrow keys to move the item. Press space again to drop the item in its new position, or press escape to cancel.
To pick up a draggable item, press the space bar. While dragging, use the arrow keys to move the item. Press space again to drop the item in its new position, or press escape to cancel.
| Log File | Description |
|---|---|
| CAS.log | The Content Access service. Maintains the local package cache on the client. |
| CIAgent.log | Records details about the process of remediation and compliance for compliance settings, software updates, and application management. |
| CIDownloader.log | Records details about configuration item definition downloads. |
| CIStateStore.log | Records changes in state for configuration items, such as compliance settings, software updates, and applications. |
| ClientLocation.log | Records tasks that are related to client site assignment. |
| CMBITSManager.log | Records information for Background Intelligent Transfer Service (BITS) jobs on the device. |
| ContentTransferManager.log | Schedules the Background Intelligent Transfer Service (BITS) or Server Message Block (SMB) to download or access packages. |
| DataTransferService.log | Records all BITS communication for policy or package access. |
| DCMAgent.log | Records high-level information about the evaluation, conflict reporting, and remediation of configuration items and applications. |
| LocationServices.log | Records the client activity for locating management points, software update points, and distribution points. |
| StateMessage.log | Records details about software update state messages that are created and sent to the management point. |
| UpdatesDeployment.log | Records details about deployments on the client, including software update activation, evaluation, and enforcement. Verbose logging shows additional information about the interaction with the client user interface. |
Server Logs
To pick up a draggable item, press the space bar. While dragging, use the arrow keys to move the item. Press space again to drop the item in its new position, or press escape to cancel.
To pick up a draggable item, press the space bar. While dragging, use the arrow keys to move the item. Press space again to drop the item in its new position, or press escape to cancel.
| Log File | Description |
|---|---|
| MP_Location.log | Records location request and reply activity from clients. |
| IIS Logs | Built-in IIS logging – useful for all IIS based ConfigMgr roles. Log location and name may vary. |