When publishing third-party updates, a common error our customer may encounter is error code 2147942403.
The most common reason this error will occur is when the WSUSContent folder from the registry is different than the SUSDB database. Error 2147942403 = The system cannot find the path specified.
Determine if You are Affected
Depending on the method you are using to publish updates to WSUS, you will see one of the following errors in the PatchMyPC.log, SMS_ISVUPDATES_SYNCAGENT.log, or SoftareDistribution.log
An error occurred while publishing an update to WSUS: Failed to sign package; error was: 2147942403
Error signing cab file: %Path%fdfec4101f23f3c1d1b9-6c38-4a7a-855c-d4e4746be71c_1.cab, result: 2147942403
Troubleshooting Step 1: Validate the WSUS Content Folder in the Registry Matches the SUSDB
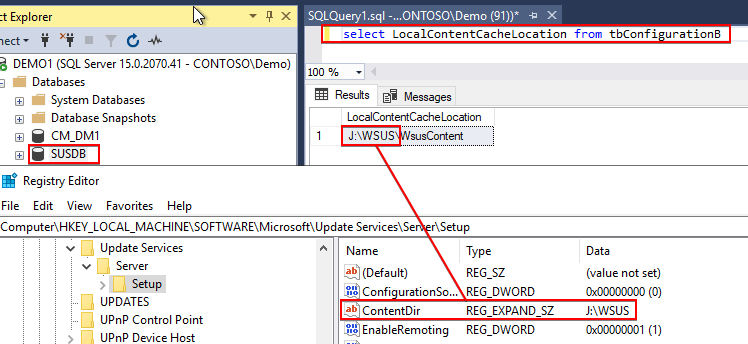
The first step we recommend is validating the WSUS folders are defined correctly, and the values in the registry match the values in the database (SUSDB).
- To check the WSUS ContentDir in the Registry check: HKLM\SOFTWARE\Microsoft\Update Services\Server\Setup:ContentDir
- To check the value in the SUSDB run the following query in SQL Management Studio against the SUSDB:
Select LocalContentCacheLocation from tbConfigurationB
Ensure the paths resolve to the same root folder as shown below:

Troubleshooting Step 2: If LocalContentCacheLocation Database Value doesn’t Match ContentDir RegKey
If the database value for LocalContentCacheLocation matches the ContentDir this step can be skipped. If the values do not match, please proceed below:
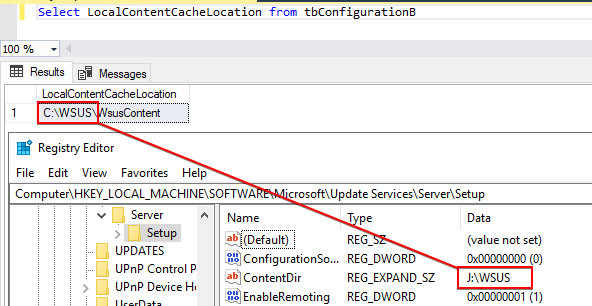
Here’s an example where the WSUS content directory is different and incorrect in the database:

Option 1 Fix (Recommended):
The safest method to correct the value in the database would be to perform a WSUS Content move to the correct directory using the KB: How to Move the WSUS Content Folder to a New Location
Option 2 Fix (Database Edit):
If the value is correct in the registry and only the database value is wrong, commonly occurs when you set up a second SUP with a different WSUS Content folder and used the same SUSDB. You may be able to correct the issue by editing the value for LocalContentCacheLocation.
In the example below, the incorrect value in the database was: ‘C:\WSUS\WsusContent’ when the expected value should be: ‘J:\WSUS\WsusContent’
To change the path in the scenario above you could run the following SQL command against the SUSDB:
Update tbConfigurationB Set LocalContentCacheLocation = ‘J:\WSUS\WsusContent’
Note: A common reason the ContentDir registry value and LocalContentCacheLocation value may not match is that a second SUP/WSUS has been added that shared the same SUSDB, but the value for the WSUSContent folder was configured to a different directory than the primary software update.
When third-party updates are published, the authoritative path used is the value defined in the LocalContentCacheLocation in the SUSDB, and not the path defined in the ContentDir registry value.
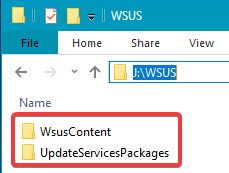
Troubleshooting Step 3: Validate the WSUSContent and UpdateServicesPackages Folder Exist
Validate the WSUSContent and UpdateServicesPackages exist and are shared as shown below:


If the folders or shares do not exist please see CreateDirectory failed Error when Publishing Third-Party Updates | Patch My PC
Resolution for Error 2147942403 when Publishing Third-Party Updates (Video Version)
Please review the video guide below for the resolution for error “2147942403”
