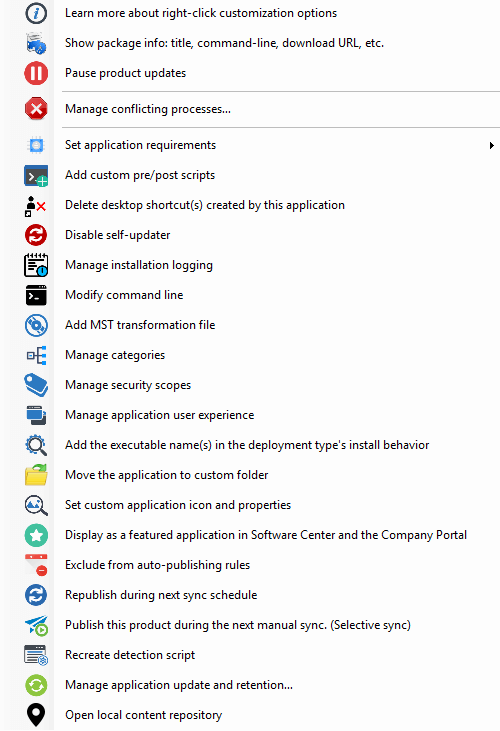
Right-Click Options Available for Updates and Applications
You can easily customize updates for third-party applications using our custom right-click selection menu, including custom scripts, command lines, and more.
This article details the custom right-click actions available within our publishing service. Right-click actions can be applied at the All Products, Vendor, and Product level with the products list in the Updates Rules and Application Rules tab.
All the custom actions and based on customer feedback, and can be applied as needed to improve your software update or application installation experience. Any customizations applied will also be used for any future updates or applications published.
Topics covered in this article:
- Watch the Live Webinar Playback on Right-Click Options with Q&A
- Publishing with Full-Content or Metadata Only
- Show package info: title, command-line, download URL, etc.
- Pause Product Updates
- Manage conflicting processes…
- Set application requirements
- Add custom pre/post scripts
- Delete desktop shortcuts(s) created by this application
- Disable self-updater
- Manage installation logging
- Modify command line
- Add MST transformation file
- Manage assignments
- Assignment Filters
- Manage dynamic assignments
- Manage categories
- Manage security scopes
- Manage ESP Profiles
- Manage role scope tags
- Override Win32 application options
- Manage naming convention
- Manage Application User Experience
- Add the executable name(s) in the deployment type’s install behavior
- Move the application to a custom folder
- Set custom application icon and properties
- Display as a featured application in the company portal
- Exclude from auto-publishing rules
- Republish during next sync schedule
- Recreate detection script
- Manage application update and retention…
- Publish this product during the next manual sync (Selective Sync)
- Open local content repository
- Watch the video recording
Watch the Live Webinar Playback on Right-Click Options with Q&A
You can review our webinar about all the available right-click options for customizing applications in the video below:
Publishing with full-content or metadata only
The right-click options for full content and metadata only can be used to configure how you want software updates to be published to WSUS.
- Full Content: publishes the full content of the update to WSUS. Full content includes metadata and the update binaries and is required to download and deploy the update in WSUS/SCCM.
- Metadata only: publish only the metadata; update binaries are not published. Metadata only allows you to view the compliance details in SCCM/WSUS for the update, but you will be unable to deploy unless it’s re-published with full-content.
- Available At: All Products, Vendors, and Products
- Applicable To: Software Updates
Show package info: title, command-line, download URL, etc.
This option will show information for the currently synchronized catalog.![]()
- Title (Including version)
- File Name
- Command-line
- Download URL
- Digest
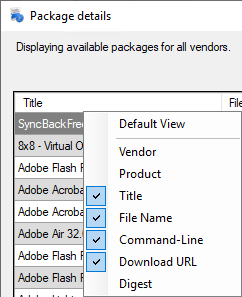
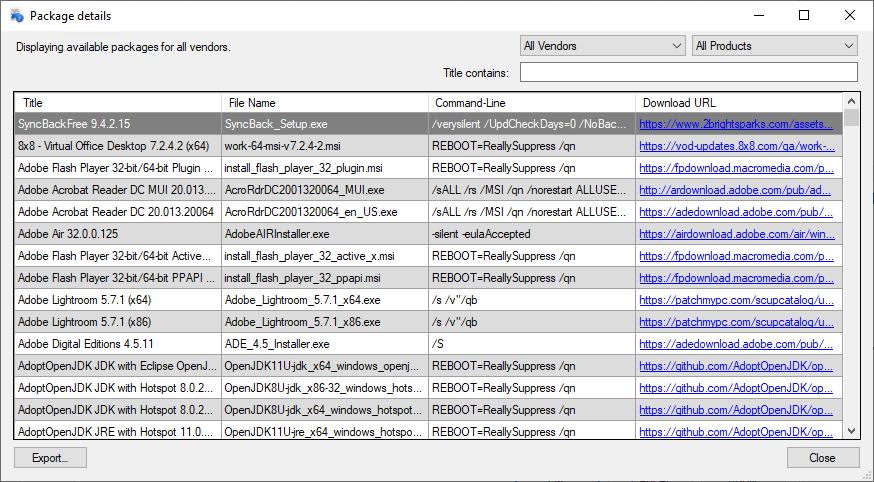
- Available At: All Products, Vendors, and Products
- Applicable To: Applications, Software Updates
Pause Product Updates
This option allows you to temporarily stop publishing, of an application or update for a particular product, until a given date configured by you.
For example, in the screenshot below, Adobe Acrobat Reader DC Continous (x64) is configured to not publish a new version until 01 September 2022. A new version (if available) will publish on this date.
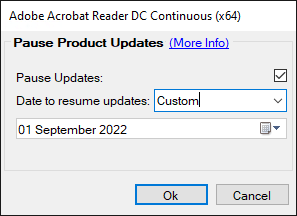
If a product is paused and there is a new version available, you will be notified via the Alerts that the product is paused.
![]()
This feature requires the Enterprise Plus subscription.
- Available At: Products
- Applicable To: Applications, Software Updates
Manage conflicting processes
When updating third-party applications, there may be cases where you need to close an application that is currently open by an end-user.
Read more about this option: Manage Conflicting Processes when Updating Third-Party Applications
![]()
- Available At: All Products, Vendors, and Products
- Applicable To: Applications, Software Updates
Set application requirements
Control whether applications created by the Publisher can only be installed on workstations, servers or 32bit operating systems.
This sets a requirement on the application in Intune or ConfigMgr (deployment type).

- Available At: Products
- Applicable To: Applications
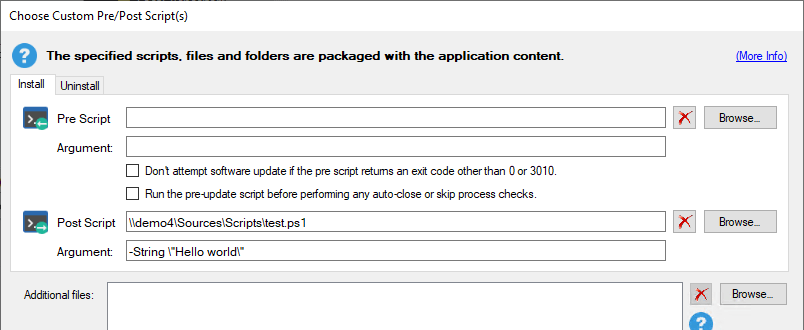
Add custom pre/post scripts
This option allows you to insert custom scripts that can be set to run either before or after the product installation.
![]()
When enabled, you can choose custom scripts by browsing out and selecting files to insert as a pre-install script, post-install script, pre-uninstall script, or post-uninstall script. Each script inserted includes a field for arguments if necessary. You can also insert any additional files or folders that the script(s) may need access to.
![]() Note: Any scripts, files, or folders you choose from the below will be included in the payload to the device. In other words, the script and any additional files and folders will be transferred locally to the device when the update or application is downloaded.
Note: Any scripts, files, or folders you choose from the below will be included in the payload to the device. In other words, the script and any additional files and folders will be transferred locally to the device when the update or application is downloaded.
Additionally, there are two checkboxes that change the behavior of the scripts.
- Don’t attempt the software update if the pre-script returns an exit code other than 0 or 3010.
- If the provided pre-script exits with any exit other than 0 or 3010 then ScriptRunner will exit with code 32767
- Run the pre-update script before performing any auto-close or skip process checks.
- If you have a ‘Manage Conflicting Process‘ option set and this box is checked then the pre-script will run before the conflicting process check.

The file types supported for custom scripts are:
- .vbs
- .bat
- .cmd
- .ps1
- .exe
- .msi
Please note that if the product has already been published as an update, you will need to republish the update.
See the following two articles as examples on how to leverage scripts or additional files:
- How to customize your TeamViewer App or Update
- Advanced Application Configuration using Pre/Post Scripts
- Pass Variables into Pre and Post Scripts
- Available At: Products
- Applicable To: Applications, Software Updates
![]() Note: To include quotes in the arguments field for any of your pre/post scripts, wrap them in double quotes escaped with a backslash. For example:
Note: To include quotes in the arguments field for any of your pre/post scripts, wrap them in double quotes escaped with a backslash. For example:
![]() Note: The pre/post scripts will be executed in whatever context the installation starts in.
Note: The pre/post scripts will be executed in whatever context the installation starts in.
If an install/update will start in the SYSTEM context, so will the pre/post scripts. For user-based apps, the scripts will run in the USER context.
![]() Note: When specifying a PowerShell .ps1 script file for either a pre or post-update script, and you attempt to pass an argument which accepts an array, you cannot use traditional PowerShell syntax.
Note: When specifying a PowerShell .ps1 script file for either a pre or post-update script, and you attempt to pass an argument which accepts an array, you cannot use traditional PowerShell syntax.
It helps to understand that powershell.exe is invoked from cmd.exe and therefore the syntax of -MyParameter "Item1","Item2","Item3" will not parse as you might intend when used in the Argument field. This is because cmd.exe cannot interpert PowerShell arrays, it attempts to parse the second item in the array as a command or parameter.
To workaround this, you could pass a string to your parameter with a delimiter and within your script split the string on the delimiter. Here is an example:

Delete desktop shortcuts(s) created by this application
This option will automatically delete any public desktop shortcut(s) created by a product’s installer.
![]()
- Available At: All Products, Vendors, and Products
- Applicable To: Applications, Software Updates
Disable self-updater
This option will disable the product’s auto-update feature if it exists.
![]()
- Available At: All Products, Vendors, and Products
- Applicable To: Applications, Software Updates
Manage installation logging
This option enables logging during the installation of the update on the client device.
![]()
When enabled, the publishing service will create a directory (default path: C:\windows\ccm\logs\PatchMyPCInstallLogs) that will store the vendor’s installation log for that product, providing greater detail if troubleshooting is necessary. There are additional checkbox options to enable verbose logging, prefix the log with the computer name of the client device, and to designate a backup location to store log files for failed installations.

- Available At: All Products, Vendors, and Products
- Applicable To: Applications, Software Updates
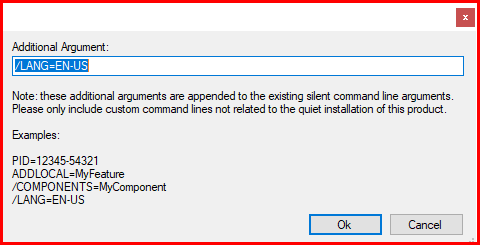
Modify command line
This allows you to modify the command line by inserting additional arguments.
![]()
When enabled, a field will appear to insert additional arguments that will be appended to the existing silent command-line arguments for the product’s installation.
- Available At: Products
- Applicable To: Applications, Software Updates
Add MST transformation file
For products that use an MSI based-installer, you can apply a Transforms file. A transform can modify information that is in any persistent table in the installer database.
![]()
Within the MST file dialog, you need to select the (.MST) file and optionally a (.CAB) file, if required.

- Available At: Products that use MSI Based Installers
- Applicable To: Applications, Software Updates
![]() Note: The MST and/or Cab file are added into the update/app in the relative path. For an Application it will be in the app’s content path, for an update the MST/Cab will be bundled in update cab file. MST/Cab file selections will persist through updates.
Note: The MST and/or Cab file are added into the update/app in the relative path. For an Application it will be in the app’s content path, for an update the MST/Cab will be bundled in update cab file. MST/Cab file selections will persist through updates.
Manage assignments
- Available At: All Products, Vendors, and Products
- Applicable To: Intune Apps, Intune Updates
This option allows you to manage the assignments you would like created for your Win32 applications (Intune Apps, and Intune Updates).
When you select to Manage assignments a UI is presented as shown below where you can Add assignment, Remove assignment, and configure Override manual assignment changes.
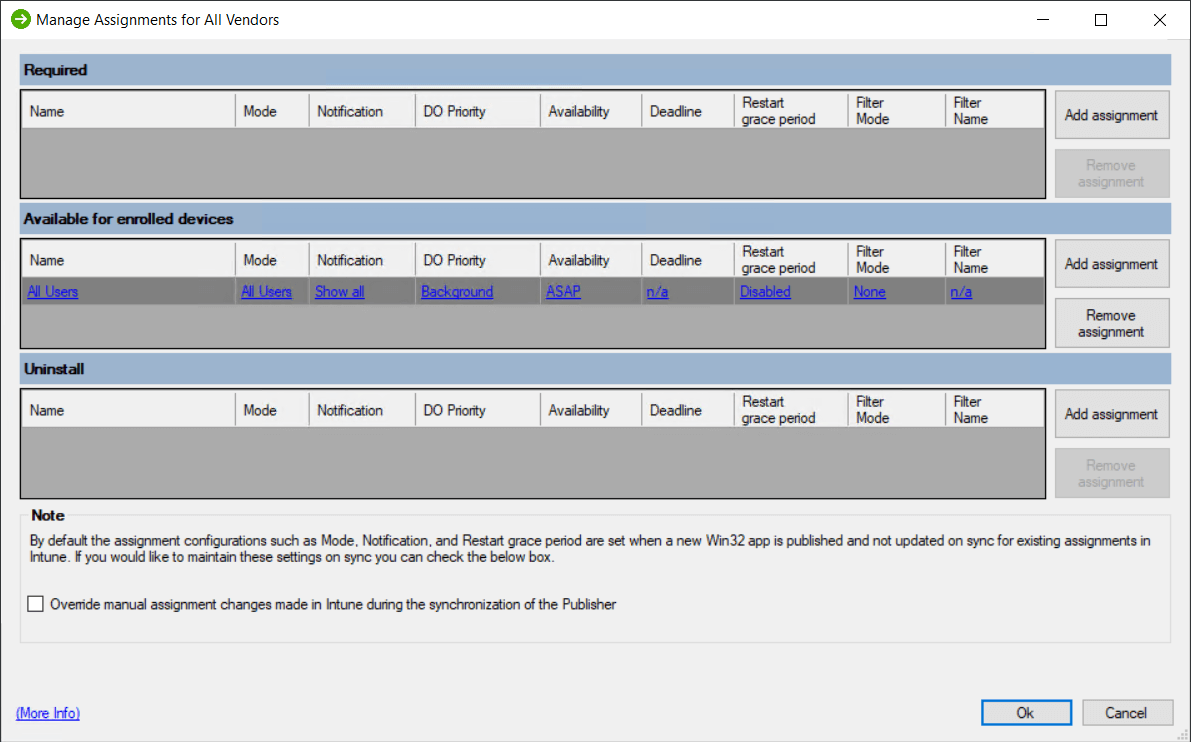
Selecting Add assignment will present a window allowing the selection of an Azure AD Group as shown below.

This is a live query of our Azure AD tenant for groups. There are some filtering options to assist with finding the desired group to target with an assignment.
Once an assignment is created the Name, Mode, Notification, DO Priority, Availability, Deadline, or Restart grace period column content can be clicked to open the Assignment editor.
Assignment Options
Any changes made to assignment options here will be applied to the Intune application or update during the next Publisher synchronization.
Mode
Mode cannot be configured for “All Users” and “All Devices” assignments. For other Azure AD groups, you can choose whether the group should be Included or Excluded from the assignment.

Notification
The Notification can be customized on all assignments. The configuration here will determine if and what toast notifications are popped by the Intune Management Extension as the app or update is installed or uninstalled. The options for notifications are:-
- Show All (Default)
- Show Restarts
- Hide All

DO Priority
Delivery Optimization (DO) priority will dictate how quickly an application should be processed once the policy has been evaluated by the Intune Management Extension. The options for DO are:-
- Foreground
- Background (Default)
For Patch My PC updates, typically background is an acceptable setting for DO. If you deploy Patch My PC applications during auto-pilot, it is recommended to set DO to foreground

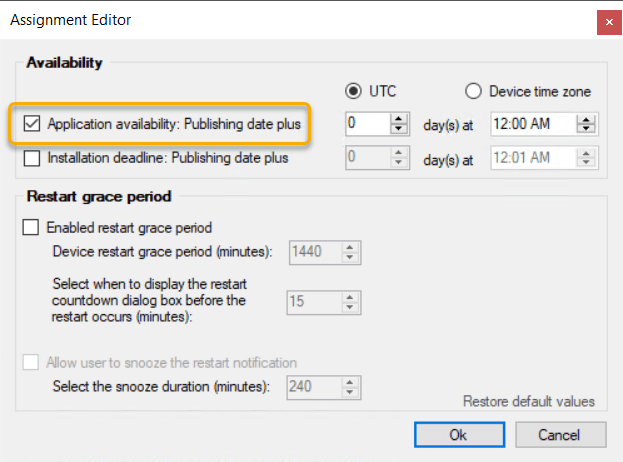
Availability
The Availability setting will dictate the earliest time which the Win32 app is made available to the device. Once the availability time is reached, detection is run on the device and content immediately starts to download. The options for availability are:-
- ASAP (Default)
- A date and time in the future, from the date the Win32 app was published (max 120 days)
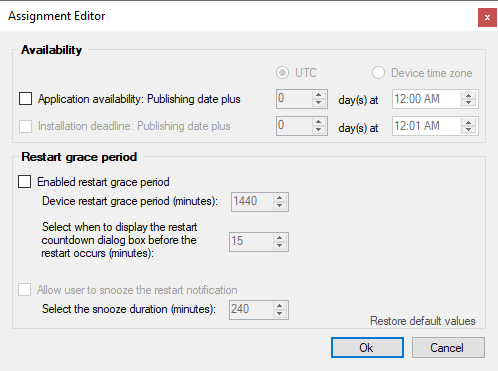
The Device restart grace period (in minutes) setting will dictate the grace period allowed before the device will be rebooted. By default, the restart grace period is 24 hours (1440 minutes). A toast notification will be popped to the end user informing them of the pending reboot. The option Select when to display the restart countdown.. can be configured when to alert the user of the reboot. The default setting is to pop the toast notification is 15 minutes before the reboot is enforced.
Deadline
Deadlines can only be configured on Patch My PC Apps and Updates deployed with a Required intent. An availability date must also be configured ( The defaul value zero indicates the Win32 app is made available ASAP). Once the deadline is reached, the Win32 app will policy will be processed by the device.
The Device restart grace period (in minutes) setting will dictate the grace period allowed before the device will be rebooted. By default, the restart grace period is 24 hours (1440 minutes). A toast notification will be popped to the end user informing them of the pending reboot. The option Select when to display the restart countdown.. can be configured when to alert the user of the reboot. The default setting is to pop the toast notification is 15 minutes before the reboot is enforced.
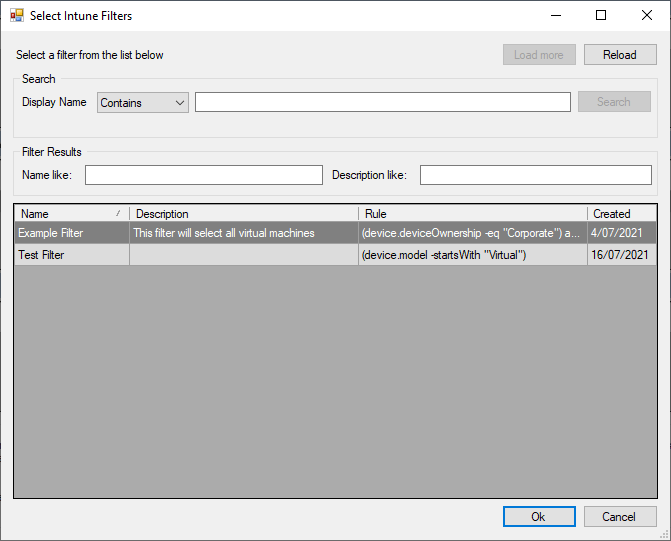
Filter Mode and Filter Name
This feature requires the Enterprise Plus subscription.
- Available At: All Products
- Applicable To: Intune Updates
![]() Note: To Assign and manage filters you will require an Enterprise Plus or Enterprise Premium license. If an assignment in Intune has filters applied to it, these will be copied across to new product versions regardless of license level.
Note: To Assign and manage filters you will require an Enterprise Plus or Enterprise Premium license. If an assignment in Intune has filters applied to it, these will be copied across to new product versions regardless of license level.
Clicking on Filter Mode will cycle through the available modes – Include, Exclude & None.
Clicking on the Filter Name will bring up a filter selection window to allow you to select which filter to apply to the assignment.
![]() Note: To assign and manage filters you will need to update your AAD application registration with the DeviceManagementConfiguration.Read.All application scoped API permission.
Note: To assign and manage filters you will need to update your AAD application registration with the DeviceManagementConfiguration.Read.All application scoped API permission.
![]() Note: Only one filter can be applied at one time to an assignment.
Note: Only one filter can be applied at one time to an assignment.
![]() Note: Setting the filter mode to None will clear the filter association from the assignment.
Note: Setting the filter mode to None will clear the filter association from the assignment.
Override manual assignment changes made in Intune during the synchronization of the Publisher

When this checkbox is checked for a product the Publisher will enforce the intent (required, available, uninstall), mode, notification, and restart grace period configuration for the assignments.
If this checkbox is checked and an assignment targeting a specific group changes intent (i.e. required to available) or mode (i.e. include to exclude) then the assignment will be deleted and recreated during the next sync. This would include a new available and deadline time based on your configured settings, as it is a newly created assignment.
If this checkbox is checked and the notification or restart grace period configuration is changed in the Publisher the settings will be applied during the next sync.
![]() Note: Changes made in the Manage Assignments right-click option are not immediate. They are applied during the Publisher synchronization.
Note: Changes made in the Manage Assignments right-click option are not immediate. They are applied during the Publisher synchronization.
![]() Note: Some settings will not apply until a new application is published unless the Override checkbox is checked, or it is a newly created assignment for a group without an existing assignment. See the Override section above for more details.
Note: Some settings will not apply until a new application is published unless the Override checkbox is checked, or it is a newly created assignment for a group without an existing assignment. See the Override section above for more details.
![]() Note: The Publisher will never delete an assignment directly. If you remove an assignment from the list, it will not be recreated in the future, but it will not be deleted. It may also be copied from previous app versions depending on your Intune application creation options.
Note: The Publisher will never delete an assignment directly. If you remove an assignment from the list, it will not be recreated in the future, but it will not be deleted. It may also be copied from previous app versions depending on your Intune application creation options.
Manage dynamic assignments
This option allows you to publish application updates to Intune that will dynamically assign to security groups based on pre-defined search criteria.
![]()
Read more about this option: Manage Dynamic Assignments
This feature requires the Enterprise Plus subscription.
- Available At: All Products
- Applicable To: Intune Updates
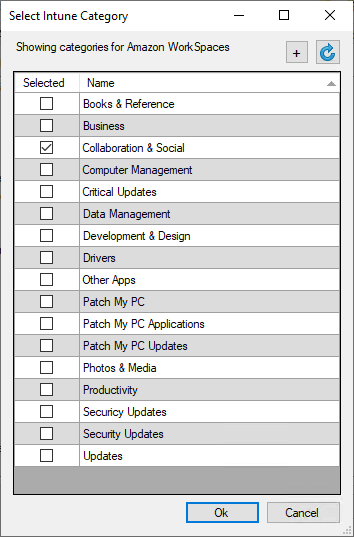
Manage categories
This option allows you to set the categories that will be assigned to applications.
![]()
The categories displayed will include existing categories. You can create new categories within this same UI using the + button to the right.
Managing Intune categories:
Managing SCCM categories:
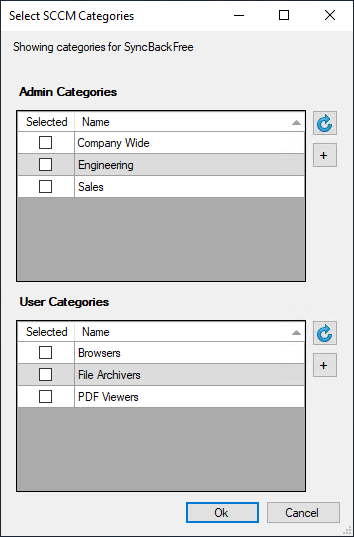
![]() Note: Categories will be added to existing applications and updates during the next publisher sync, but they will not be removed for existing applications and updates. Whenever a new application or update is created the Publisher will ensure the currently specified categories are in place.
Note: Categories will be added to existing applications and updates during the next publisher sync, but they will not be removed for existing applications and updates. Whenever a new application or update is created the Publisher will ensure the currently specified categories are in place.
- Available At: All Products, Vendors, and Products
- Applicable To: ConfigMgr Apps, Intune Apps, Intune Updates
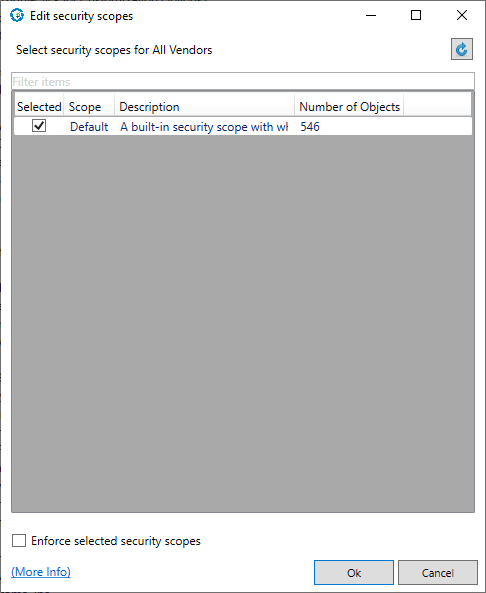
Manage security scopes
This option allows you to set the Security Scopes an application in ConfigMgr should be associated with. The Publisher will set the Security Scopes for the applications during the sync.
![]()
The security scopes are pulled from your ConfigMgr environment. You can refresh the list with the button in the top right corner. Additionally, you can right-click the headers to add or remove columns. The list can be filtered by using the ‘Filter items’ textbox as well.
Optionally, you can check the box to Enforce selected security scopes. When checked, the Publisher will ensure only the selected scopes exist on the ConfigMgr application. If a scope is added outside of the Publisher, such as directly in the ConfigMgr console, then the Publisher will remove the extra scopes during synchronization.
![]() Note: Security scopes will require new permission, specifically Application > Set Security Scope, and Security Scopes > Read, which you may not have in your Security Role created for Patch My PC. You can follow the instructions in this article to either re-import an updated role or set the new permissions manually. If you choose to re-import the role it will simply overwrite the permissions and retain your existing role assignments.
Note: Security scopes will require new permission, specifically Application > Set Security Scope, and Security Scopes > Read, which you may not have in your Security Role created for Patch My PC. You can follow the instructions in this article to either re-import an updated role or set the new permissions manually. If you choose to re-import the role it will simply overwrite the permissions and retain your existing role assignments.
- Available At: All Products, Vendors, and Products
- Applicable To: ConfigMgr Apps
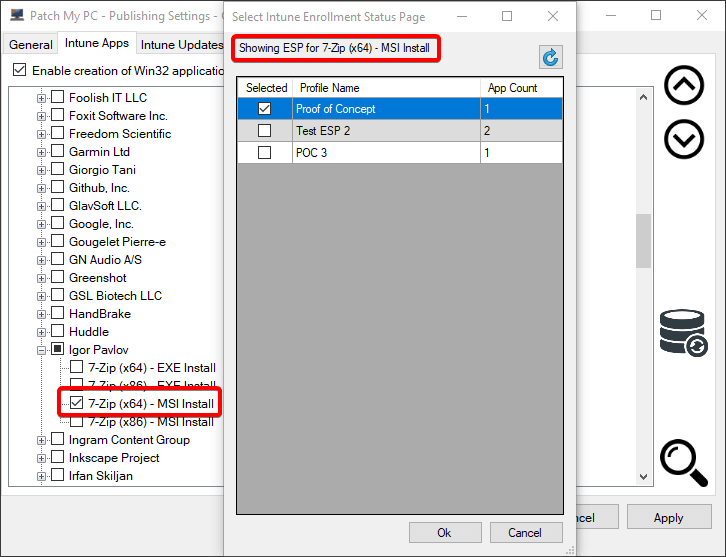
Manage ESP Profiles
This option allows you to manage the Enrollment Status Page profiles which any Win32 application can be associated with (Intune Apps). ![]()
- Available At: All Products, Vendors, and Products
- Applicable To: Intune Apps
Manage Role Scope Tags
This option allows you to manage the role scope tags which a Win32 application is associated with in Intune.
![]()
The role scope tags are pulled from Microsoft Intune for your configured tenant. An example list is shown below. Also, this feature will require your Azure App Registration to have DeviceManagementRBAC.Read.All permissions set.
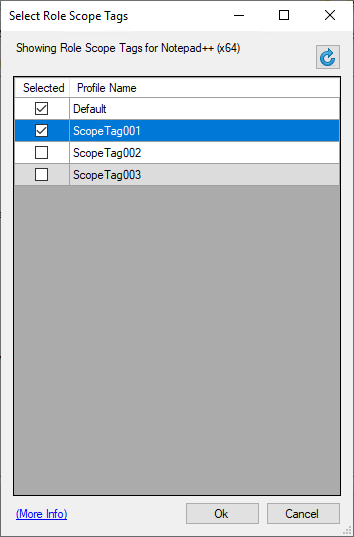
Any Win32 application created by the publisher will be assigned the role scope tags selected for the respective application.
![]() Note: Role scope tags will be added to existing applications during the next publisher sync, but they will not be removed for existing applications. Whenever a new application is created the Publisher will ensure the currently specified role scope tag associations are in place.
Note: Role scope tags will be added to existing applications during the next publisher sync, but they will not be removed for existing applications. Whenever a new application is created the Publisher will ensure the currently specified role scope tag associations are in place.
- Available At: All Products, Vendors, and Products
- Applicable To: Intune Apps, Intune Updates
Override Win32 application options
This option allows you to override the relevant Win32 application options for the selected product. They can be configured globally in the Intune options and overridden per product or per vendor.
![]()
It is not an option to override the code signing certificate. Applications and Updates each show the options that can be overridden. There is no ESP configuration option for Intune Updates, which is not shown when configuring an override for Intune Updates. Below is the override window for each product type.
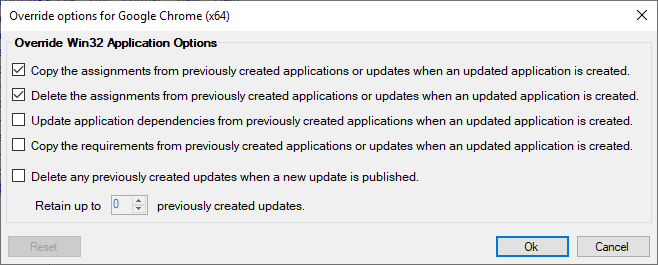
Updates
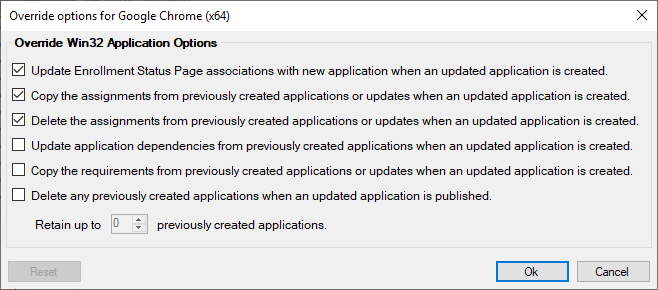
Applications
- Available At: Vendors, and Products
- Applicable To: Intune Apps, Intune Updates
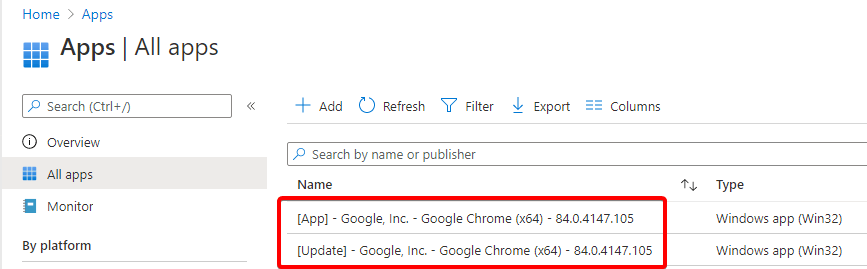
Manage naming convention
This option allows you to set a custom naming convention for the Win32 applications that are created by the publisher. (Intune Apps, and Intune Updates)
![]()
There are variables available for customizing the name that will be used for the Intune Win32 application as shown below.
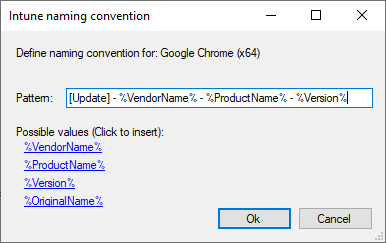

You can click the links of the variable names to insert them into your naming convention. The resulting applications can be seen in Intune with the naming standard set.
Note: the %OriginalName% will be the default name that Patch My PC uses. It can be inserted as a variable if you want to build on the default name. If the pattern is empty, the default name is also used.
- Available At: All Products, Vendors, and Products
- Applicable To: Intune Applications*, Intune Updates
* For Intune Applications at the product level, you will be able to manage naming convention in the Set custom application icon and properties right click option.
Manage application user experience
This option allows you to set custom user experience options for the application. The ability to set Installation behavior is limited due to not all applications supporting a user based install. User-based installations will be a possibility for Applications in the catalog with this option going forward.
If the ‘Installation behavior’ option is grayed out this means the application does not support a user based installation. The UI should prevent you from creating an unsupported Application User Experience.
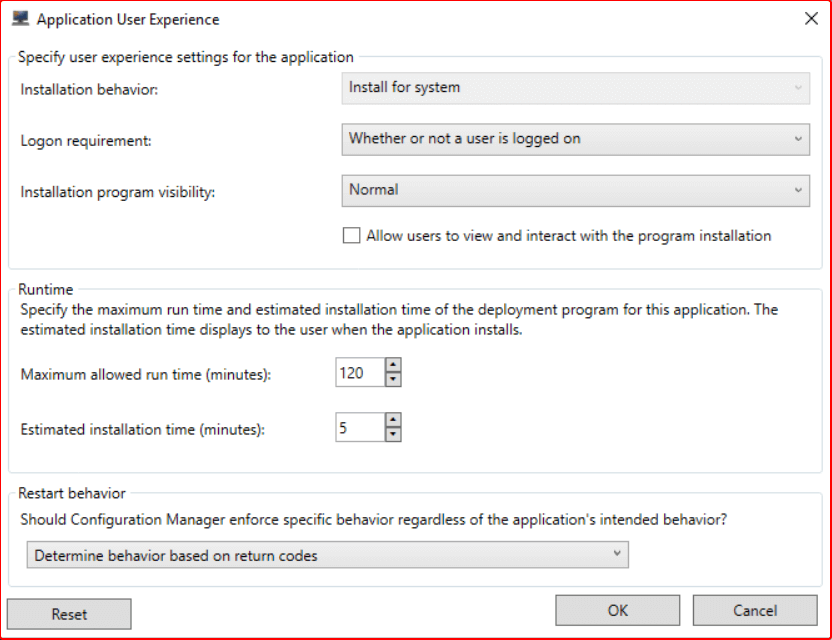
When enabled, the deployment type for any application created for the product will have the user experience tab populated according to the configuration set in the wizard above.
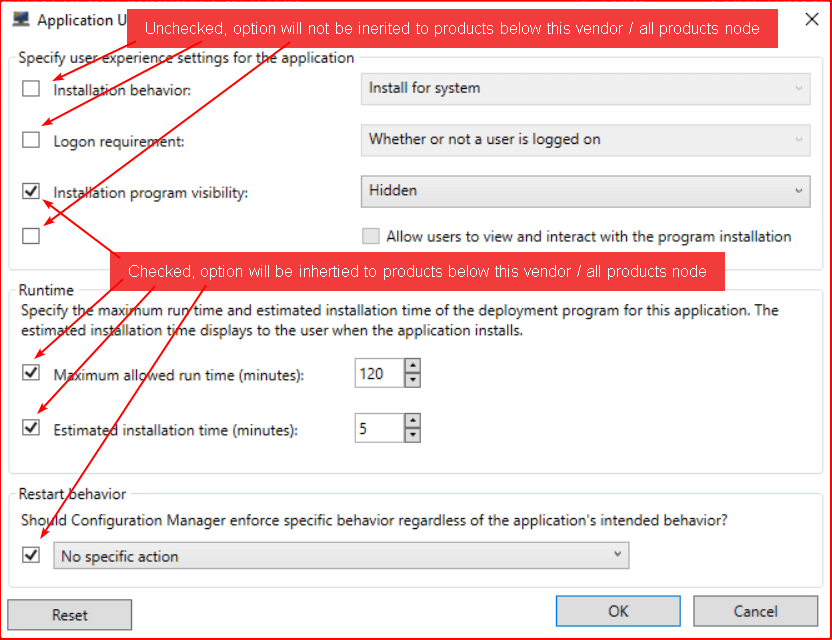
Note that you are able to select which options are inherited when you set this option at the Vendor or All Products level. See below for an example.
- Available At: All Products, Vendors, and Products
- Applicable To: ConfigMgr Apps
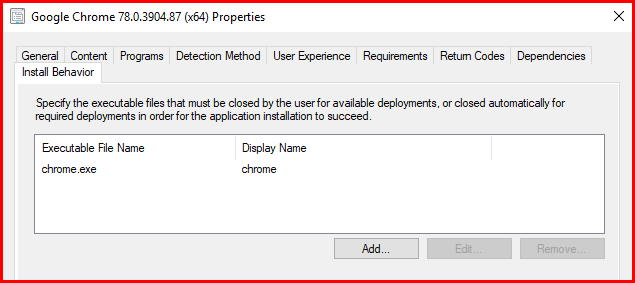
Add the executable name(s) in the deployment type’s install behavior
This option, when enabled, allows the publishing service to define the executable files in the install behavior tab that must be closed by the user for available deployments, or close automatically for required deployments for the application installation to succeed.
![]()
These file names will be set in SCCM under the Install Behavior tab in the application’s deployment type properties.
- Available At: All Products, Vendors, and Products
- Applicable To: ConfigMgr Apps
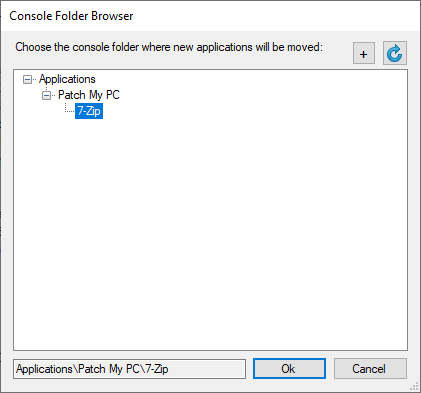
Move the application to a custom folder
By default, all applications created will end up in the root of your applications folder within Configuration Manager. This option lets you choose a custom folder to move the published applications to.
![]()
It is also possible to create a new folder using the + button or refresh the list with the refresh button.
- Available At: ConfigMgr Apps Options, Vendors, and Products
- Applicable To: ConfigMgr Apps
Set custom application icon and properties
By default, the application metadata and icon’s will be based on the software vendor.
This option allows you to customize the properties of the application, as it would be seen in the SCCM console and Software Center.
![]()
You can customize the application name, localized application name, localized description, and even set a custom icon for the application. When enabled, the publishing service will use the defined properties during initial application creation or when an application is updated for the product.
This option may be helpful if you need the application name and other settings to be static for certain task sequence installation scenarios.
For ConfigMgr Apps, your options look like this:

For Intune Apps, your options look like this:

- Available At: Products
- Applicable To: ConfigMgr Apps, Intune Apps
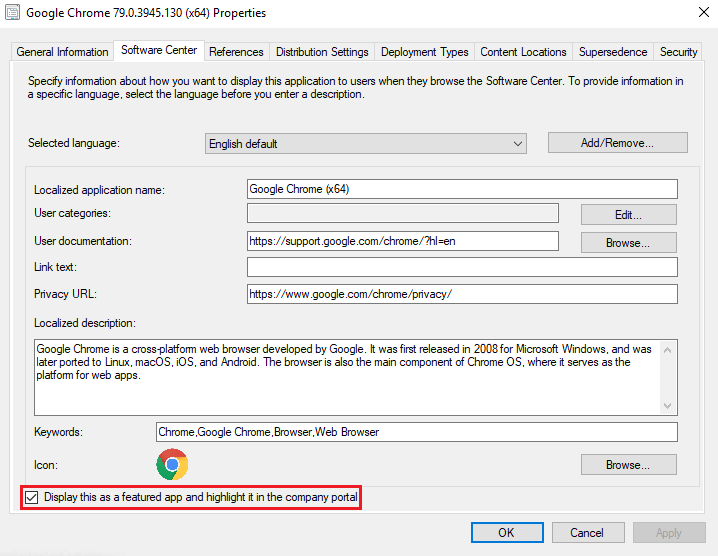
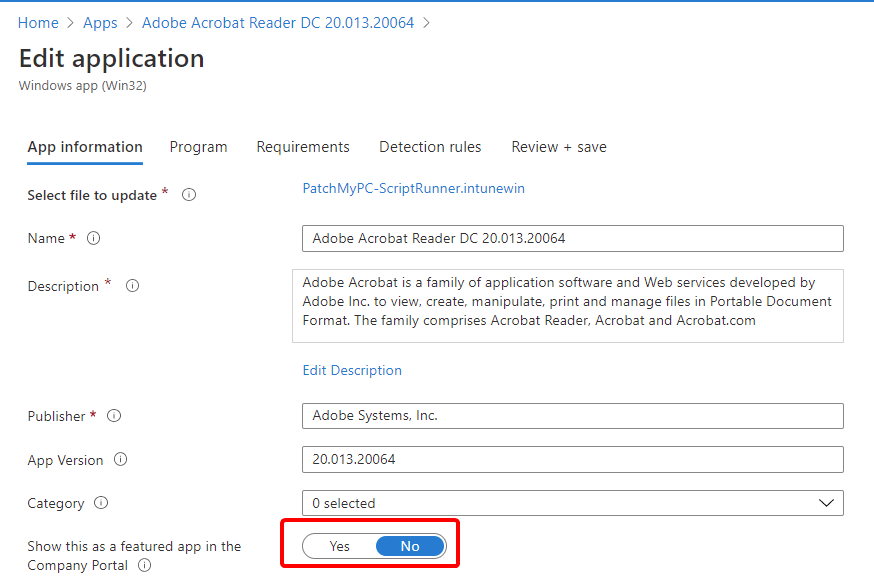
Display as a featured application in the company portal
This option allows you to set an application as featured for the company portal or software center application.
![]()
The following checkbox in the Software Center tab of an application will be automatically enabled.
And for Intune, it will set the below-highlighted feature to ‘Yes’
- Available At: Products
- Applicable To: ConfigMgr Apps, Intune Apps
Exclude from auto-publishing rules
Selecting this option will block the product from being enabled, even if the option to auto-enable products based on SCCM inventory scans is active, or the equivalent Intune option, and the product meets or exceeds the device count threshold for automatic publishing.
![]()
Excluded products will be visually crossed out in the Update/Application Rules tab(s).
- Available At: Vendors, and Products
- Applicable To: Applications, Software Updates
![]() Note: Marking a vendor for exclusion is a point-in-time operation. If a new product is added to the catalog for this vendor it will not be automatically excluded.
Note: Marking a vendor for exclusion is a point-in-time operation. If a new product is added to the catalog for this vendor it will not be automatically excluded.
Republish during next sync schedule
This option will enable the product to be republished during the next publishing service sync.
![]()
More info on when, why, and how to republish third-party updates can be found here.
- Available At: All Products, Vendors, and Products
- Applicable To: Software Updates, ConfigMgr Apps, Intune Apps, Intune Updates
Recreate detection script
This option will force the Publisher to recreate the PowerShell detection script for the selected application(s).
Use Cases:
- New code signing certificate
- If you have a new code signing certificate for your WSUS server, this option lets you recreate and resign all the detection scripts used by the applications published by Patch My PC
- Detection script changes
- Occasionally we will make changes to the detection method script. This can be to improve logging, resolve bugs, or improve the accuracy of detection. Recreating the script will ensure the latest detection method script is used.
![]()
- Available At: All Products, Vendors, and Products
- Applicable To: ConfigMgr Apps, Intune Apps, Intune Updates
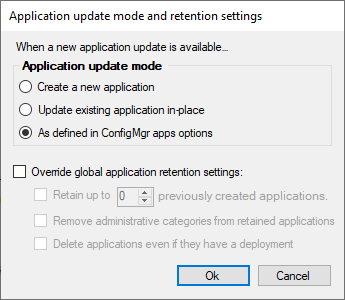
Manage application update and retention…
This option allows you to define how to update a specific product when a new application update is released. This feature will take precedence over the options defined on the global level.
![]()
- Available At: Products
- Applicable To: ConfigMgr Apps
Publish this product during the next manual sync. (Selective Sync)
This option allows you to specify an individual, or list of product(s) to Publish during the next manual sync instead of all products during the next scheduled sync.
When selecting the above right-click context menu option, you will be prompted to confirm your choice.
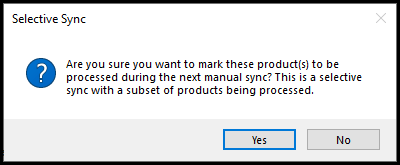
When clicking “Run Publishing Service Sync,” you will be shown all products with selective sync enabled.
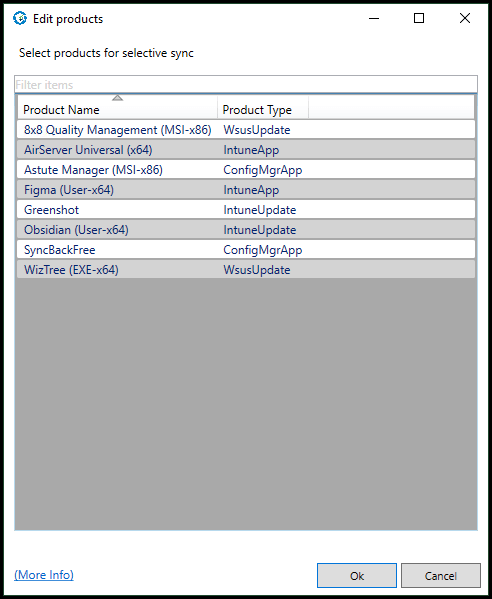
Clicking OK will run a manual sync and process the products marked for selective sync.
Clicking Cancel will ask if you want to edit your selective sync choices or reset them and run a normal full sync.
- Available At: Vendors, and Products
- Applicable To: Software Updates, ConfigMgr Apps, Intune Apps, Intune Updates
![]() Note: If a manual sync has not been run before the next scheduled sync, all selective sync flags will be cleared, and a normal full sync will be run.
Note: If a manual sync has not been run before the next scheduled sync, all selective sync flags will be cleared, and a normal full sync will be run.
Open local content repository
The option will open your configured local content repository.![]()
- Available At: All Products, Vendors, and Products
- Applicable To: Applications, Software Updates